Mail Settings
To make emails more recognizable and consistent with your brand, you can set up a custom domain so notifications emails are sent from your domain instead of ixopay.com. Unless you run through one of the following configuration options, our platform will send e-mails from [email protected].
Once configured the email configuration will be used for sending emails such as Password Recovery Notifications for your tenant users, Risk Engine Notifications, but also emails triggered by the Pay-By-Link feature.
The following options are available to send emails via your own domain:
- Direct Mail via Domain Verification (not clients who would like to facilitate the Pay-by-Link feature)
- Connecting the IXOPAY platform to your own Mail System
- Connecting your Sendgrid Account
Please note, that for using the Pay-By-Link feature, you cannot send emails using the Domain Verification method.
Tenants & Configurations Inheritance
Clients with a multi-tenant configuration should be aware that the SMTP configuration items are inherited from the parent Tenant and can be overwritten on a Sub-tenant level incl. the outbound domain.
Direct Mail via Domain Verification
To start sending emails from your own domain, complete the following steps:
- Complete SPF and DKIM setup for your domain
- Contact your Customer Success Manager or our Support Team in the IXOPAY Customer Experience Portal to configure the custom domain
To verify your domain, you must configure the following DNS (Domain Name System) records. These DNS records are necessary to ensure your ownership of the domain and the reliable email delivery.
| DNS Record | Type | Value |
|---|---|---|
example.com | TXT | v=spf1 include:spf.ixopay.com ~all |
mailout._domainkey.example.com | CNAME | example.com._dkim.ixopay.com |
Connecting IXOPAY to your own Mail System
Please contact your Customer Success Manager or our Support Team in the IXOPAY Customer Experience Portal to setup the outbound email configuration. They will need the following information additionally to the below described Mail Settings:
- Mail Sender Address - the sender email address notifications should be sent from
- Mail Sender Name - the sender name notifications should be sent from
On (sub-)tenant level you have the option to configure a mail server and account, which the IXOPAY platform can connect to and send outbound emails from.
Mail Settings
- SMTP host - the hostname of an internet reachable SMTP server.
- SMTP port - the port to connect to, the following ports can be used:
25,465,587,2525 - SMTP protocol - configure encryption settings of the SMTP session
- TLS - encrypt using TLS
- SSL - encrypt using SSL/STARTTLS
- none - send in plain text (avoid this!)
- SMTP username - configure the username to use for authentication.
- SMTP password - configure the password to use for authentication.

Keep in mind to configure the SMTP settings on (sub-)tenant level only after Mail Sender Address and Mail Sender Name are configured by the IXOPAY platform, otherwise emails will end up in spam.
Connecting your SendGrid Account
Connecting SendGrid via SMTP
To connect your (Sub-)Tenant to your SendGrid account via SMTP the following steps are necessary
Please contact your Customer Success Manager or our Support Team in the IXOPAY Customer Experience Portal to setup the outbound email configuration. They will need the following information additionally to the above described Mail Settings:
- Mail Sender Address - the sender email address notifications should
- Mail Sender Name - the sender name notifications should be sent from
- Register a SendGrid account and perform the domain verification.
- Provide the IXOPAY platform with the Mail Settings, Mail Sender Address and Mail Sender Name and we will configure the settings on tenant level for you. On Sub-Tenant level you can configure the SMTP settings yourself (see Image SMTP settings on tenant level)
Connecting SendGrid via API
To connect a Connector to your SendGrid account via API the following steps are necessary
- Register a SendGrid account and perform the domain verification.
- Create Dynamic Templates (for payment link email and optional for confirmation email if Pay-By-Link Feature is used). There are additional dynamic fields available to be used in these templates (see table below)
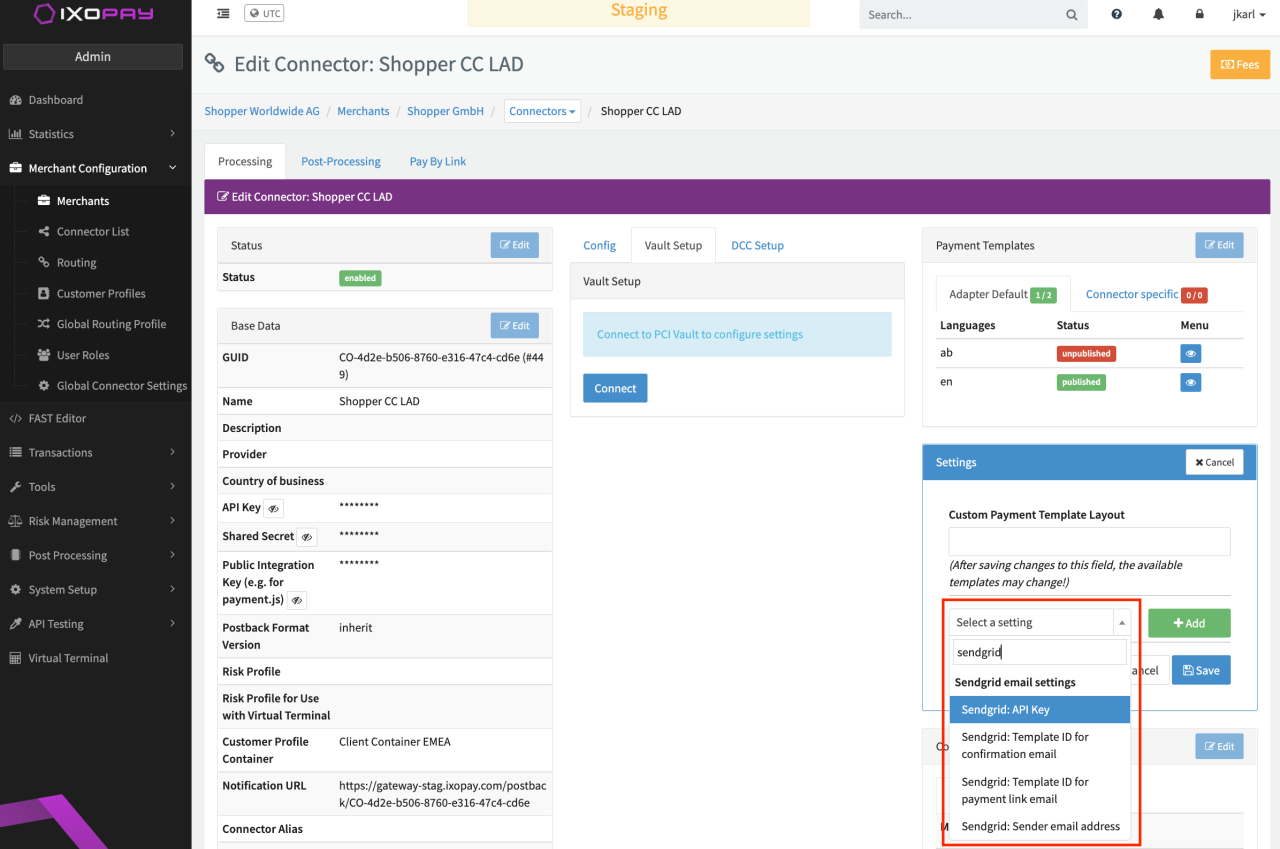
- On Connector level configure the additional Sendgrid email settings (see Image Connector settings Sendgrid)
| Dynamic fields | Description |
|---|---|
link | Payment Link (only available for payment link email) |
subject | Email subject |
data.transaction.transactionId | Transaction ID |
data.transaction.type | Transaction Type |
data.transaction.token | Adapter Token (internal IXOPAY data) |
data.transaction.amount | Transaction Amount |
data.transaction.currency | Transaction Currency |
data.transaction.description | Transaction Desciption (e.g. Order ID) |
data.transaction.testMode | Boolean value if transaction was processed in test mode |
data.transaction.createdAt | Creation date of transaction (YYYY-MM-DD HH:MM:SS) in UTC |
data.transaction.merchantMetaData | Transaction Merchant MetaData |
data.connector.name | Connector name the transaction was processed by |
data.connector.description | Connector Description |
data.connector.guid | Connector GUID the transaction was processed by |
data.customer.identification | Customer Identification |
data.customer.firstName | Customer's first name |
data.customer.lastName | Customer's last name |
data.customer.birthDate | Customer's birth date |
data.customer.gender | Customer data: Gender |
data.customer.billingAddress1 | Customer billing Data: Address line 1 |
data.customer.billingAddress2 | Customer billing Data: Address line 2 |
data.customer.billingCity | Customer billing data: City |
data.customer.billingPostcode | Customer billing data: Postcode |
data.customer.billingState | Customer billing data: State |
data.customer.billingCountry | Customer billing data: Country |
data.customer.billingPhone | Customer billing data: Phone number |
data.customer.shippingFirstname | Customer shipping data: First name |
data.customer.shippingLastname | Customer shipping data: Last name |
data.customer.shippingCompany | Customer shipping data: Company |
data.customer.shippingAddress1 | Customer shipping data: Address line 1 |
data.customer.shippingAddress2 | Customer shipping data: Address line 2 |
data.customer.shippingCity | Customer shipping data: City |
data.customer.shippingPostcode | Customer shipping data: Postcode |
data.customer.shippingState | Customer shipping data: State |
data.customer.shippingCountry | Customer shipping data: Country |
data.customer.shippingPhone | Customer shipping data: Phone number |
data.customer.company | Customer shipping data: Company name |
data.customer.email | Customer's email address |
data.customer.ipAddress | Customer's IP address |
data.customer.nationalId | Customer's national Identification |
data.customer.iban | Customer's IBAN |
data.customer.bic | Customer's BIC |
data.transaction.items | Transaction items |
data.merchant.name | Merchant name |
data.merchant.guid | Merchant GUID |