Step-by-Step Guides
If you want to get access to all IXOPAY platform features you need to upgrade your plan. Please contact our Support Team in the IXOPAY Customer Experience Portal for more information.
In this section we provide you with Step-by-Step Guides on how to create Post Processing Jobs for:
- Periodical Transaction Report
- Configure to collect all transactions in the job period, to generate a file in the desired format and to sent it to your backend systems (SFTP, HTTP, etc.)
- Schedule a periodical PP Job (e.g. daily, weekly) on the desired entity
- Provider Settlement Consolidation
- Configure Provider Settlements Data Fetchers
- Map reported Fees to the various Fee Entities
- Configure to generate a file in desired format and to send it to your backend systems (SFTP, HTTP, etc.)
- Schedule PP Job with “On Provider Settlement Schedule”
- Mark fraudulent Transactions from Report
- Configure Job Type to collect all transaction from uploaded CSV
The IXOPAY platform's Post Processing Engine is a powerful tool to support you aggregate and standardize your reports and processes. These examples can be adopted and customized according to your needs. Please contact your Customer Success manager or contact our Support Team in the IXOPAY Customer Experience Portal in case you have further questions.
Periodical Transaction Report
Periodically collect all transactions of the desired entity ((Sub-)Tenant, Merchant, Provider) and report them in a standardized format to your backend systems.
- Configure to collect all transactions in the job period, to generate a file in the desired format and to sent it to your backend systems (SFTP, HTTP, etc.)
- Schedule a periodical PP Job (e.g. daily, weekly) on the desired entity
Configure Job Type
Configure a Job Type on Tenant Level to generate a file in a unified format of all Transaction of a Merchant and send it to your backend system:
- Navigate to the System Setup section, sub-section Job Configuration
- Click + New Job Type (see Post Processing Jobs) and configure the following steps:
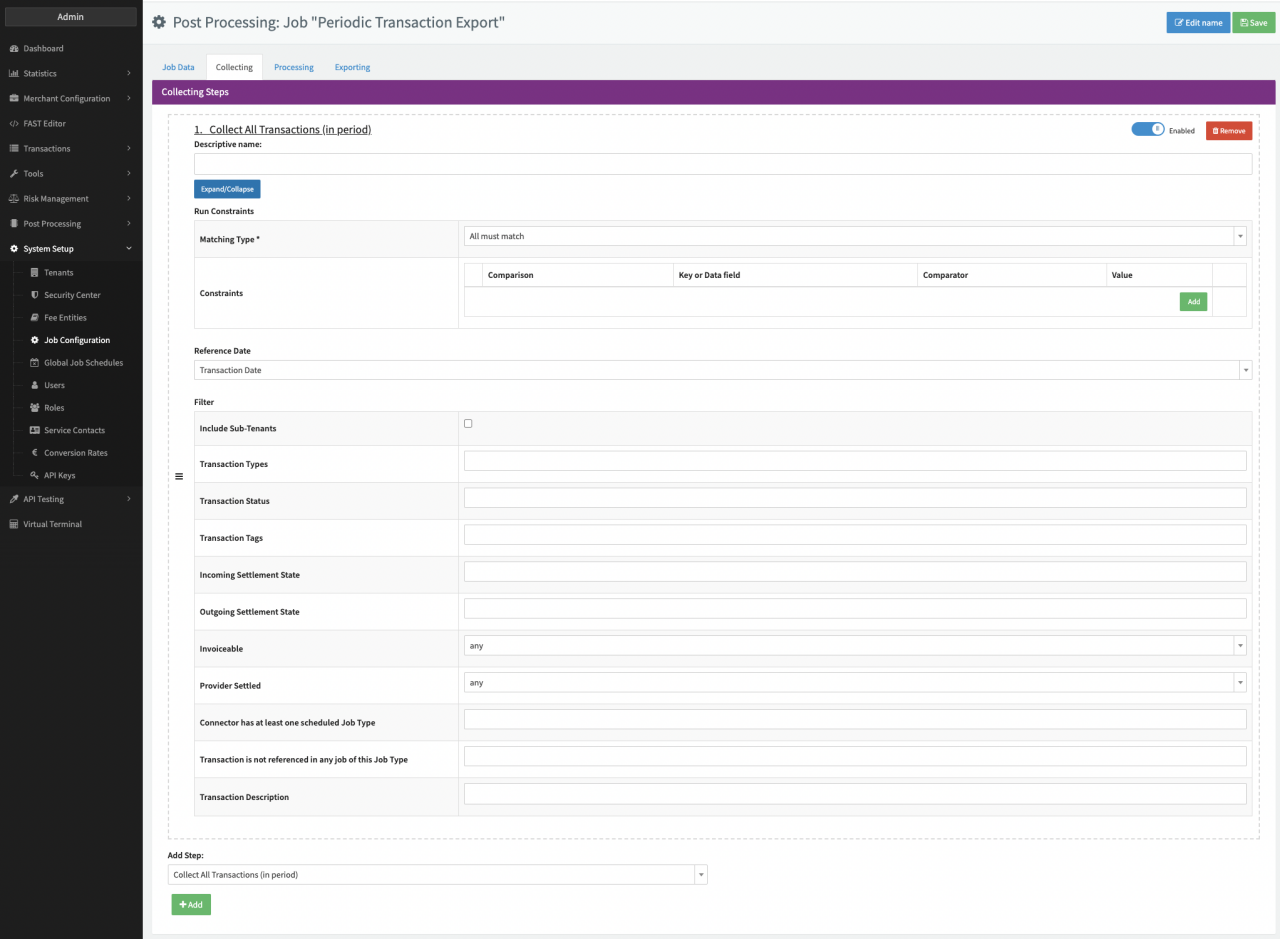
- Collecting: Add Collect All Transactions (in period) and configure the step
(see Periodic Transaction Export - Collecting):
- Reference Date: Select Transaction Date to include all Transactions for which the Transaction Date is in the Job Period (see Schedule Job periodically)
- Skip Processing
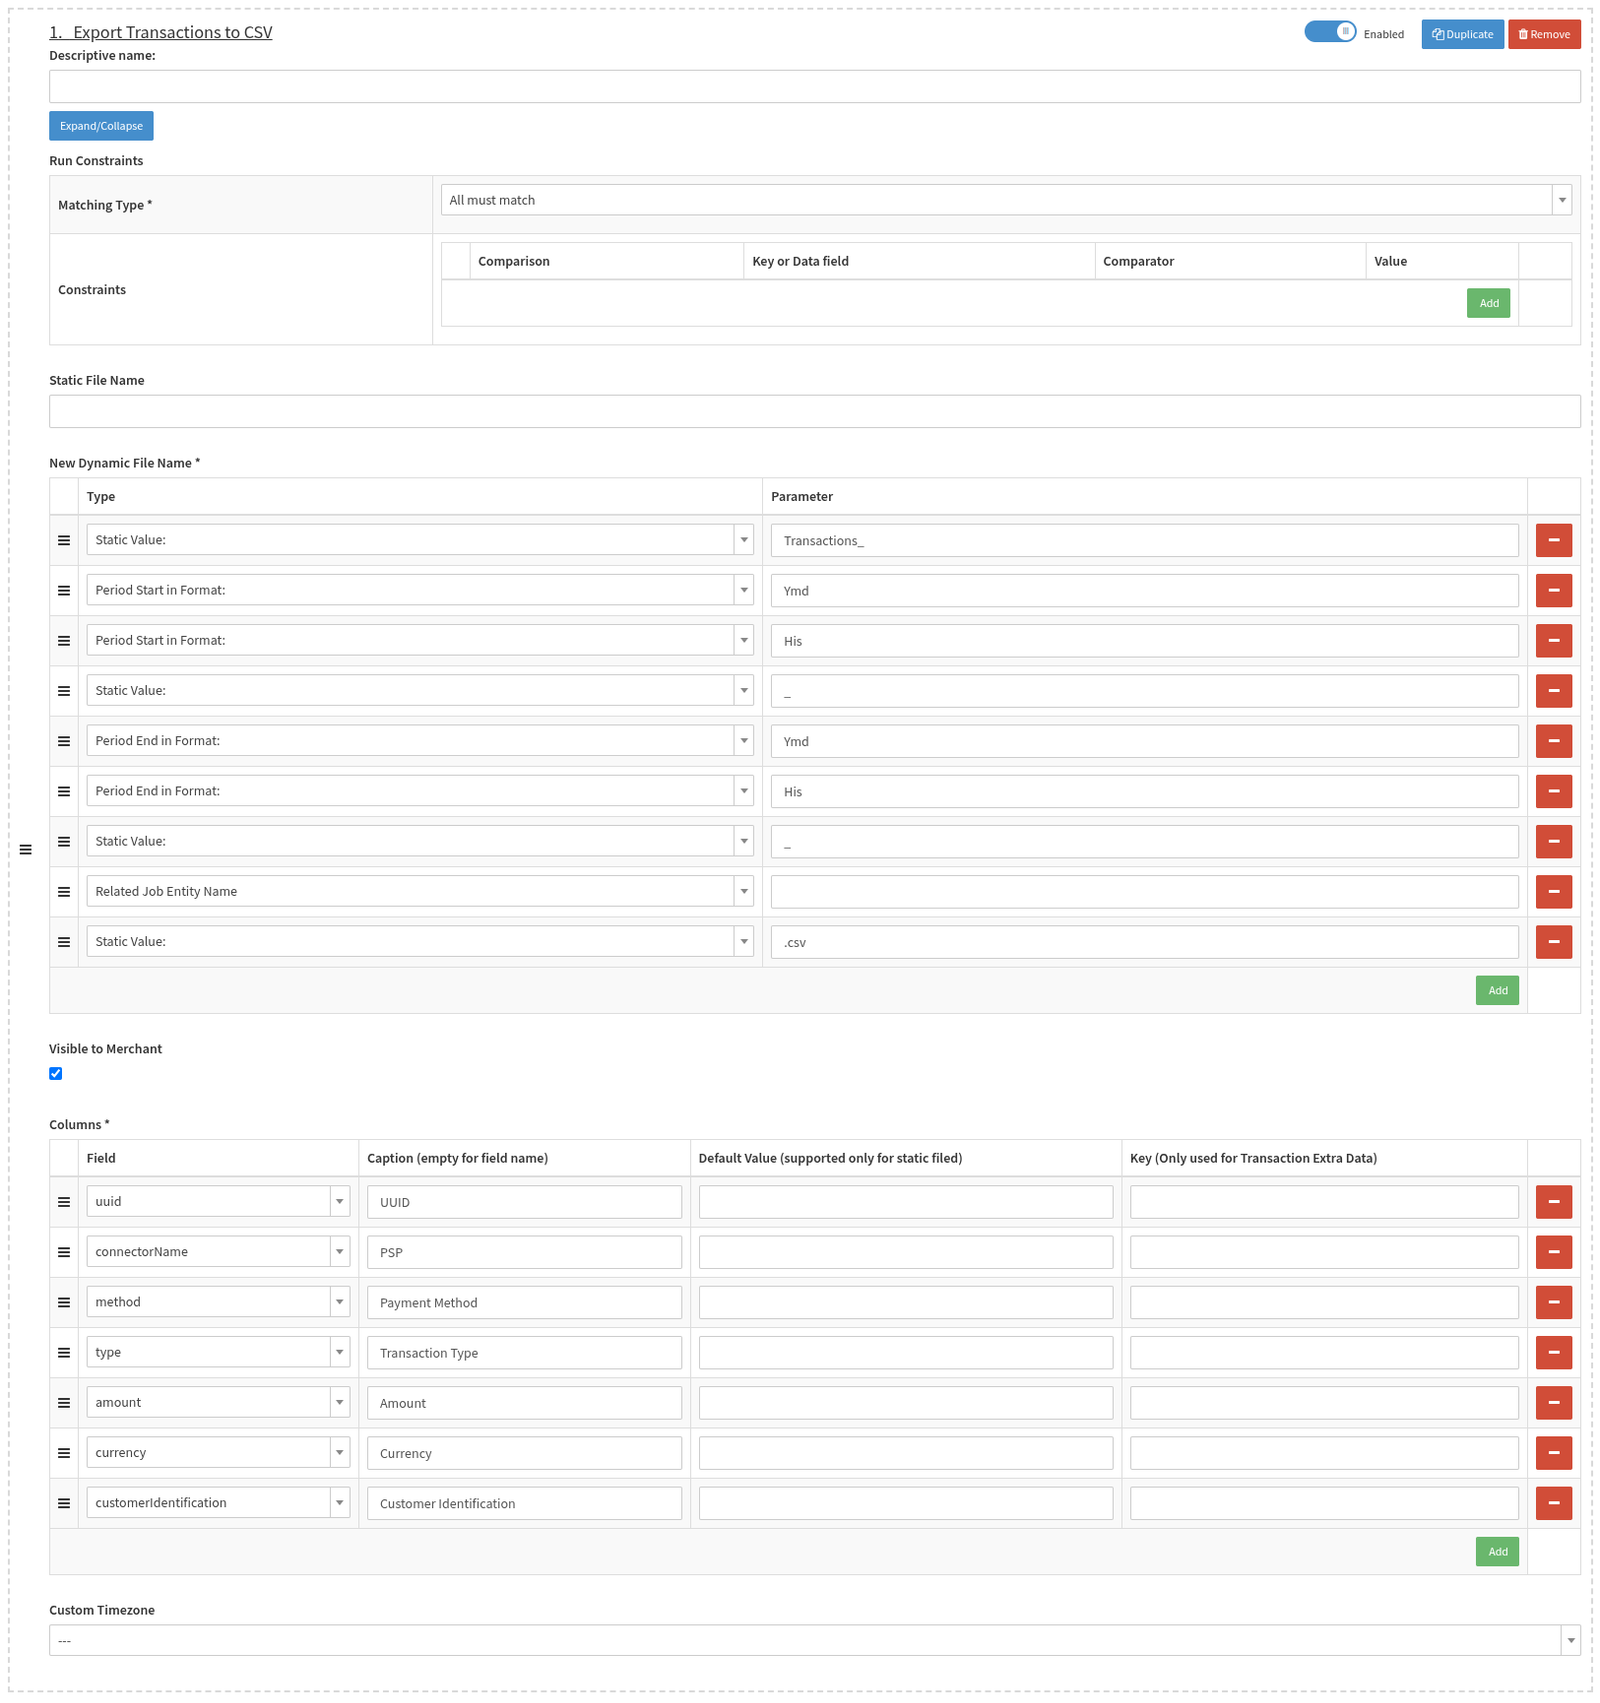
- Exporting: Add Export Transactions to CSV and configure the step (see Periodic Transaction Export - Exporting I)
- New Dynamic File Name: Fill in the different parameters to generate a dynamic file name,
in our example the file name would look like:
Transactions_20230109000000_20230115235959_ACME Italy.csv - Optional: Enable the option to mark the created CSV file Visible to Merchant
- Columns: Select all Transaction Data Fields you want to have included in the CSV file and add a Caption
- New Dynamic File Name: Fill in the different parameters to generate a dynamic file name,
in our example the file name would look like:
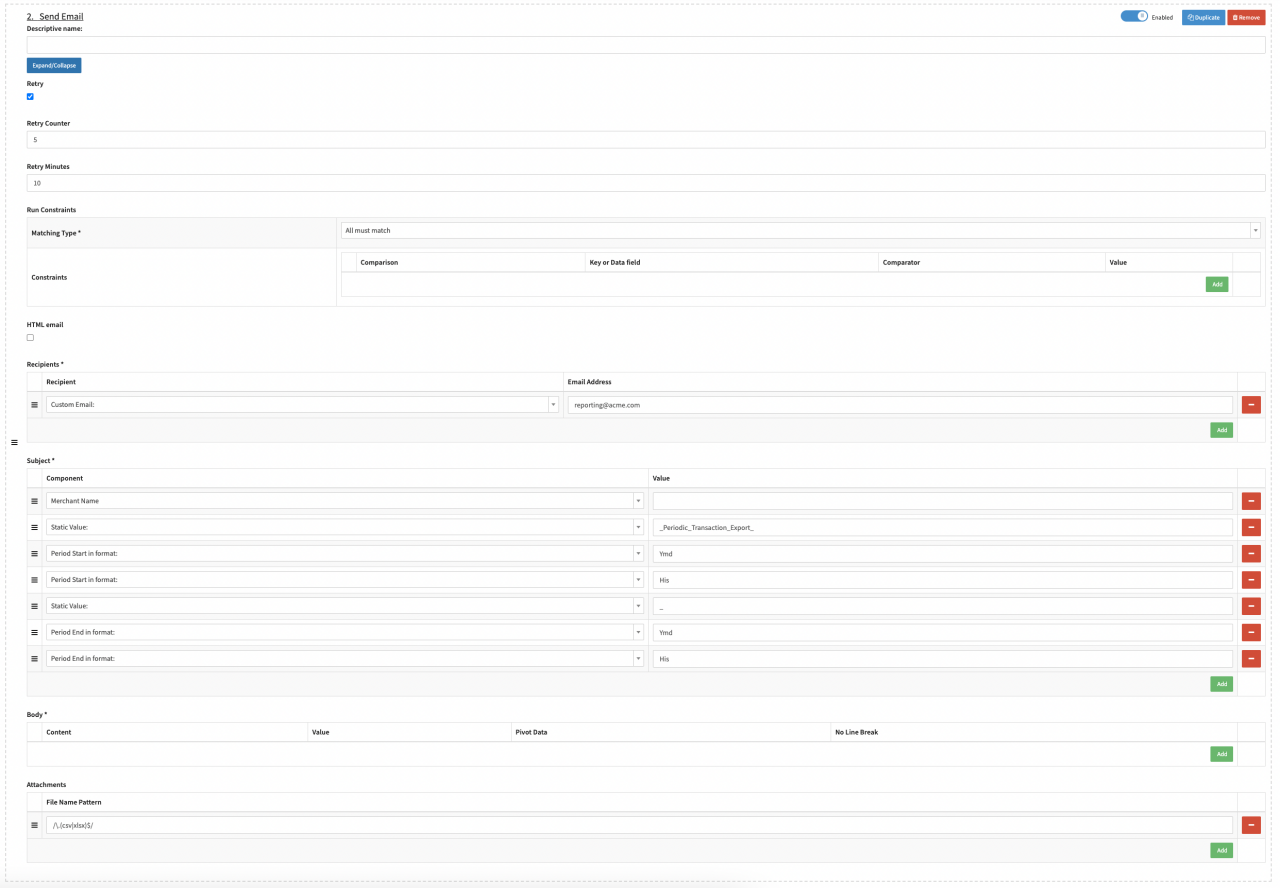
- Exporting: Add Send Email and configure the step (see Periodic Transaction Export - Exporting II)
- Optional: Enable Retry and configure the Retry Counter and Retry Minutes
- Recipients: Add Recipients, in our example we added the custom email [email protected].
- Subject: Fill in the different parameters to generate a dynamic email subject,
in our example the subject would look like:
ACME Italy_Periodic_Transactions_Report_20230109000000_20230115235959 - Attachments: Fill in the File name pattern. In our example to include CSV and XLSX files use the expression /\.(csv|xlsx)$/
- Collecting: Add Collect All Transactions (in period) and configure the step
(see Periodic Transaction Export - Collecting):
Schedule Job periodically
- Navigate to the Merchant Overview, select Job Schedules from the More drop-down of the desired Merchant
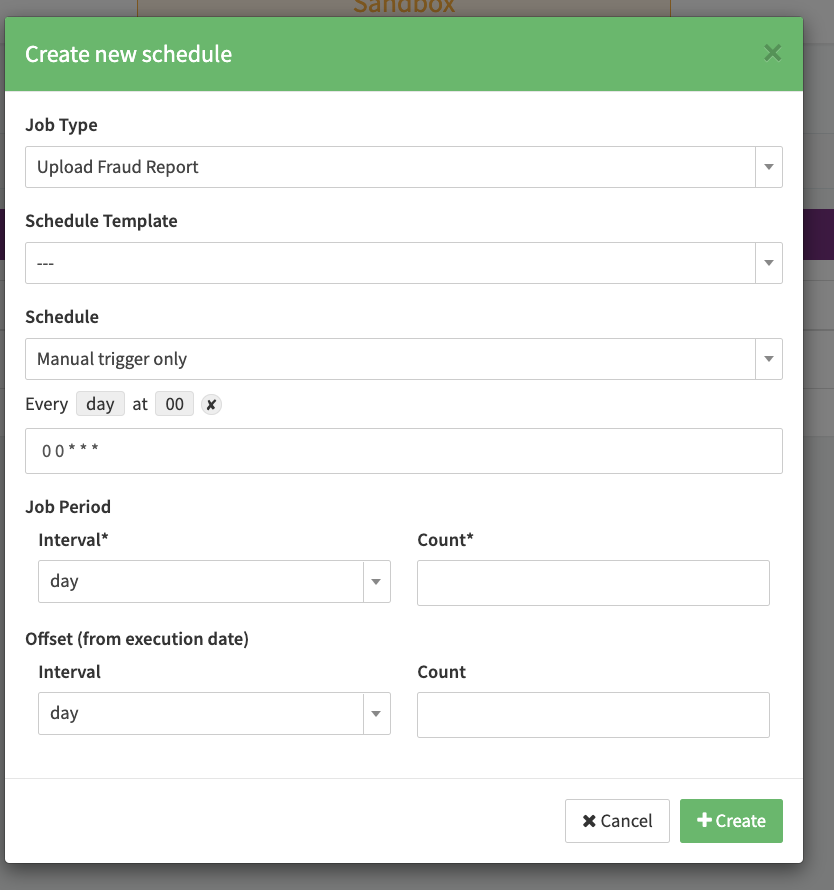
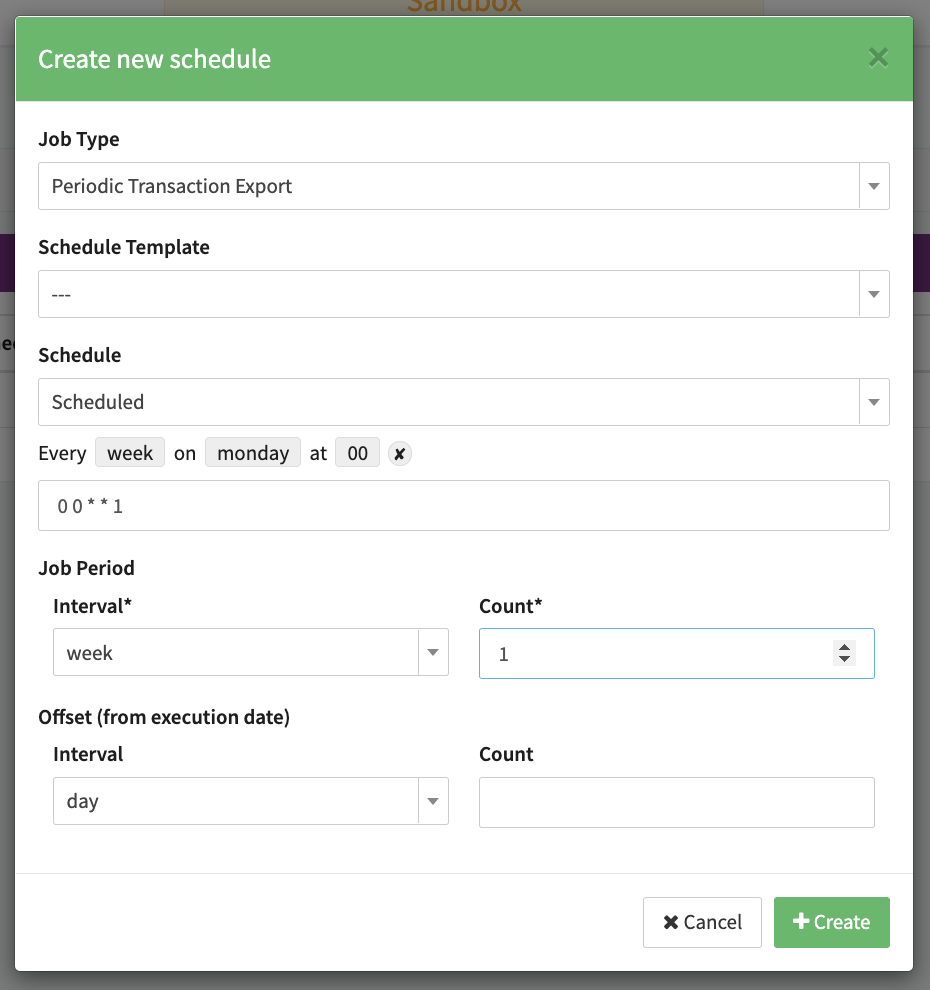
- Click + Create new schedule and configure the schedule (see Merchant Schedule)
- Job Type: Select the configured Job Type, Periodic Transaction Export in our example
- Schedule: Select Scheduled and configure the schedule using a Cron Expression (similar to Unix CronJobs, in UTC). The Cron Expression can be generated using the build-in wizard. In our example the job will be triggered every week on mondays at 00:00 UTC.
- Job Period: Select the Job Period, in our example 1 week which means all Transactions with Transaction Dates from Monday 00:00 UTC to Sunday 23:59 UTC will be considered in the Post Processing Job.
- Click + Create
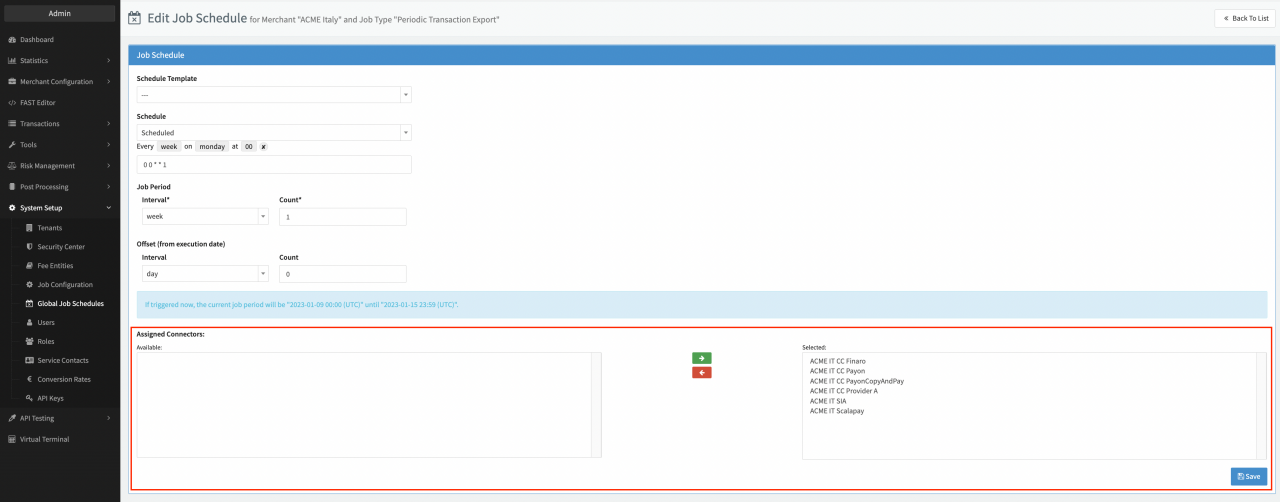
- Edit the Schedule to assign the related Connectors to the schedule and click Save (see Assign Connectors)
- Enable the Schedule (see Enable Schedule)

Provider Settlement Consolidation
Retrieve Settlements from multiple providers and report them in a unified format to your backend systems.
Provider Settlement Data Fetchers
For each Provider, whose settlement reports you want to consolidate, configure a Provider Settlement Data Fetcher (see Provider Data Fetcher):
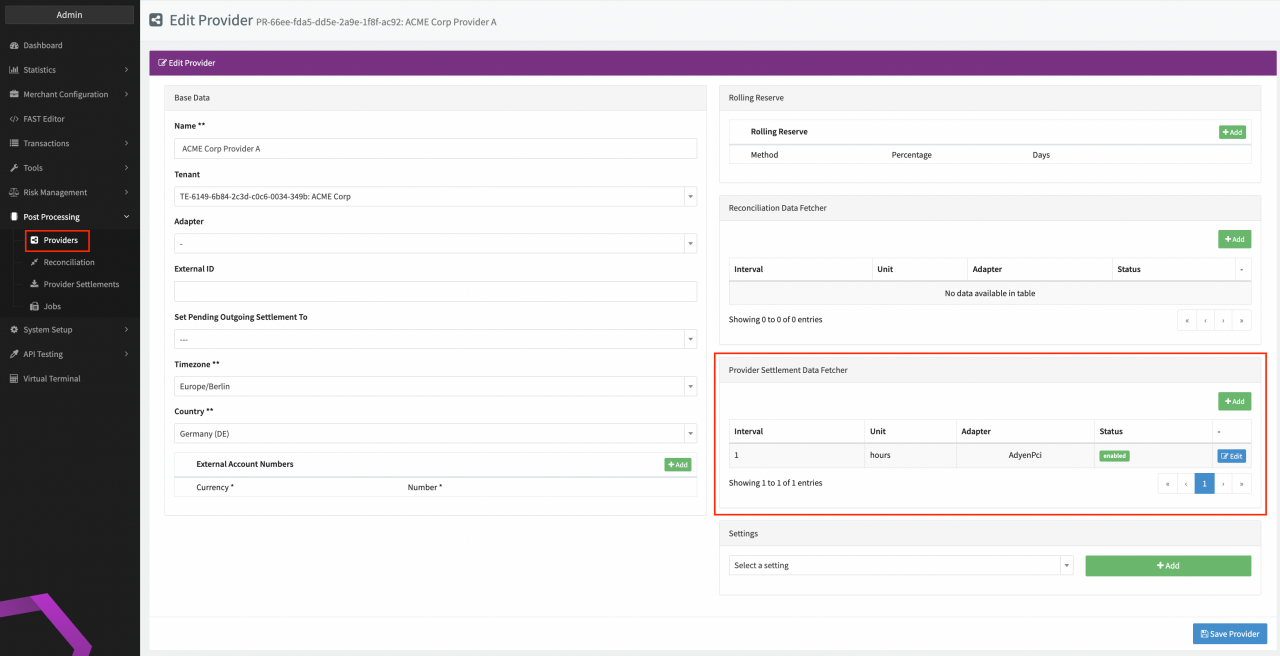
- Navigate to the Post Processing section, sub-section Provider
- For each Provider, whose settlement reports you want to consolidate, click + New Provider and configure the relevant data (see Provider).
- Click Edit for each Provider and configure a Provider Settlement Data Fetcher according to the adapter-specific documentation
Map reported Fees to Fee Entities
Depending on your contract, create Fee Entities in the IXOPAY platform and map them to the Provider reported standard categories of fees (see Fee Mapping):
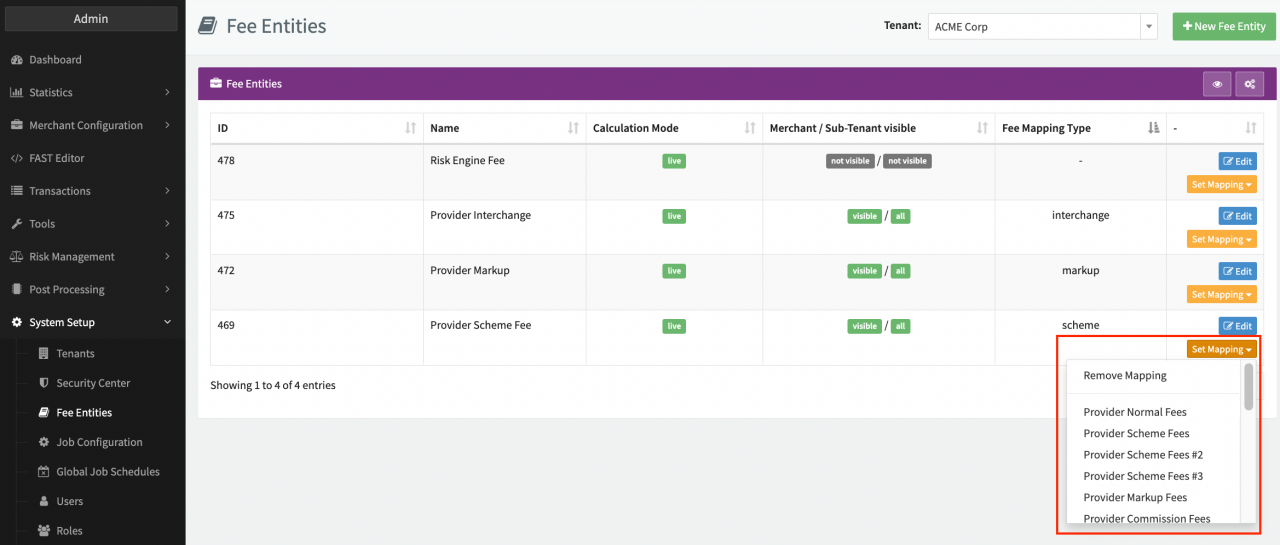
- Navigate to the System Setup section, sub-section Fee Entities
- For each Provider Fee, click + New Fee Entity and configure the relevant data (see Fee Entities)
- For each Provider Fee, click Set Mapping and select the applicable Provider Fee Mapping (see Fee Entity)
Configure Job Type
Configure a Job Type on Tenant Level to generate a settlement file in a unified format and send it to your backend system:
- Navigate to the System Setup section, sub-section Job Configuration
- Click + New Job Type (see Post Processing Jobs) and configure the following steps:
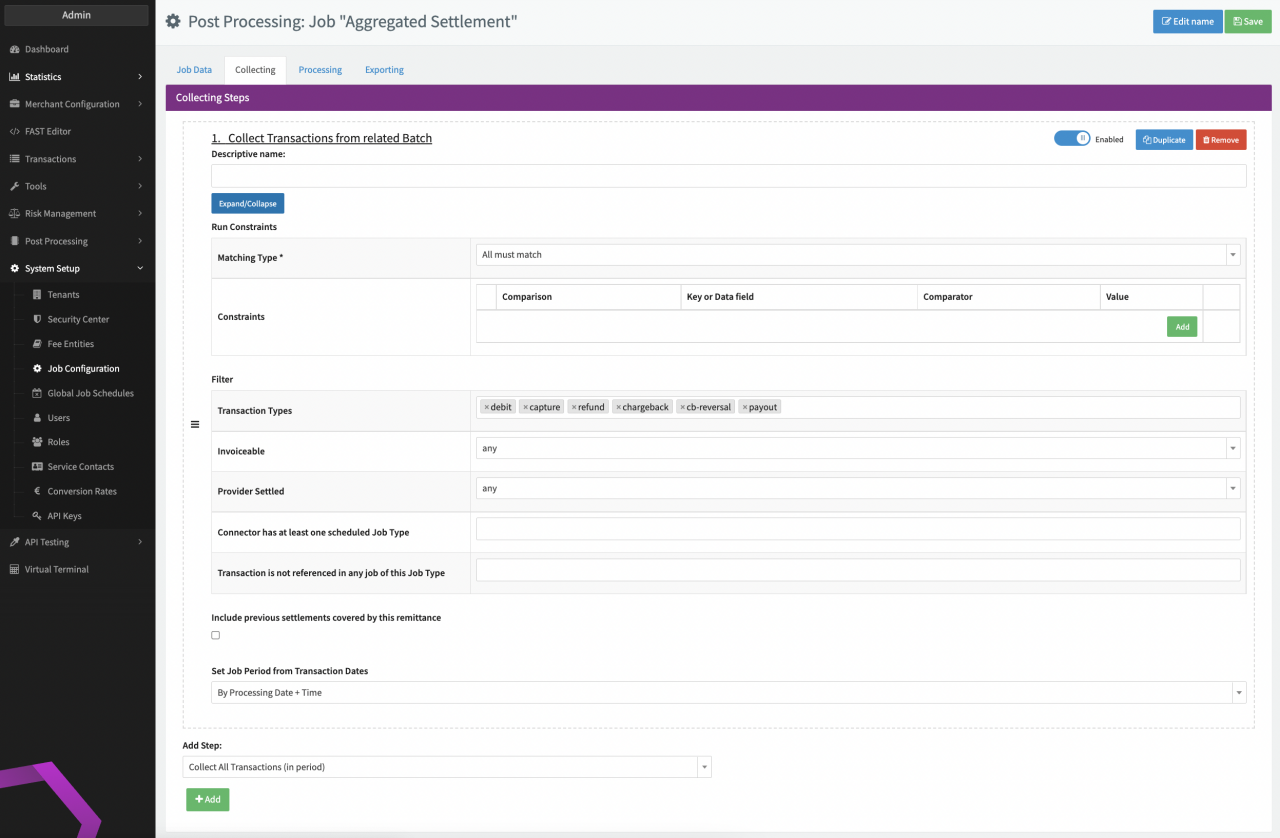
- Collecting: Add Collect Transactions from related batch and configure the step (see Aggregated Settlement - Collecting):
- Optional: In our example we Filter the Transactions to be collected according to Transaction Types debit, capture, refund, chargeback, chargeback-reversal and payout
- Set Job Period from Transaction Dates: Select By Processing Date+Time to sets the job period automatically based on the included settled Transactions
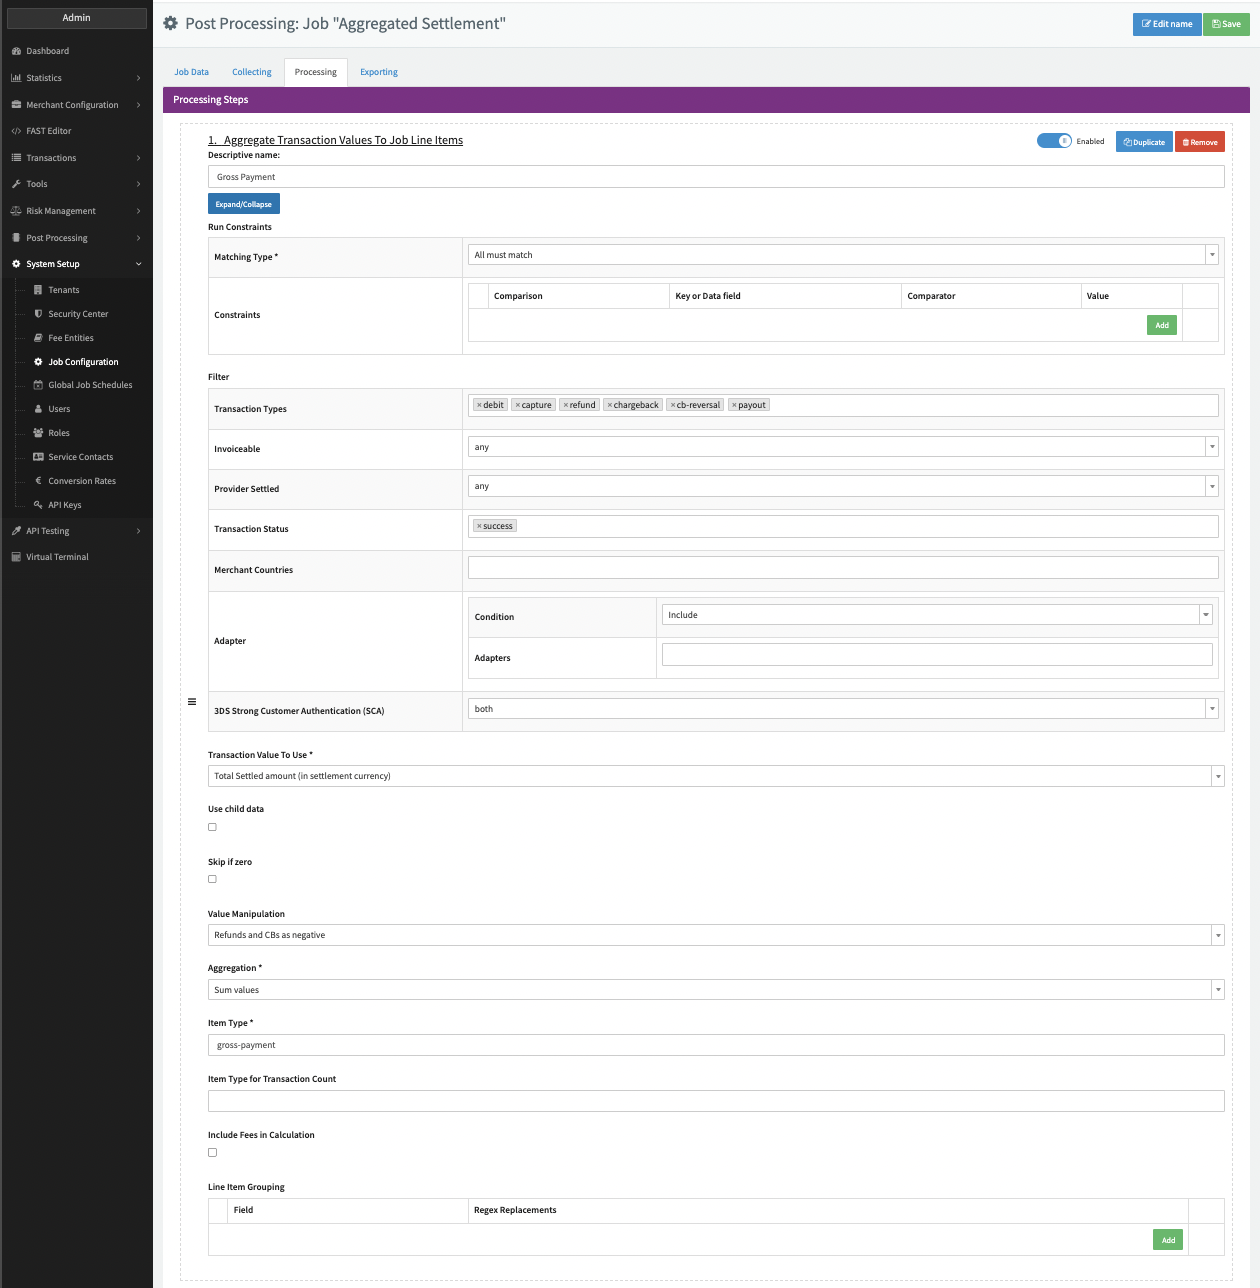
- Processing: Add Aggregate Transaction Values To Job Line Items and configure the step (see Aggregated Settlement - Processing I):
- Optional: Add a Descriptive name, e.g. Gross Payment
- Option: In our example we Filter the Transactions to be processed only in case the Transaction Status is success. Filtering according to Types debit, capture, refund, chargeback, chargeback-reversal and payout is redundant in this example
- Transaction Value To Use: Select Total Settled amount (in settlement currency) as Transaction Value to be used for the Aggregation
- Value Manipulation: Select Refunds and CBs as negative to aggregate Transaction Values for these Transaction Types as negative
- Aggregation: Select Sum values
- Item Type: Fill in gross-payment for the calculated Line Item
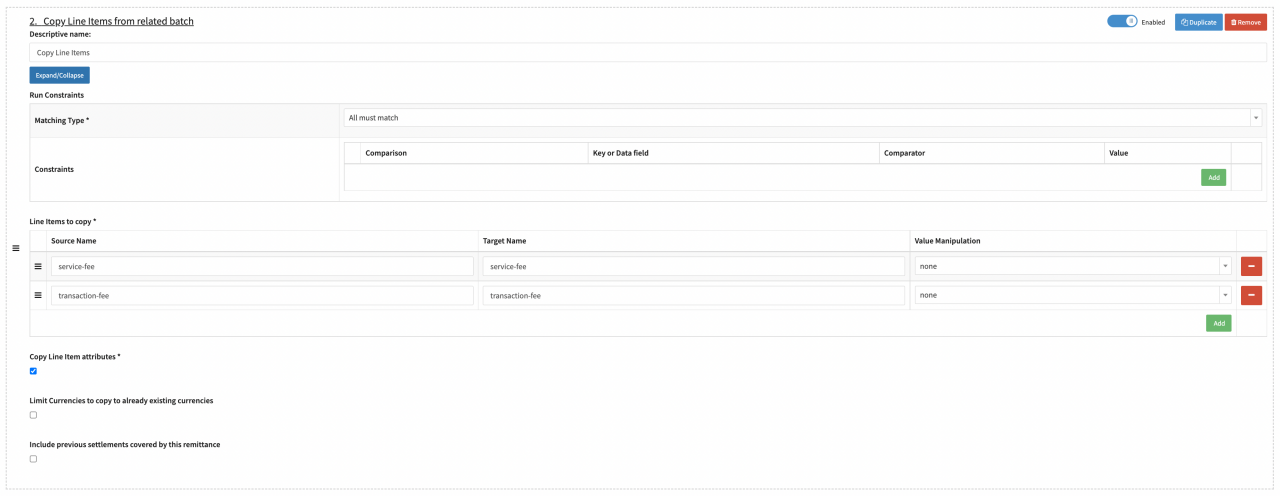
- Processing: Add Copy Line Items from related batch and configure the step (Aggregated Settlement - Processing II):
- Optional: Add a Descriptive name, e.g. Copy Line Items
- Line Items to copy: Add the triplet of Source Name, Target Name, Value Manipulation. In our example the Source name for the Provider Settlement Line Item is service-fee that will be copied to the Target name for the Job Line Item service-fee without any Value Manipulation. The same we configure for the Provider Settlement Line Item transaction-fee.
- Enable the option to Copy Line Item attributes
- Processing: Add Aggregate Transaction Fees To Job Line Items and configure the step (Aggregated Settlement - Processing III):
- Optional: Add a Descriptive name, e.g. Transaction Fee Sum
- Filter the Transactions to be processed only in case Line Items can be mapped to the Line Item Entities Provider Markup and Provider Scheme Fee. Filtering according to Types debit, capture, refund, chargeback, chargeback-reversal and payout is redundant in this example
- Transaction Value To Use: Select Fee Amount as Transaction Value to be used for the Aggregation
- Aggregation: Select Sum values
- Item Type: Fill in feeSum for the calculated Line Item
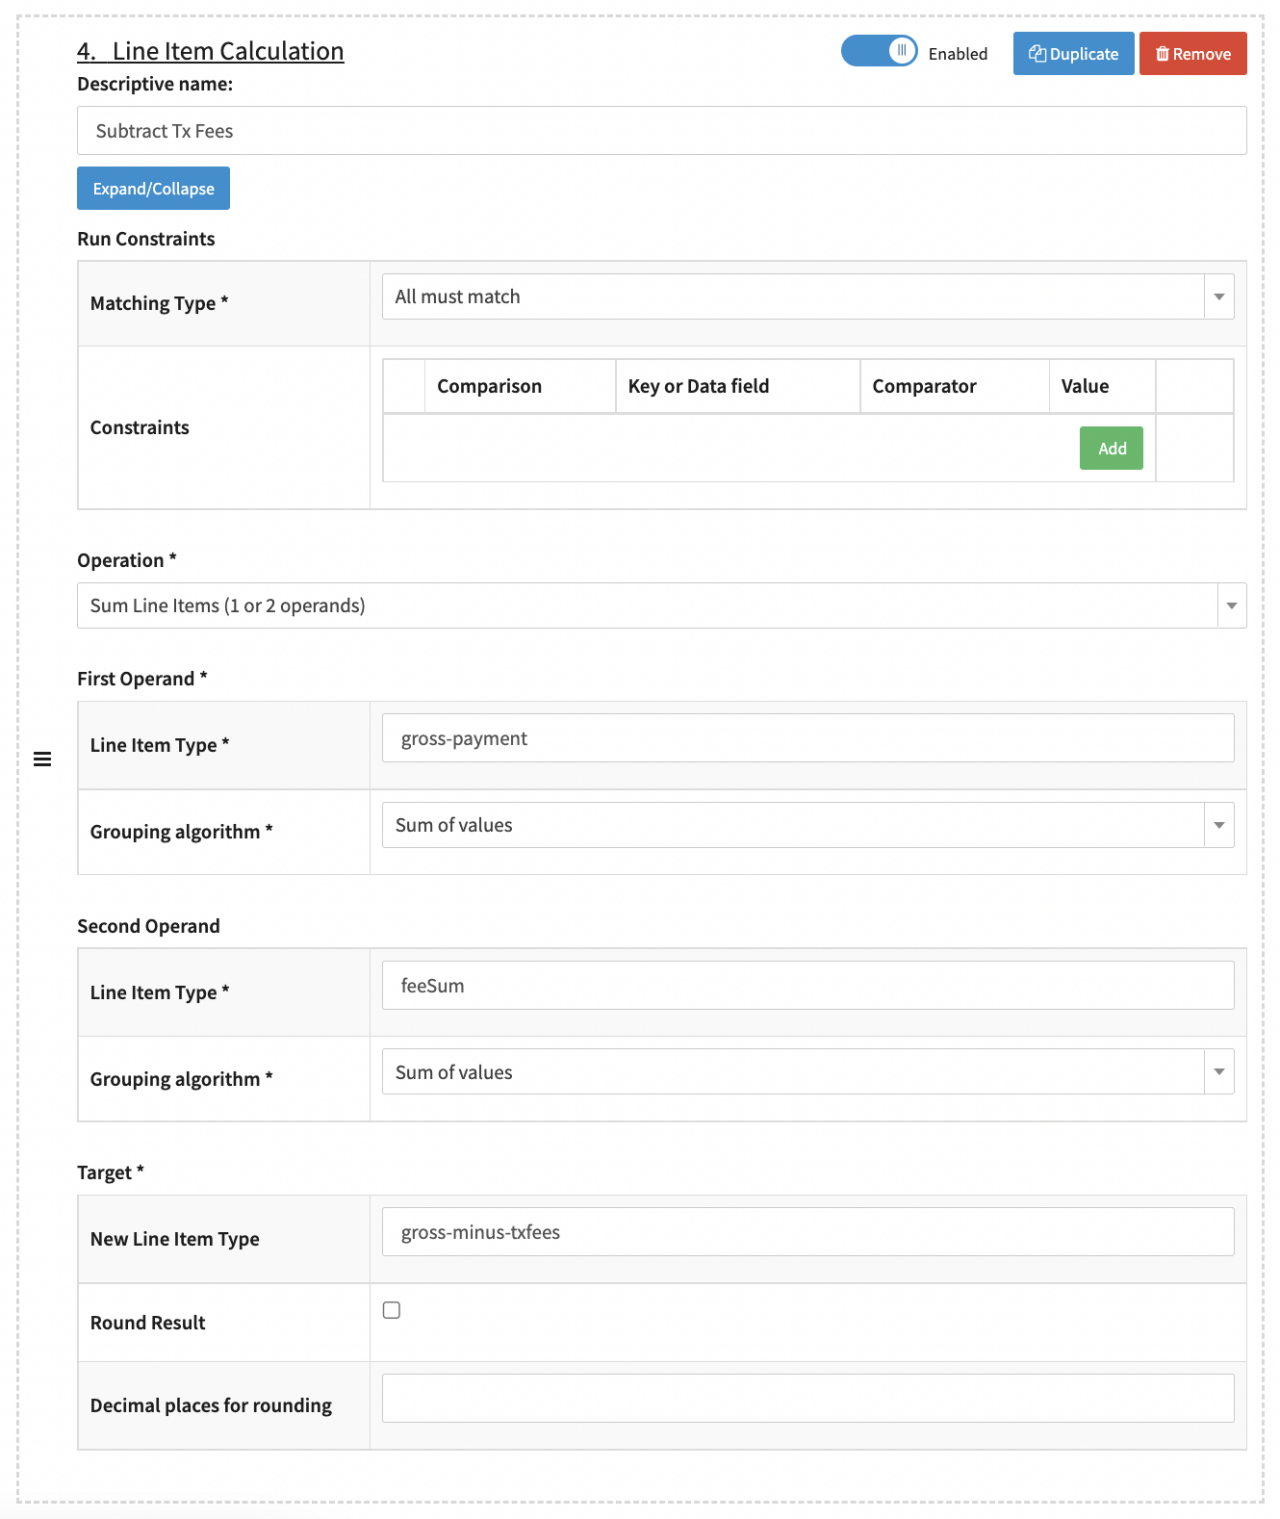
- Processing: Add Line Item Calculation and configure the step (see Aggregated Settlement - Processing IV)
- Optional: Add a Descriptive name, e.g. Subtract Tx Fees
- Operation: Select Sum Line Items (1 or 2 operands) to subtract the Fee Sum. In our example Fee Values are reported negative, therefore we chose the option Sum Line Items
- First Operand - Line Item Type: Fill in the Line Item gross-payment (as processed in 2.b)
- First Operand - Grouping algorithm: Select Sum of values
- Second Operand - Line Item Type: Fill in the Line Item feeSum (as processed in 2.d)
- Second Operand - Grouping algorithm: Select Sum of values
- Target - New Line Item Type: Fill in gross-minus-txfees for the calculated Line Item
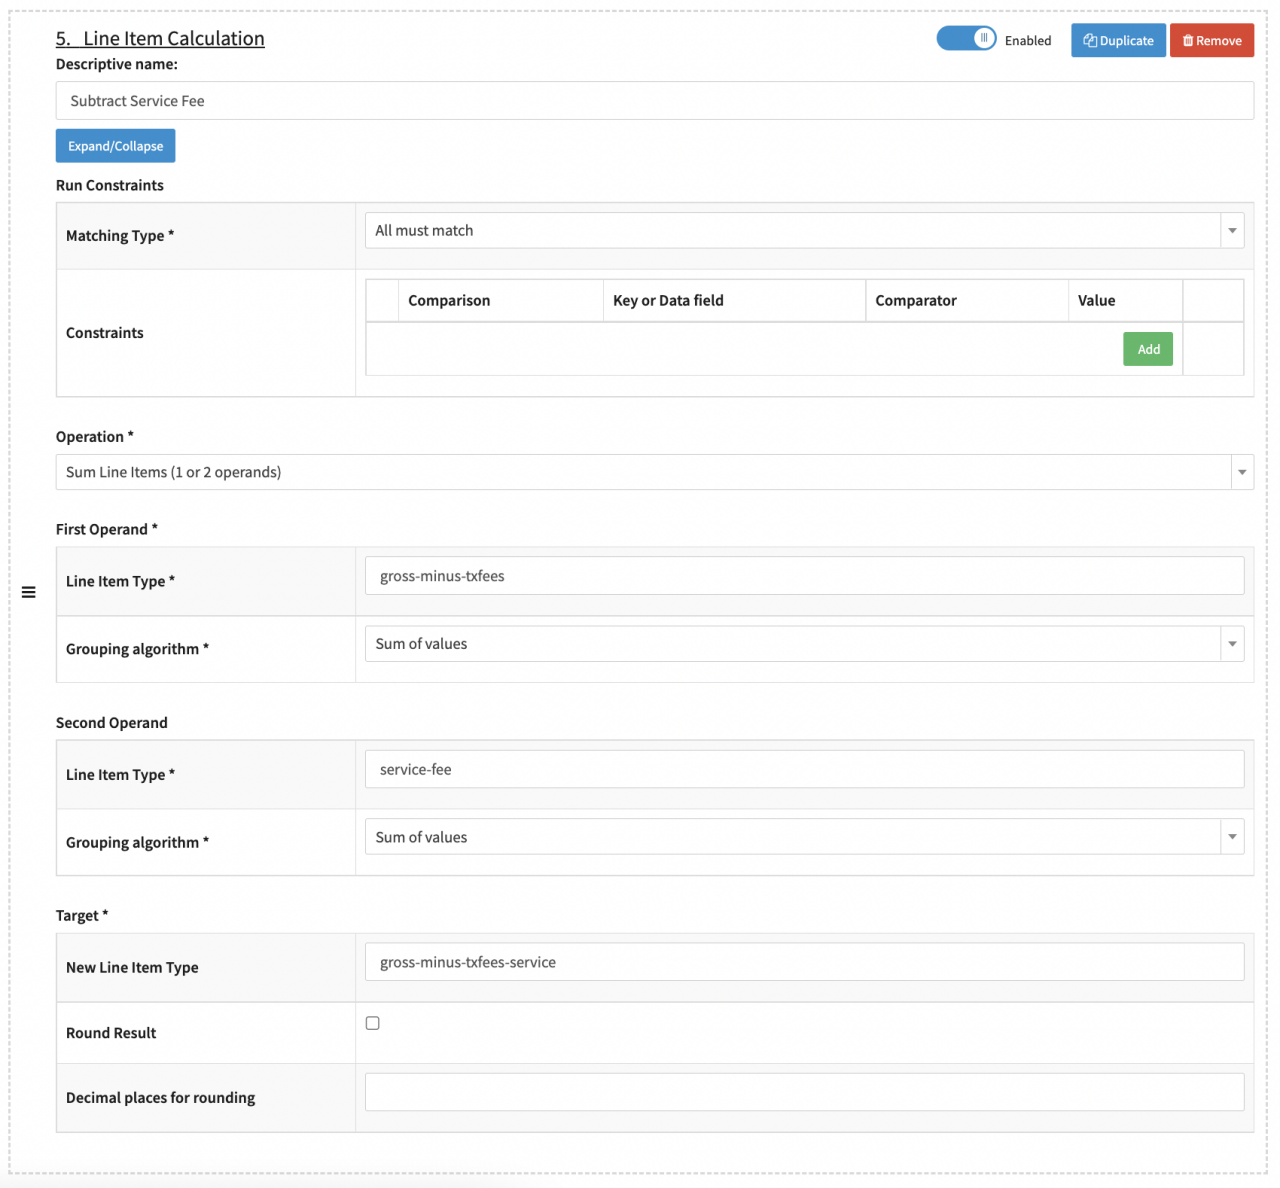
- Processing: Add Line Item Calculation and configure the step (see Aggregated Settlement - Processing V)
- Optional: Add a Descriptive name, e.g. Subtract Service Fee
- Operation: Select Sum Line Items (1 or 2 operands) to subtract the Service Fees. In our example Fee Values are reported negative, therefore we chose the option Sum Line Items
- First Operand - Line Item Type: Fill in the Line Item gross-minus-txfees (as processed in 2.e)
- First Operand - Grouping algorithm: Select Sum of values
- Second Operand - Line Item Type: Fill in the Line Item service-fee (as processed in 2.c)
- Second Operand - Grouping algorithm: Select Sum of values
- Target - New Line Item Type: Fill in gross-minus-txfees-service for the calculated Line Item
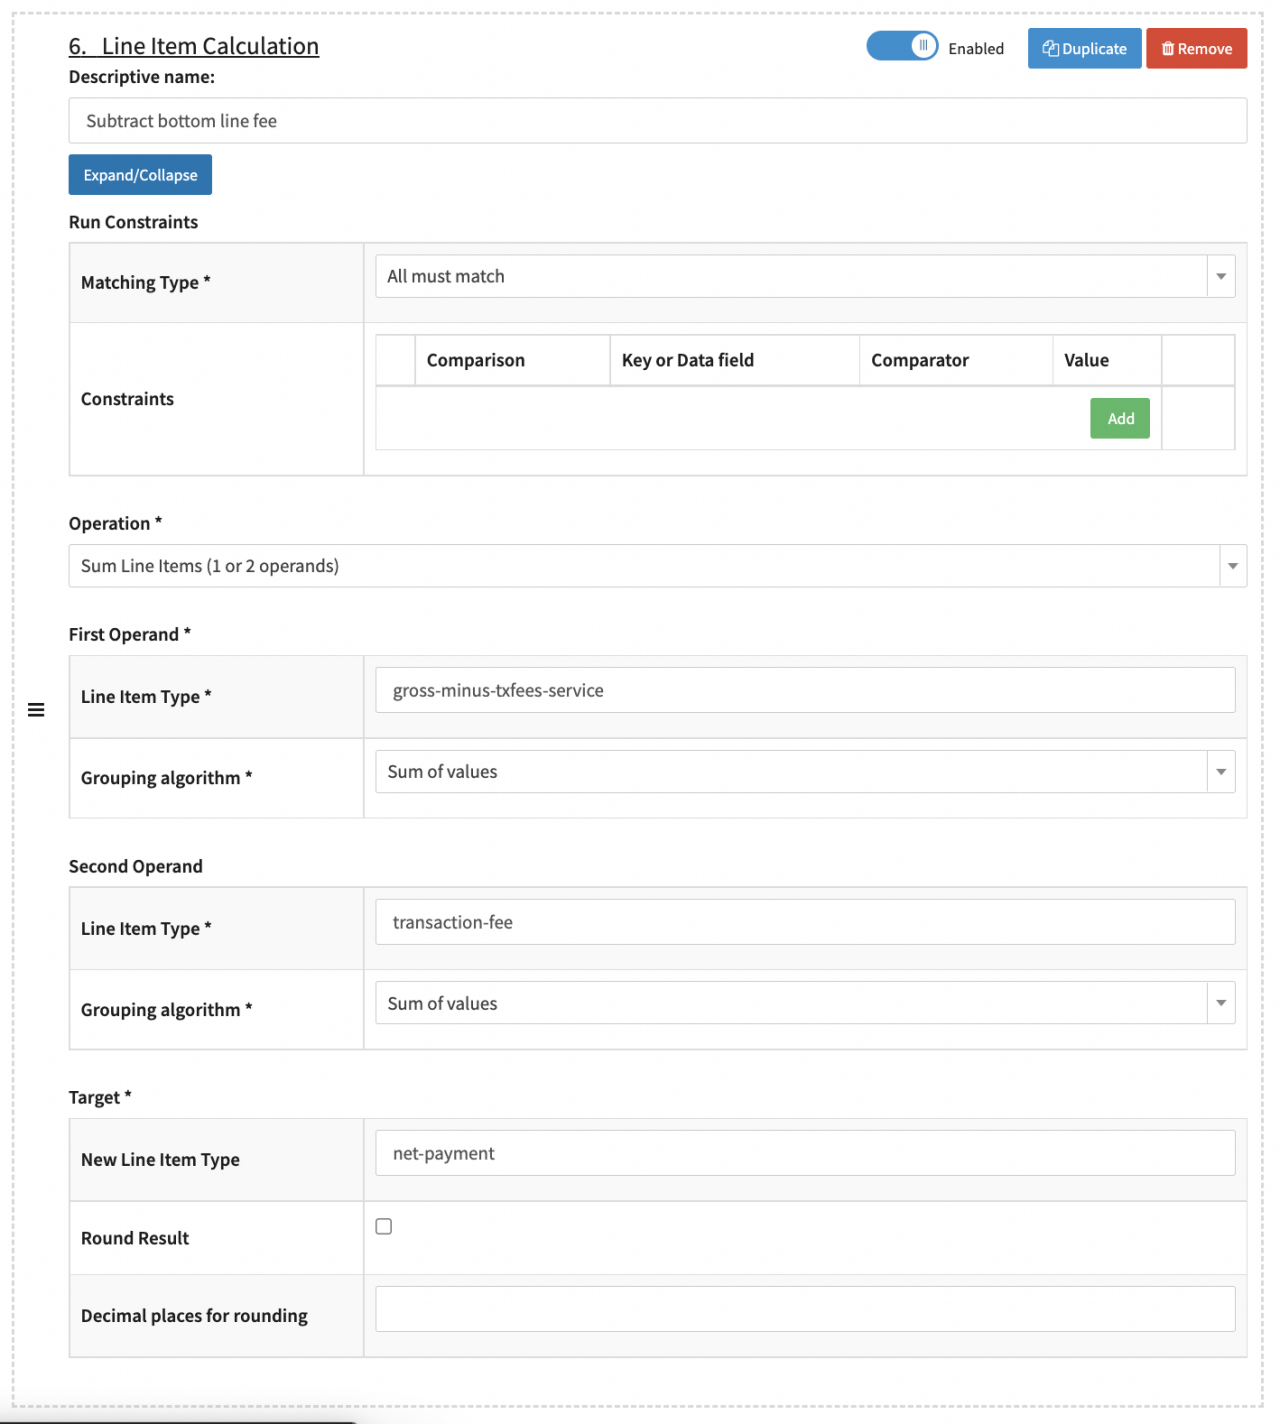
- Processing: Add Line Item Calculation and configure the step (see Aggregated Settlement - Processing VI)
- Optional: Add a Descriptive name, e.g. Subtract bottom line fee
- Operation: Select Sum Line Items (1 or 2 operands) to subtract the Tx Fees. In our example Fee Values are reported negative, therefore we chose the option Sum Line Items
- First Operand - Line Item Type: Fill in the Line Item gross-minus-txfees-service (as processed in 2.f)
- First Operand - Grouping algorithm: Select Sum of values
- Second Operand - Line Item Type: Fill in the Line Item transaction-fee (as processed in 2.c)
- Second Operand - Grouping algorithm: Select Sum of values
- Target - New Line Item Type: Fill in net-payment for the calculated Line Item
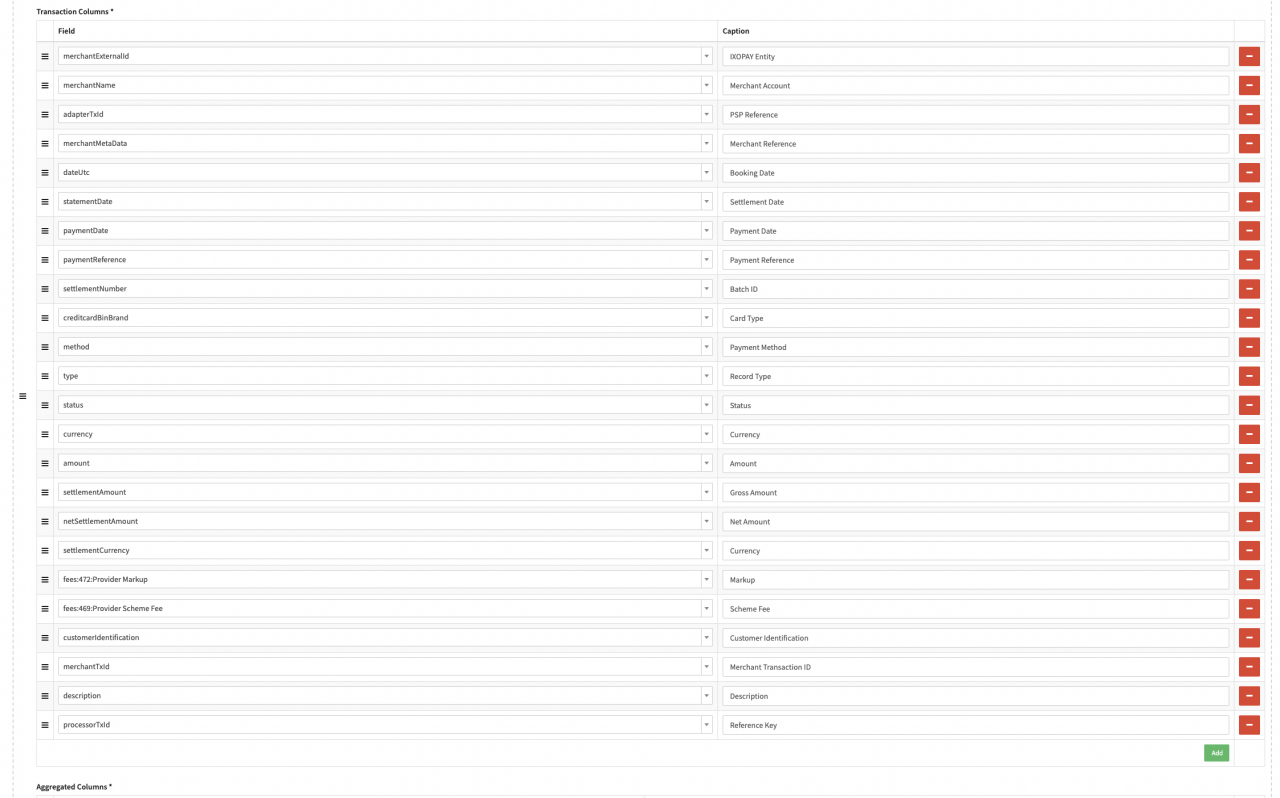
- Exporting: Add Write customized Settlement CSV and configure the step (see Aggregated Settlement - Exporting I)
- Aggregation Data Style: Select Combined (on Top) to have the aggregated data shown on top. Configuring the File Name - Aggregated File (only if separate) can be skipped
- Transaction Columns: Select all Transaction Data Fields you want to have included in the customized settlement file (see Aggregated Settlement - Exporting II for example fields)
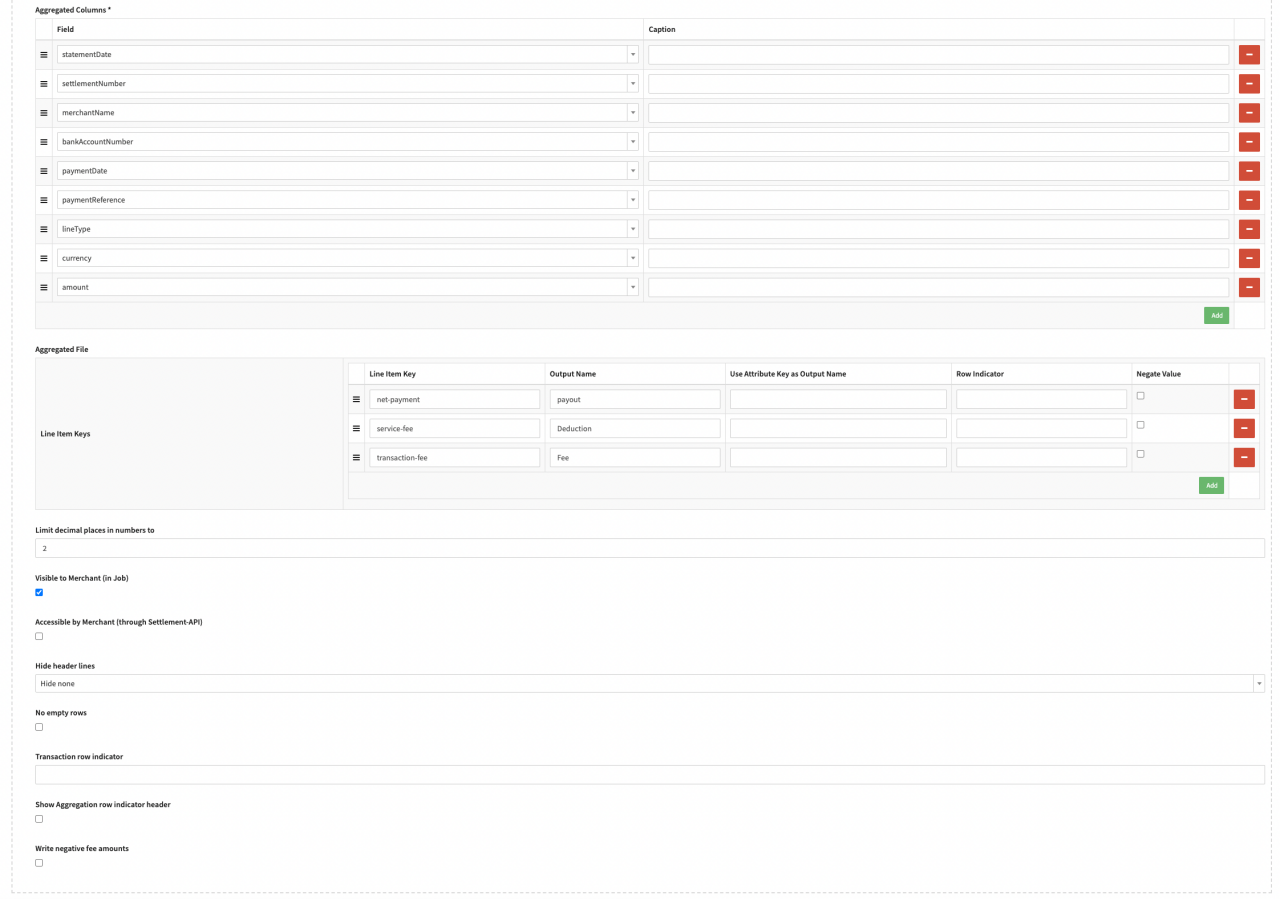
- Aggregated Columns: Select the Transaction Data Fields to be aggregated on top (as defined in 2.h.i.)
- Aggregated File - Line Item Keys: Add the Line Item Keys from previous Processing Steps and Output Name to be included in the customized settlement file. In our example the Line Items net-payment (as processed in 2.g), service-fee (as processed in 2.c), transaction-fee (as processed in 2.c)
- Optional: Fill in the Limit decimal places in numbers to
- Optional: Enable the option to mark the customized settlement file Visible to Merchant (in Job)
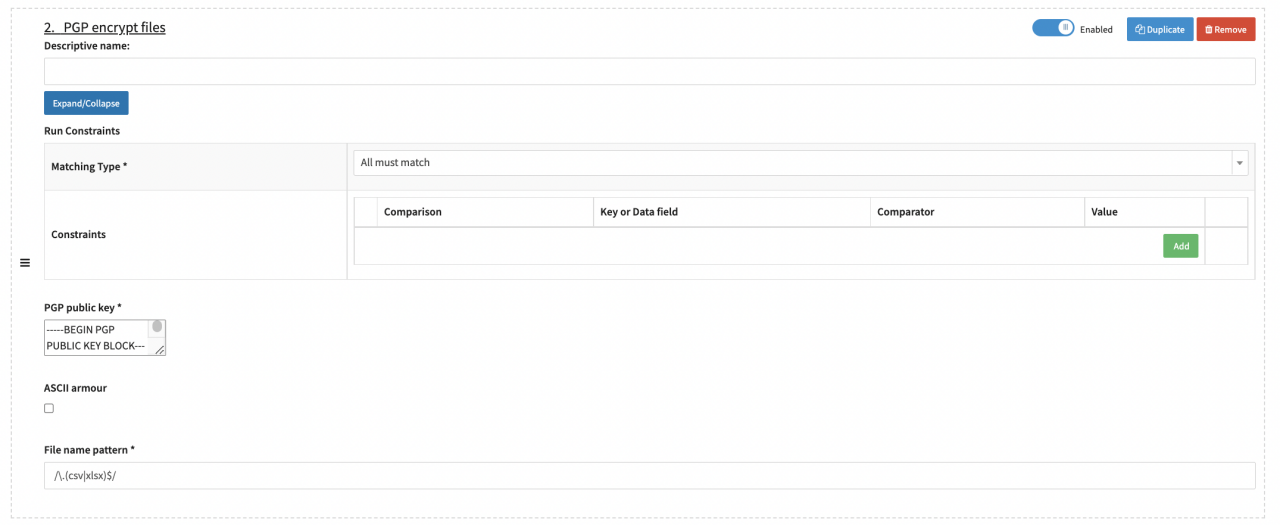
- Optional Exporting: Add PGP encrypt files and configure the step (see Aggregated Settlement - Exporting IV)
- Fill in the PGP public kex
- Fill in the File name pattern. In our example to include CSV and XLSX files use the expression /\.(csv|xlsx)$/
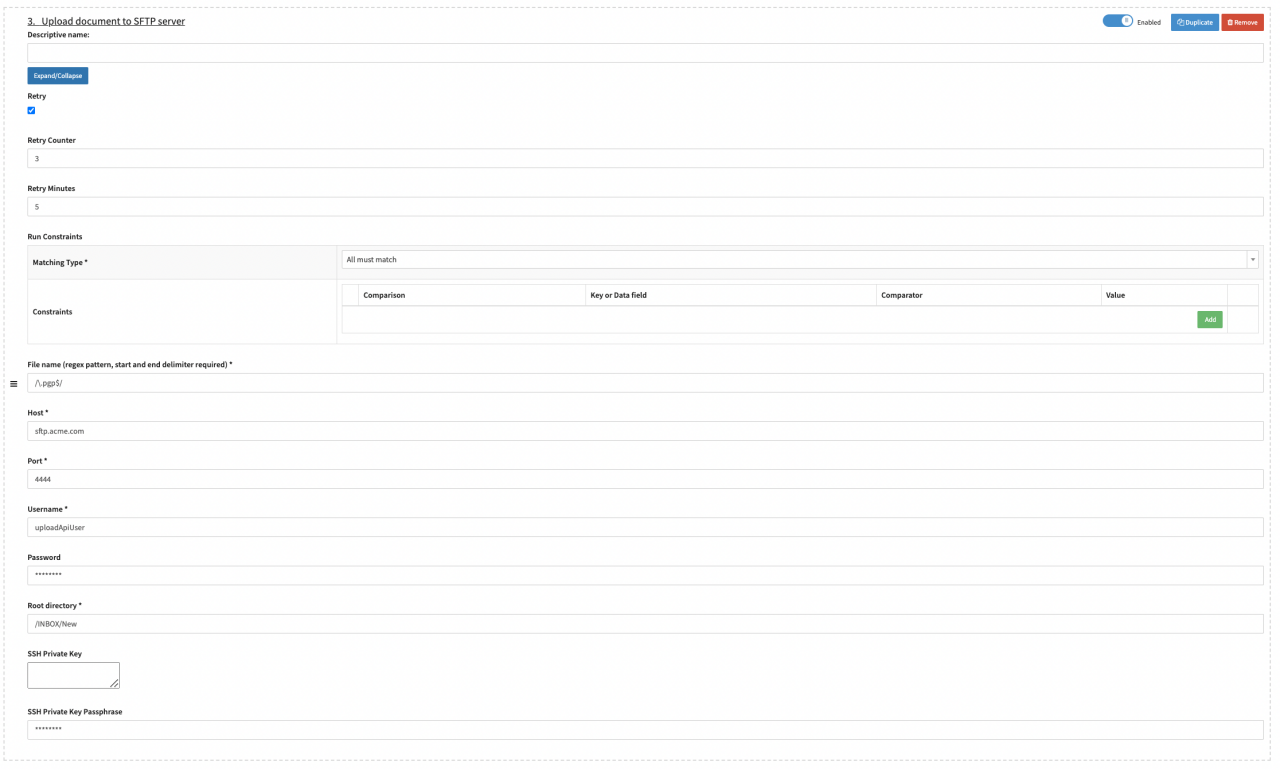
- Exporting: Add Upload document to SFTP server see Aggregated Settlement - Exporting V)
- Optional: Enable Retry and configure the Retry Counter and Retry Minutes in case the SFTP server is not reachable
- Fill in the File name (regex pattern, start and end delimiter required). In our example, due to the encryption, this would be /\.pgp$/
- Fill in the SFTP server Host, Port, Username, Password and Root directory. As well as the SSH Private Key and SSH Private Key Passphrase.
- Collecting: Add Collect Transactions from related batch and configure the step (see Aggregated Settlement - Collecting):


Schedule Job “On Provider Settlement"
Schedule the configured Job Type on the desired entity to be started "On Provider Settlement". In our example the Job should be executed per Provider
- Navigate to the Post Processing section, sub-section Provider
- For each Provider, whose settlement reports you want to consolidate, click Schedules
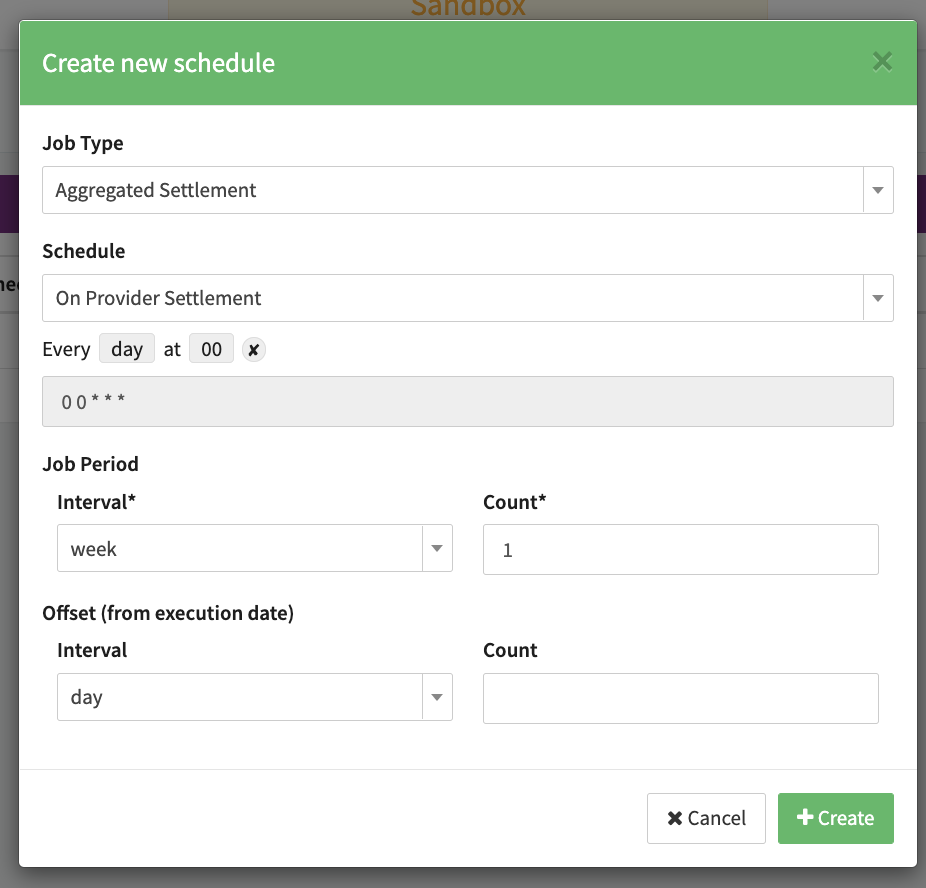
- Click + Create new schedule and configure the schedule (see Provider Schedule)
- Job Type: Select the configured Job Type, Aggregated Settlement in our example
- Schedule: Select On Provider Settlement to initiate the Post Processing Job once the Settlement is completely processed and has no conflicts
- Job Period: Select any Job Period. The Job Period will be set according to the Processing Date+Time based on the included settled Transactions of the Provider Settlement as defined in 2.a.ii
- Click + Create
- Edit the Schedule to assign the related Connectors to the schedule and click Save (see Assign Connectors)
- Enable the Schedule (see Enable Schedule)
Mark fraudulent Transactions from Report
Configure Job Type to collect all transaction from uploaded CSV
Configure a Job Type to collect and mark all fraudulent transaction from a CSV file:
- Navigate to the System Setup section, sub-section Job Configuration
- Click + New Job Type (see Post Processing Jobs) and configure the following steps:
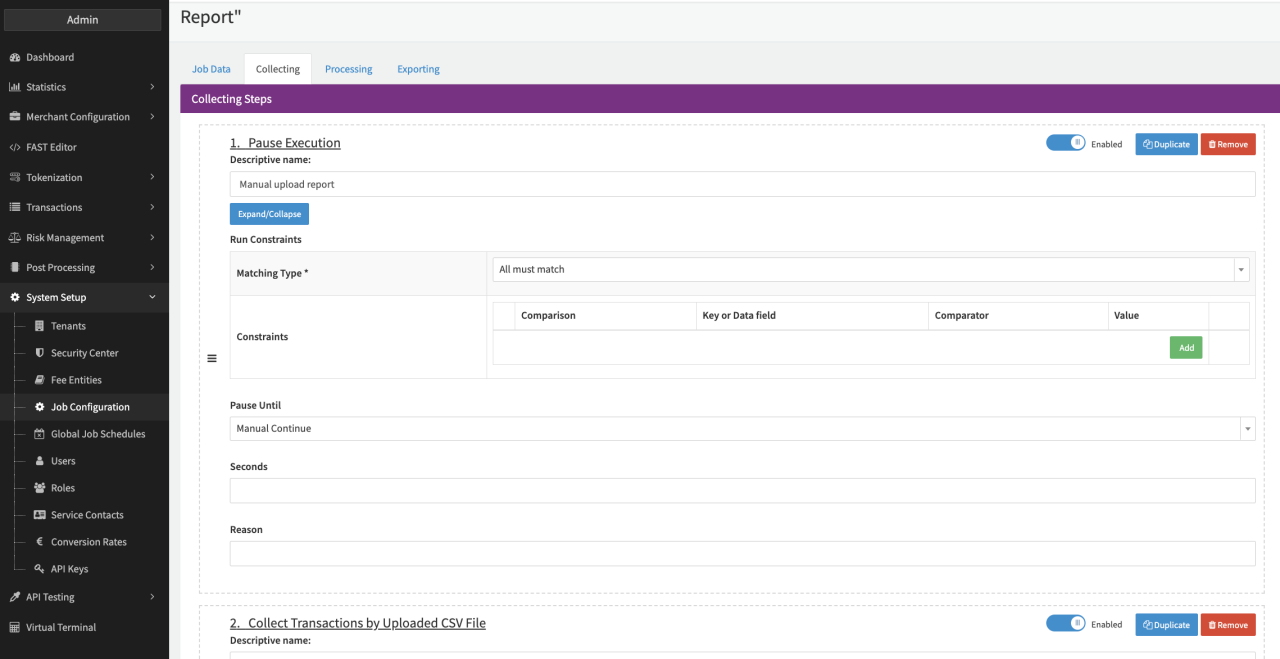
- Collecting: Add Pause Execution and configure the step (see Pause Step):
- Optional: Add a Descriptive name, e.g. Manual report Upload
- Pause Until: Select Manual Continue to pause the job until manual user interaction
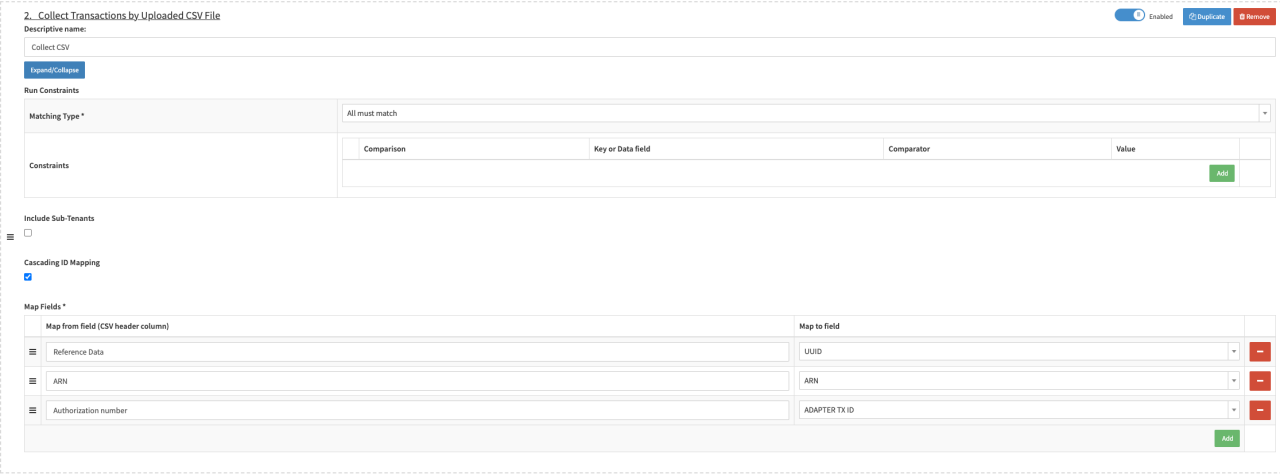
- Collecting: Add Collect Transactions by Uploaded CSV File and configure the step (see Collecting Step):
- Optional: Add a Descriptive name, e.g. Collect from Fraud Report
- Optional: Enable option Include Sub-Tenant in case also Transactions of Sub-tenants should be collected (see Collecting Step)
- Optional: Enable option Cascading ID mapping to try to map fields according to defined order. As soon as a mapping is found the query stops. If disabled all fields are mapped. In case more then one column of the uploaded CSV is mapped to the same field an error occurs.
- Configure the Map Fields pairs to be used for mapping
- Fill in the Map from field (CSV header column) from the report that is uploaded
- Select the Map to field from the drop down of transaction data to map the data from the report to
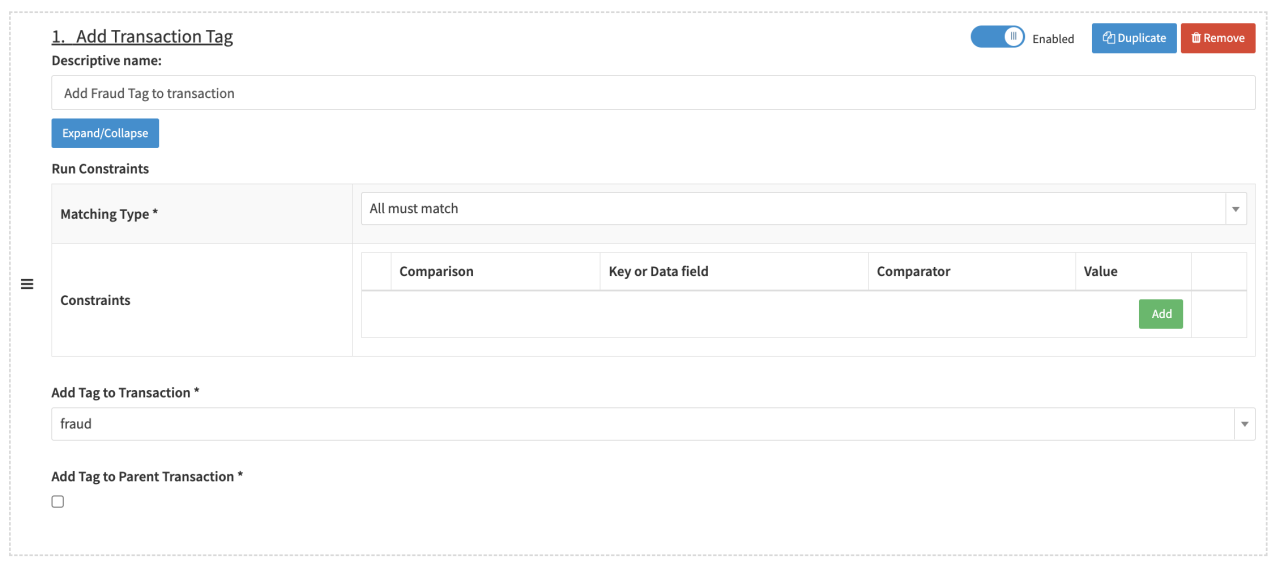
- Processing: Add Transaction Tag and configure the step (see Processing Step):
- Optional: Add a Descriptive name, e.g. Add fraud tag to transaction
- Add Tag to Transaction: fraud (see also Transaction Tags)
- Enable the Add Tag to Parent Transaction in case the tag should also be added to the parent transaction for followup transactions.
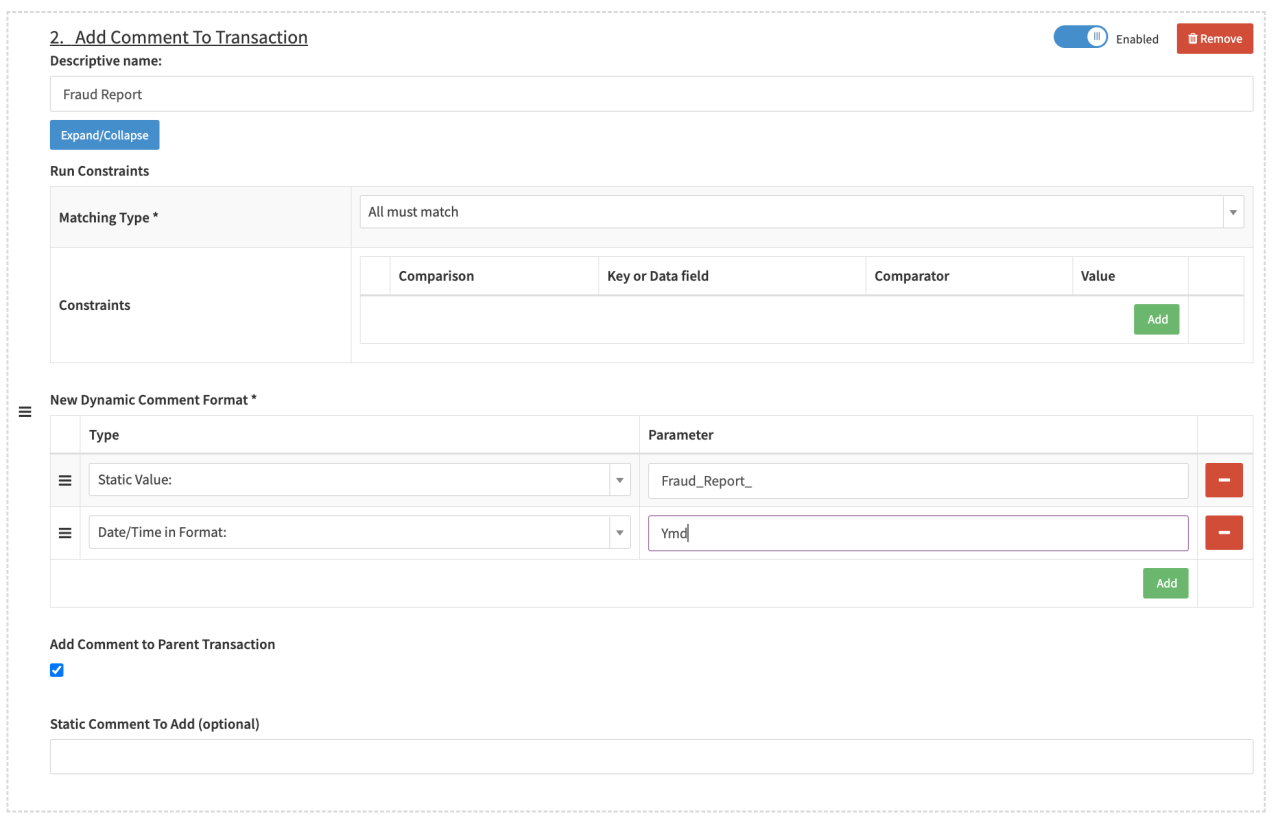
- Processing: Add Add Comment To Transaction and configure the step (see Processing Step II):
- Optional: Add a Descriptive name, e.g. Fraud Report
- Either
- Define a New Dynamic Comment Format or
- Define a Static Comment to Add (optional)
- Optional: Enable to Add Comment to Parent Transaction in case the comment should also be added to the parent transaction for followup transactions.
- Collecting: Add Pause Execution and configure the step (see Pause Step):
Schedule Job
Schedule the configured Job Type on the desired entity to be started when manually triggered (see Schedule manually triggered).