Web User
Video: Web User

User access is possible from all common web browsers (incl. mobile devices). Mobile device support however is limited regarding performing administrative functions (e.g. Post-Processing, Fast Editor).
Grant your Merchant User access to the payment platform and enable them to visualize their Transactions directly and easily.
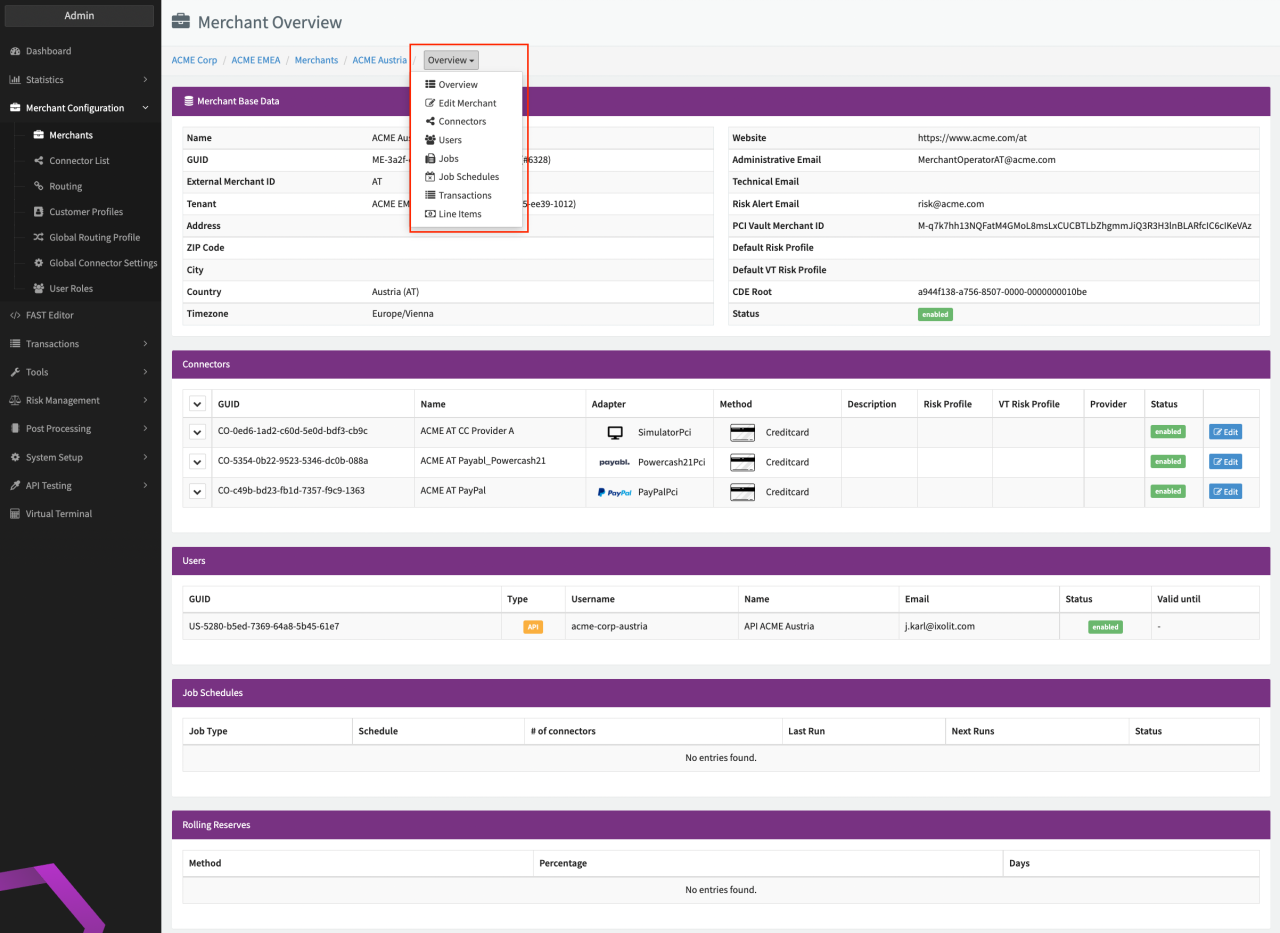
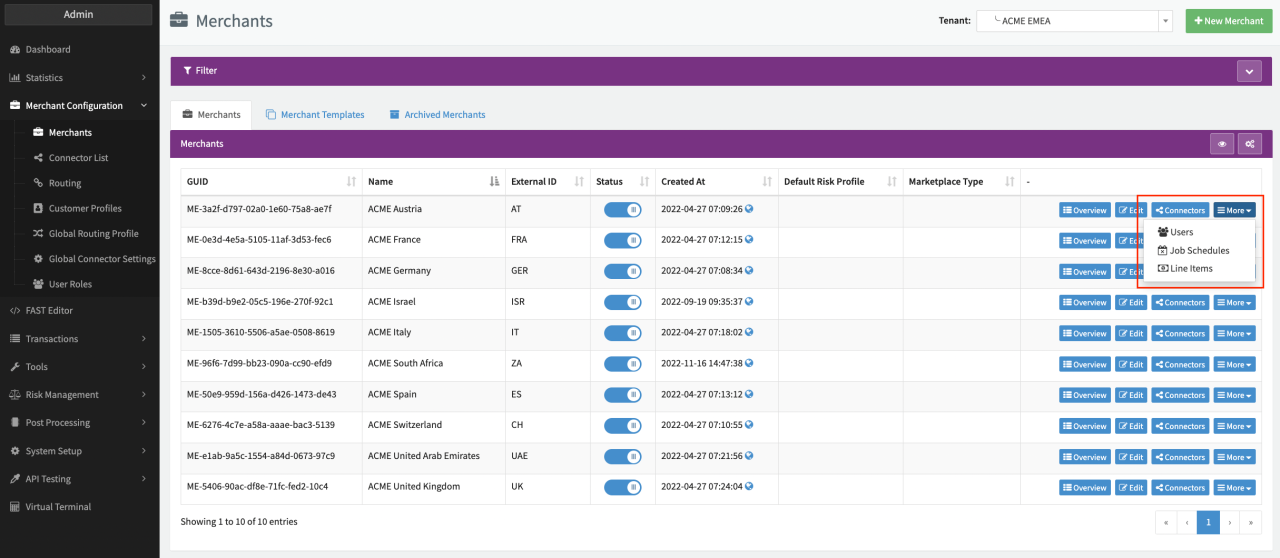
There are different options to navigate to the (Merchant) User Overview:
- Select Users in the drop down menu of the breadcrumb path for the selected Merchant (available in different views of this Merchant)
- Open the drop down menu by clicking More for the desired Merchant and select Users (Global Merchant Overview)
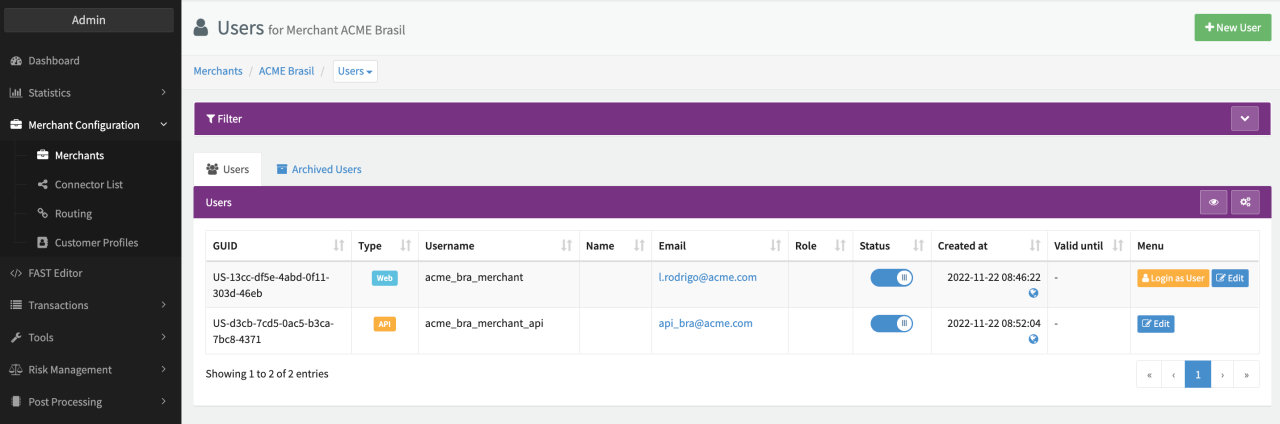
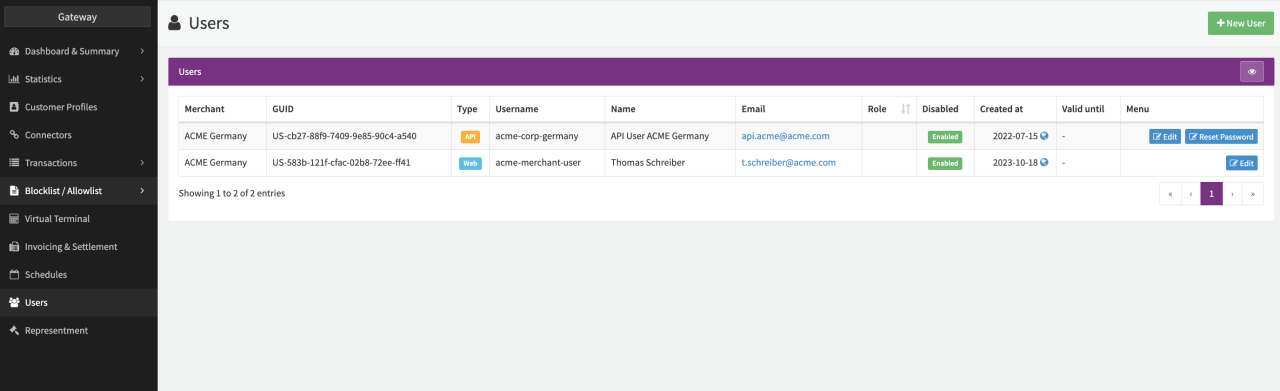
In the (Merchant) User Overview you can add and edit Users with access to the related Merchant Profile.
Add New Users
- Click + New User in the (Merchant) User Overview.
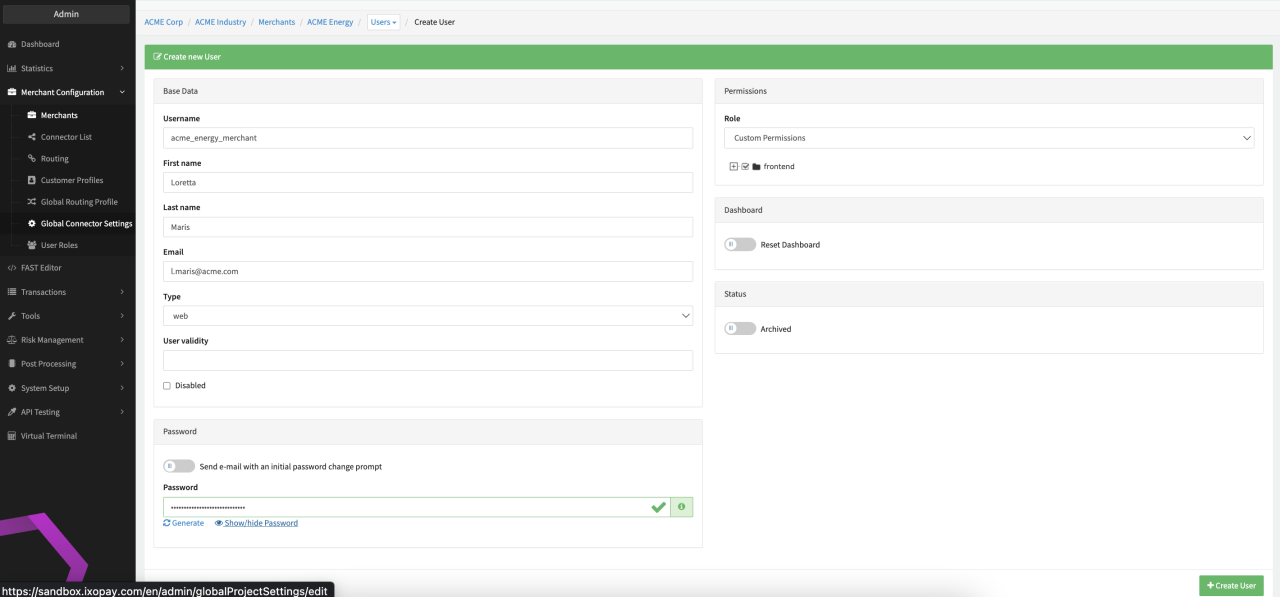
- Enter required and optional Base Data for the User (see Create User):
- username,
- first name - optional, recommended for Web Users
- last name - optional, recommended for Web Users
- email address
- Select the User Type - Web to enable Web Interface, see section API User for User Type API.
- Either type in a Password or click Generate for IXOPAY to create a random one.
- For Web User you can as well select Send e-mail with link to reset the password for the User to receive a mail to reset the password (reset password link validity is 24 hours with exception of the setup link for a newly created user which is valid for 7 days).
- Select the User Role or Permissions you would like to assign to this User. For instance you can allow the User to enter entries on the Blocklist or Allowlist, to see Transactions, modify payment templates, etc…)
- Valid your entries and confirm the User creation with + Create User (Create User).
Depending on the selected User Type different configuration options are available when editing the User.
The following password criteria must be fulfilled:
- At least 12 characters required
- Includes a lower case character
- Includes a upper case character
- Includes a number
- Includes a special character
In case you want to assign a User Role to your User, make sure to create the Role before you create your User.
Edit Web Users
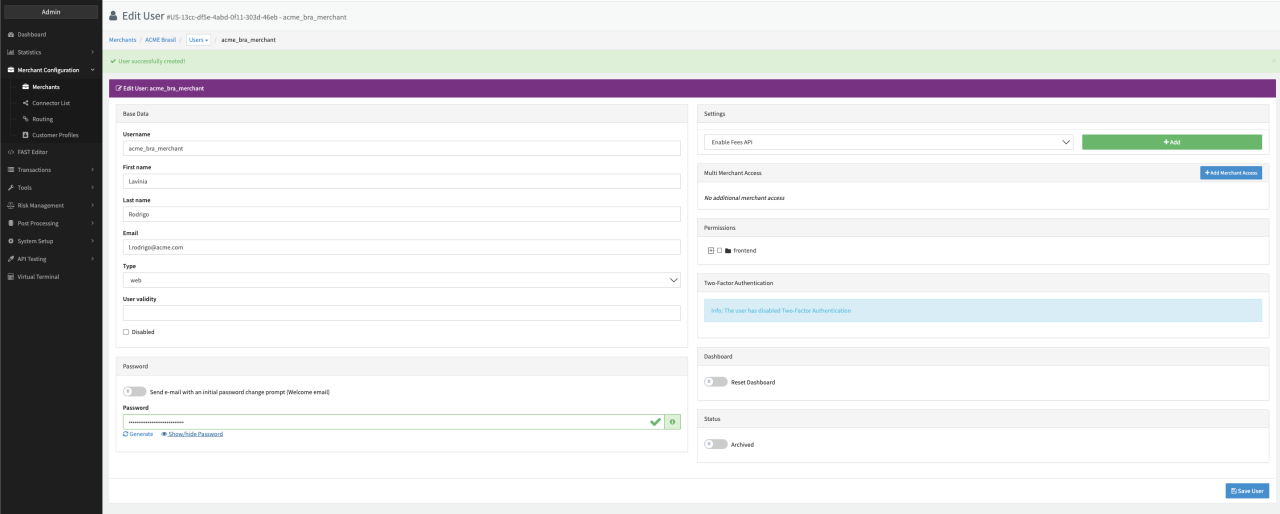
After having created a User you will be redirected to the Edit View for this user to add additional configurations. Furthermore you have the option to update and upgrade the abilities of the created User anytime by clicking Edit for the User in the (Merchant) User Overview.
- Disabled: Checkbox to disable the user. This action prevents immediate access to the platform for this user after saving (see Edit Web User)
- Settings:
- Enable Fee AP
- Enable Push API - Setting to allow access to the Push API
- Enable CDE Login,
- Enable Snapshot Retrieval
- Multi Merchant Access Enables your User to get access to multiple Merchant profiles
within your payment platform and the possibility to manage, edit and visualize several Merchants.
- Click + Add Merchant Access
- Select among the list the Merchant profile and click + Add
- Two-Factor Authentication: enable 2FA authentication
- Enable/Disable Reset Dashboard
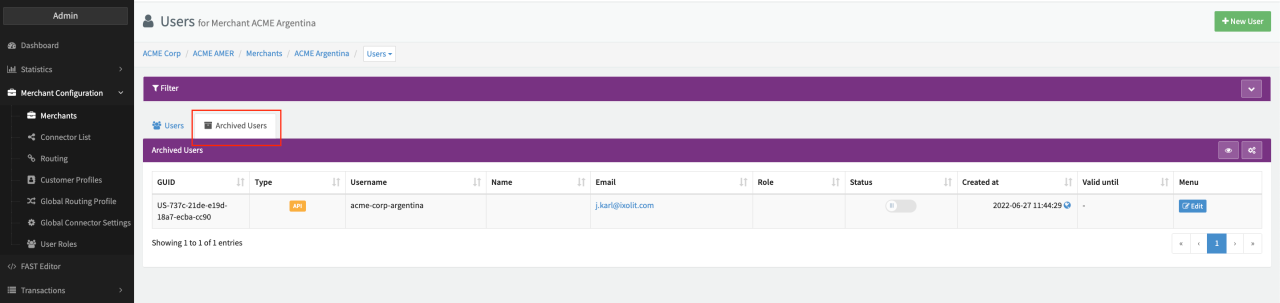
- Enable/Disable Archived: Archives this user. You can undo the archiving in the Archived Users section (see Archived (Merchant) Users)
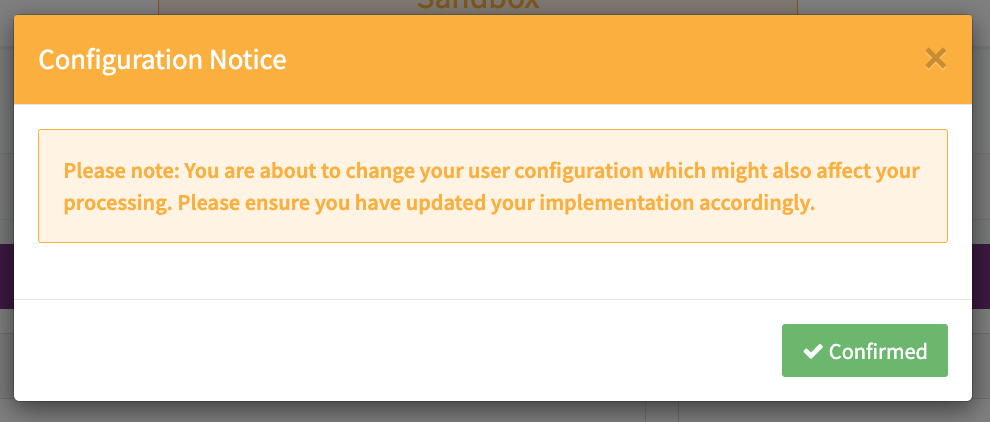
- Click Save User to save the changes and confirm changes (see Confirmation)
In order to review exactly what your User will be able to visualize and has access to, Admin Users can click Login with User and be logged in to the Web Users Platform View (see (Merchant) User Overview).
The URL to the Merchant's login page differs from your login page as an Admin User:
The available configuration parameters dependent on the enabled Permissions per Tenant. If you want to get access to all IXOPAY features please contact your Customer Success Team or our Sales Team for more information.
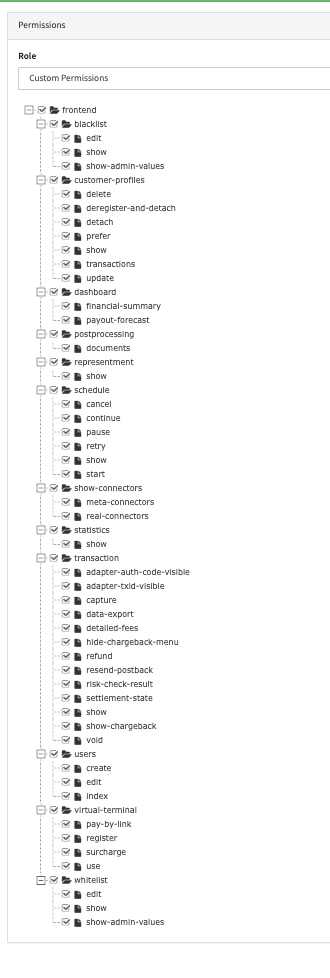
Permissions
By default the (Merchant) Web User has access to the Dashboard (e.g. as configured as Default Merchant Dashboard by an Admin User). Depending on the Tenant Permission the Permissions available for (Merchant) Web Users might differ.
Find the list of available Permissions for Web Users:
| Permission | Description |
|---|---|
| dashboard.payout-forecast | Access to Projected Payout section in the Financial Summery section |
| dashboard.financial-summary | Access to the Financial Summary section |
| transaction.adapter-txid-visible | Show Adapter TxID in the transaction view |
| transaction.detailed-fees | Enables the detailed fee section in the transaction view |
| transaction.data-export | Access to Data Export subsection in Transactions section |
| transaction.refund | Enable option to refund a debit transaction in the transaction view |
| transaction.risk-check-result | Enables the detailed Risk-based data section in the transaction view |
| transaction.capture | Enables option to capture a preauthorize transaction in the transaction view |
| transaction.settlement-state | Access to the Settlement status section in the transaction view |
| transaction.void | Enables option to void a preauthorize transaction in the transaction view |
| transaction.show | Access Transaction section in sidebar |
| transaction.adapter-auth-code-visible | Show Adapter Auth Code in the transaction view |
| transaction.resend-postback | Possibility to resend postbacks for transactions in the transaction view |
| transaction.show-chargeback | Enables option to create a manual chargeback in the transaction view |
| transaction.hide-chargeback-menu | Hides the chargeback options for the User |
| virtual-terminal.GSTCalculation | Enables the option to generate GST fees via Virtual Terminal (see Surcharge - GST Fee) |
| virtual-terminal.register | Enables the option to register a customer via the Virtual Terminal |
| virtual-terminal.use | Access to the Virtual Terminal section in sidebar |
| virtual-terminal.pay-by-link | Access to the Pay By Link functionality in the Virtual Terminal |
| virtual-terminal.payment-details | Enables the option to include payment details via the Virtual Terminal |
| virtual-terminal.surcharge | Enables the option to enter a surcharge via the Virtual Terminal |
| virtual-terminal.surchargeCalculation | Enables the option to generate GST fees via Virtual Terminal (see Surcharge - GST Fee) |
| show-connectors.real-connectors | Show connectors in Connector section |
| show-connectors.meta-connectors | Show meta connectors in the Connector section |
| blacklist.edit | Enables Blocklist to be edited |
| blacklist.show | Access to Blocklist section in sidebar |
| blacklist.show-admin-values | Show Blocklist values set on tenant level |
| postprocessing.documents | Access to Invoicing & Settlement section |
| schedule.cancel | Cancel a schedule |
| schedule.continue | Continue a schedule |
| schedule.pause | Pause a schedule |
| schedule.retry | Retry a schedule |
| schedule.show | Access to Schedule section |
| schedule.start | Create a new schedule in the Schedule |
| whitelist.edit | Enables Whitelist to be edited |
| whitelist.show | Access to Whitelist section in sidebar |
| whitelist.show-admin-values | Show Whitelist values set on tenant level |
| customer-profiles.delete | Enables deletion of a customer profile in the profile details view |
| customer-profiles.deregister-and-detach | Enables Detach & Deregister option of payment instruments in profile details view |
| customer-profiles.detach | Enables Detach option of payment instruments in profile details view |
| customer-profiles.prefer | Enables Prefer option of payment instruments in profile details view |
| customer-profiles.show | Show section Customer Profiles |
| customer-profiles.transactions | Access to the profile transactions in the profile details view |
| customer-profiles.update | Enables editing of a customer profile in the profile details view |
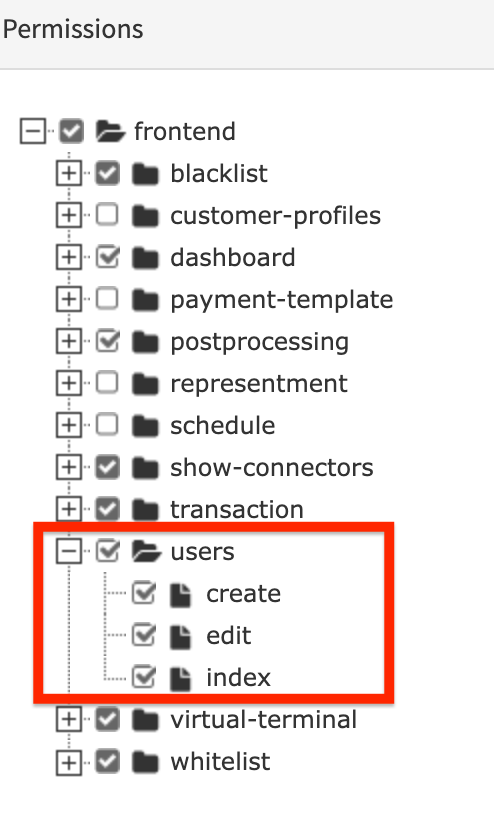
| users.create | Create a new user on merchant level |
| users.edit | Edit user in Users section |
| users.index | Access to Users section in sidebar |
| users.reset-password | Enables Merchant Web Users to reset the Password for Merchant API users |
| user.roles.edit | Enable Merchant Web Users to change the User Role of a Merchant User (see also Global Settings) |
| user.roles.show | Global Settings |
| statistics.show | Access to Statistics section in sidebar |
You can give a Merchant User the permission to add another Merchant User, instead of asking the Admin User to do that.
In order to be able to do this the Merchant User needs to have the following permissions
To ensure compliance to Access, Roles and Right Guidelines and changes on the IXOPAY platform setup are sufficiently reviewed, 4 eyes confirmation can be configured (see Admin User Roles)
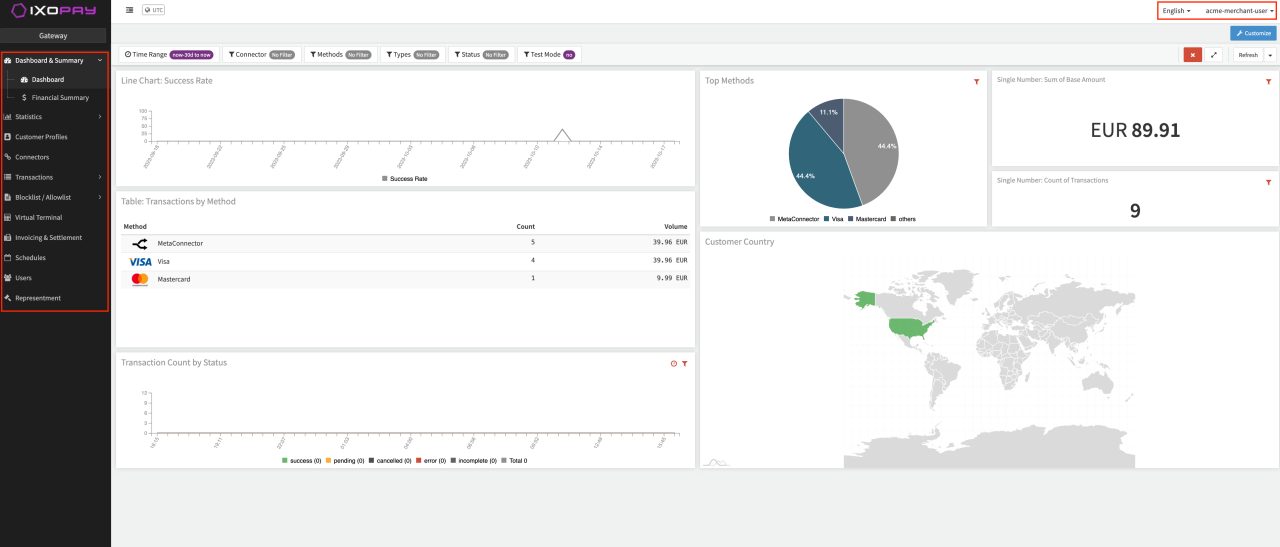
Merchant User Access
After the logging in, the Dashboard is displayed, a customizable view of all relevant transactions, providing insights about today’s, yesterday’s and monthly Counts & Volumes of the users Merchants or Connectors.
The IXOPAY platform interface is structured into 3 areas also for Merchant Users:
- Top Bar: Provides access to Account Settings (2FA setup, change password, log out) from the drop-down menu at the top right, which also provides access to the Dashboard. Users have the option to switch languages.
- Main menu: Used to navigate between areas in IXOPAY, e.g. to manage transactions or customer profiles.
- Main Frame: Displays the details for the current area.
In comparison to the Admin User, Merchant User have slightly different sections, depending also on the enabled Permissions (see Merchant User Interface):
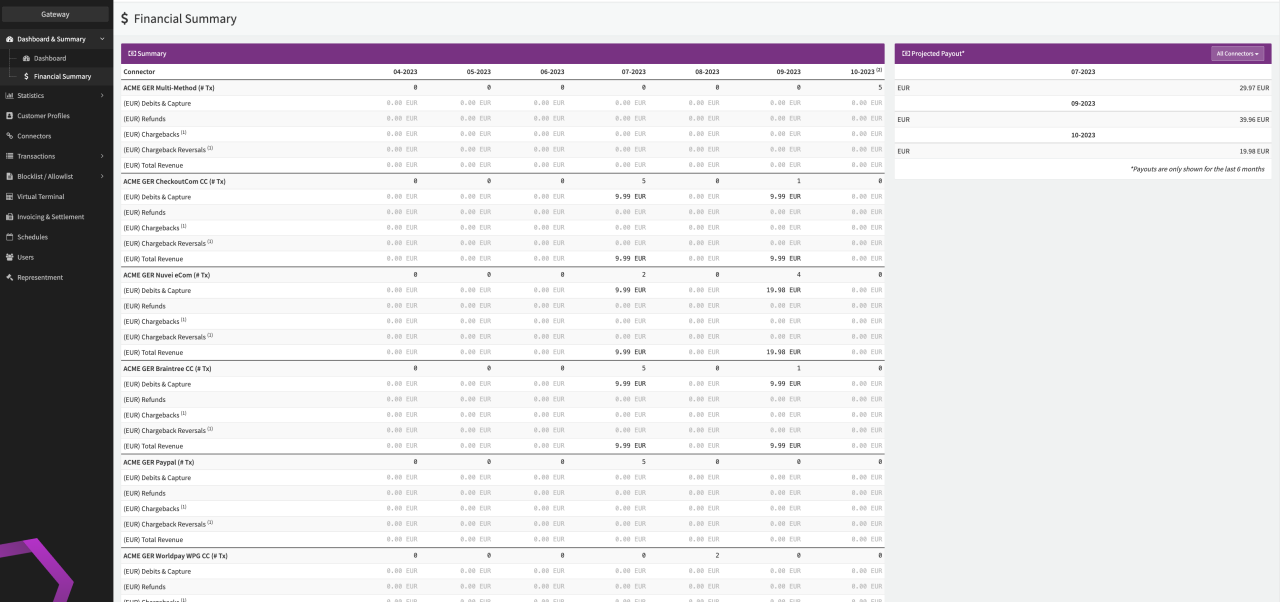
- Financial Summary: Merchant Users can check the financials of the individual Connectors of the Merchant(s) for the previous 6 months and projected payouts (filterable according to Connectors). Optionally the Payout Forecast can be shown (see Financial Summary)
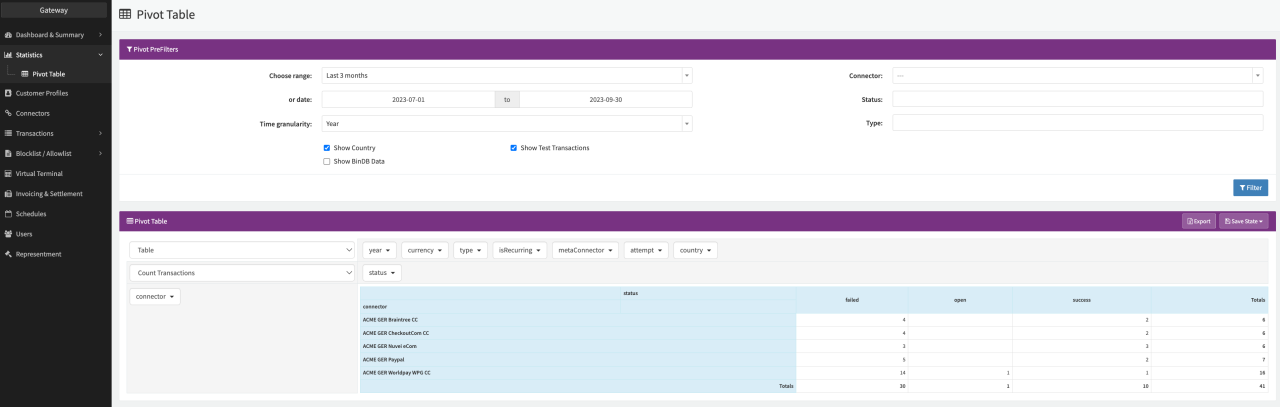
- Statistics: Merchant Users can be granted access to the Pivot Table section, a useful feature to visualize and export data as needed.
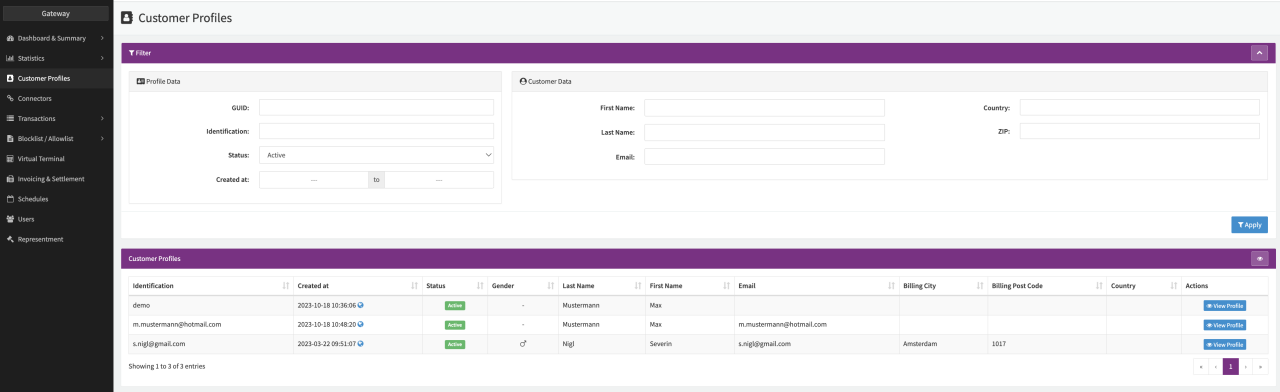
- Customer Profiles: Merchant User can be granted access to the Customer Profiles of Customer Profile Containers attached to Connectors of selected Merchant(s).
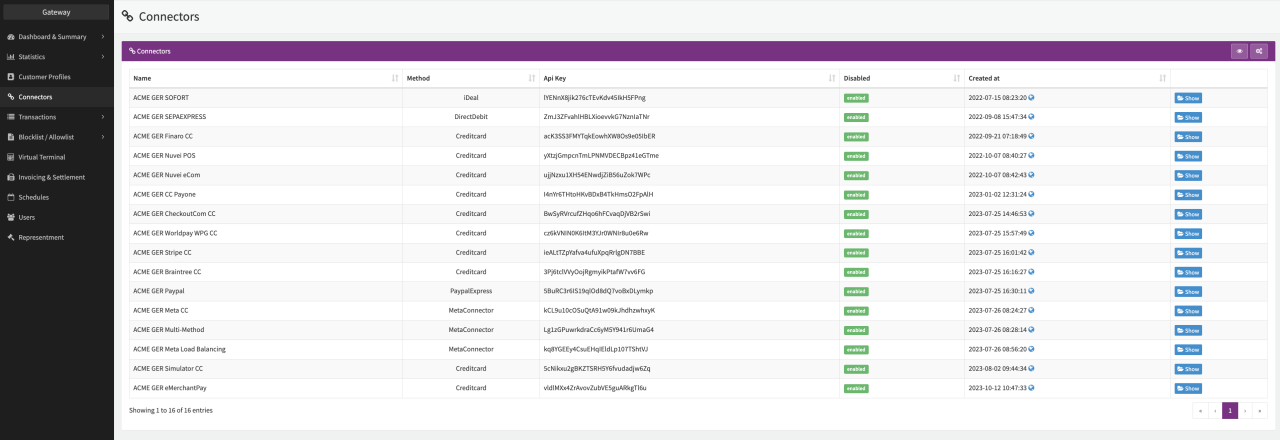
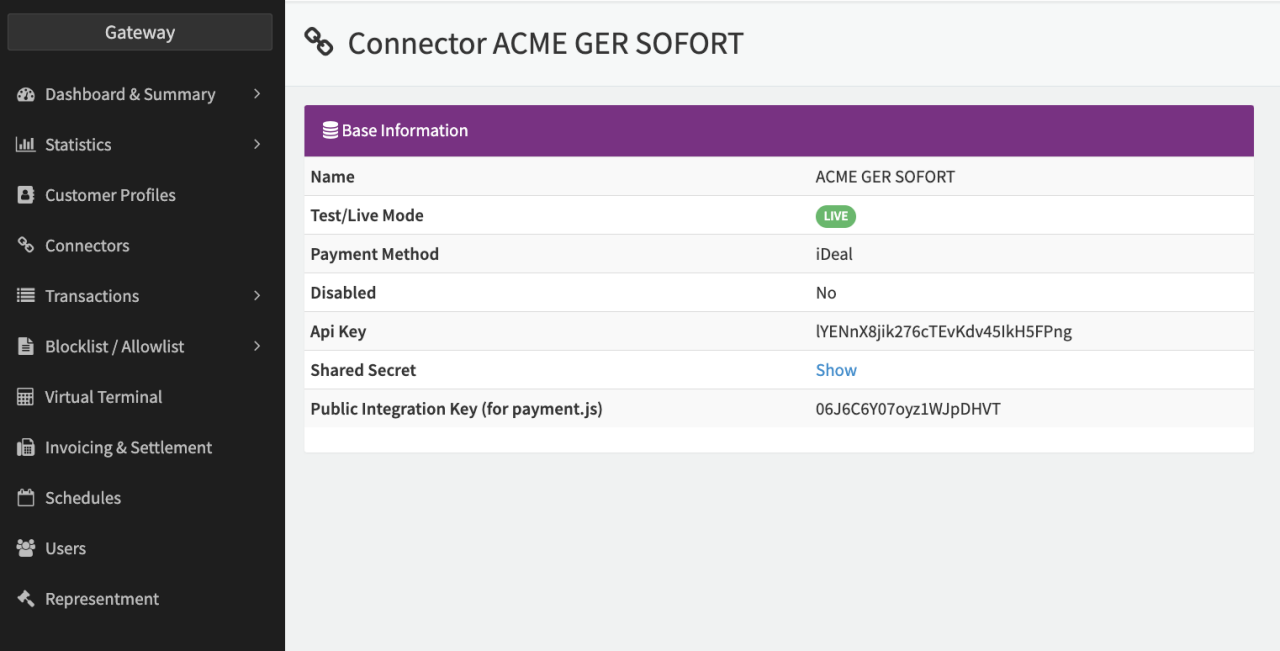
- Connectors: Merchant User can be granted access to Meta- and individual Connectors to check the Connectors Base Data (e.g. for integration purposes) (see Connectors Overview and Connector Details)
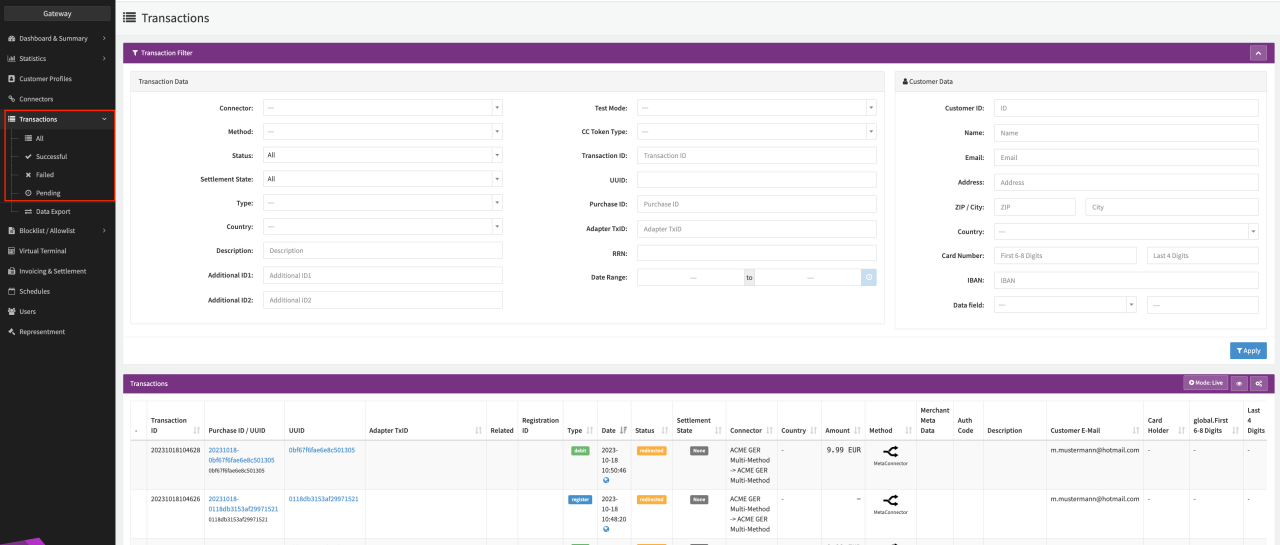
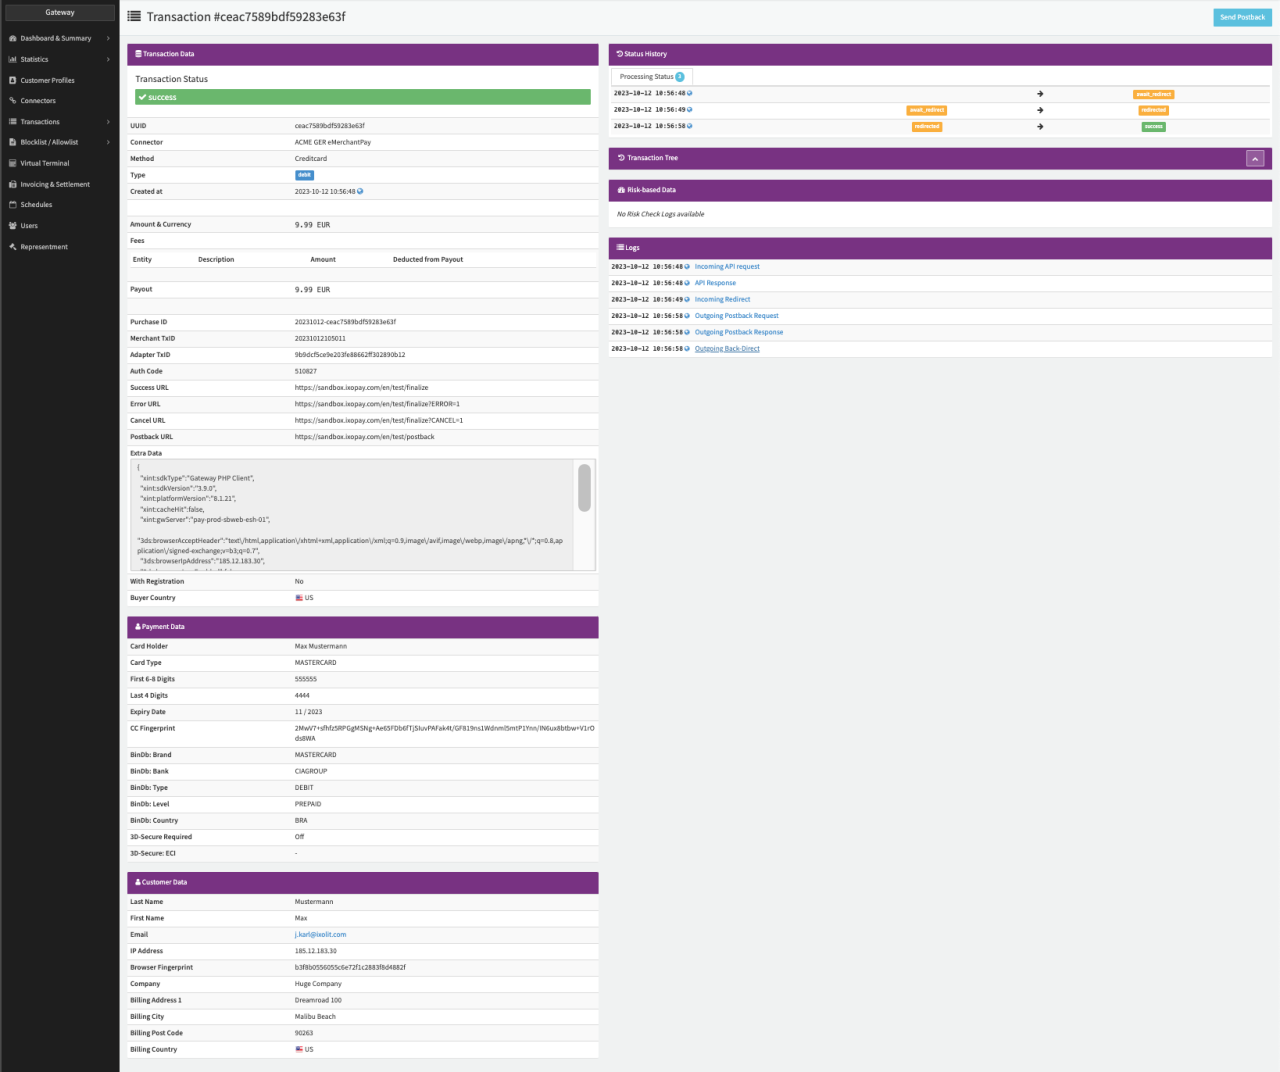
- Transactions: Merchant User can be granted access to the Transaction List, predefined filtered lists regarding transaction status are available as well (Successful, Failed, Pending) (see Transaction List). Further access to Transaction Details is available as well, but with different available Details and Action Options, depending on the Permissions (see Transaction Details).
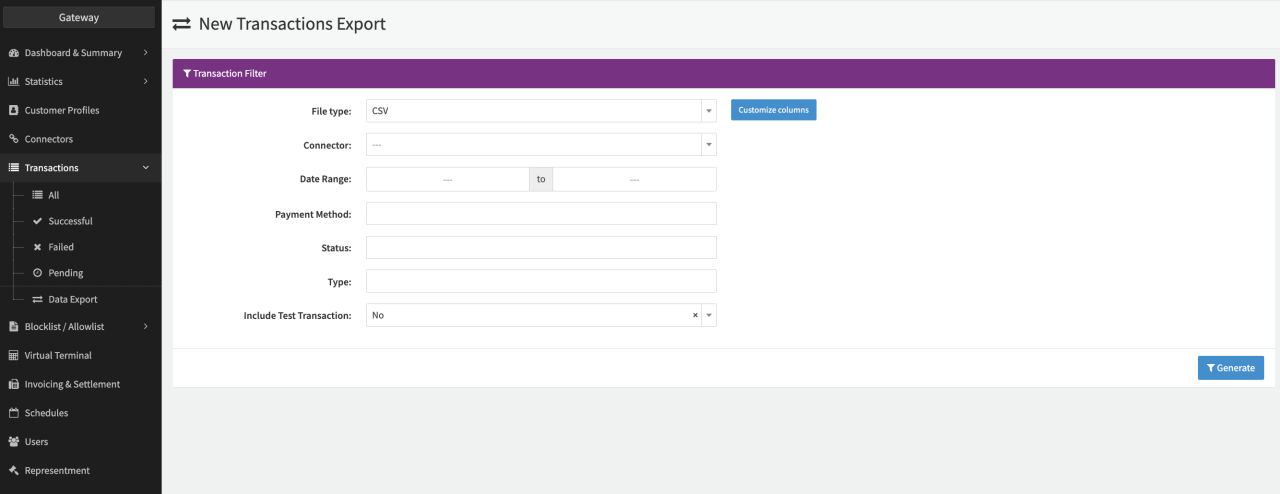
- Data Export: Merchant User can be granted access to the Data Export, to export transaction data in CSV and XLSX format. Files are retained for 7 days and permanently deleted thereafter (see Data Export).
- Blocklist / Allowlist: Merchant Users can be granted access to the Merchant(s)'s Block- and Allowlist in order to see or edit entries made by Admin User. Depending on the permission also additional Block- / Allowlist items can be added.
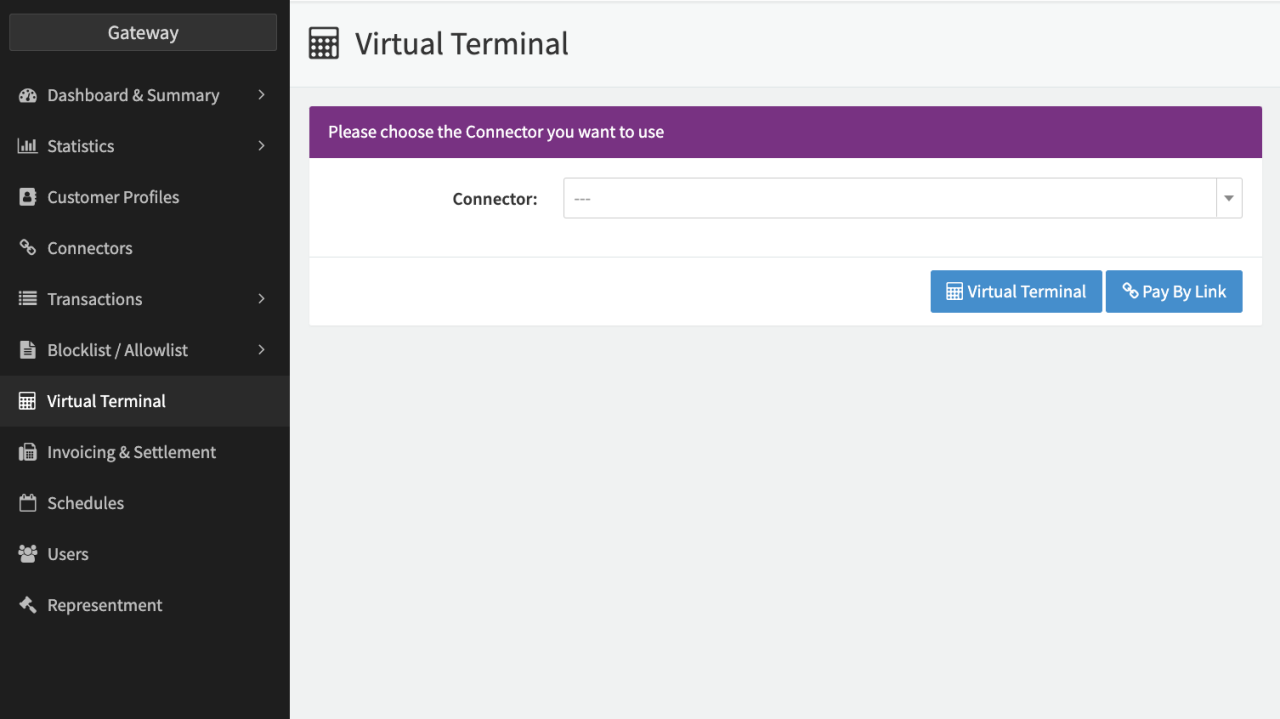
- Virtual Terminal: Authorizes and charges the Customer's payment instrument through manual capture of payment details (MOTO - Mail Order / Telephone Order) for Merchant Users (see Virtual Terminal).
- Invoicing & Settlements: Enables Merchant Users to have access to the Merchant Settlements created by Post Processing Jobs within the IXOPAY platform.
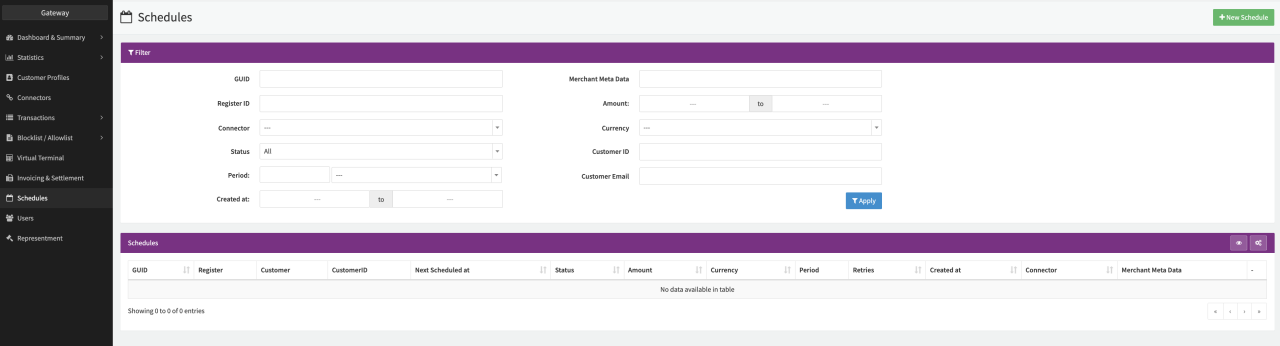
- Schedules: Merchant Users can be granted access to the Schedules section to automate recurring charges based on individually configurable schedules (see Schedules).
- Users: Dependent on the Merchant Users Permissions the User Overview enables them to create and edit other Merchant Users (see Users).
User access is possible from all common web browsers (incl. on mobile devices). Mobile devices support is limited.
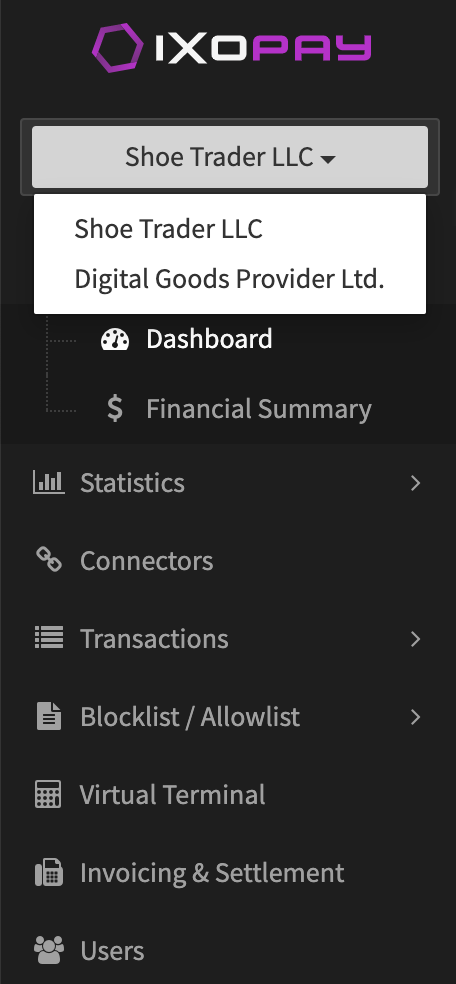
Multi Merchant Access
In some cases, a Merchant Web User needs to have access to more then one Merchant. This can be achieved with adding Multi Merchant Access (see section Edit Web Users).
After saving the configuration the User will be able to switch between the Merchants, when logged in.