Meta-Connector - Routing - Cascading - Balancing - Fallback
IXOPAY platform's Smart Routing Engine provides all the tools you need to optimize your transaction processing based on a variety of Conditions and to automate Actions in real-time if needed. It also helps you to keep track of the bigger picture, even with larger setups.
The first step to implementing routing, cascading, balancing and fallback strategies for your merchants is to create a so called Meta-Connector.
Video: Meta Connector

Before we get started with the Meta-Connector, it is important to note that its setup requires you to have already set up the connector you want to use for routing. The first step is therefore to create connectors for each PSP you want to use. If you already have configured your connectors, you can use those instead of creating new ones. However, it is advisable to create new connectors if you wish to use different connector configurations with the Meta-Connector.
Creating a Meta-Connector
Follow these steps to create a Meta-Connector:
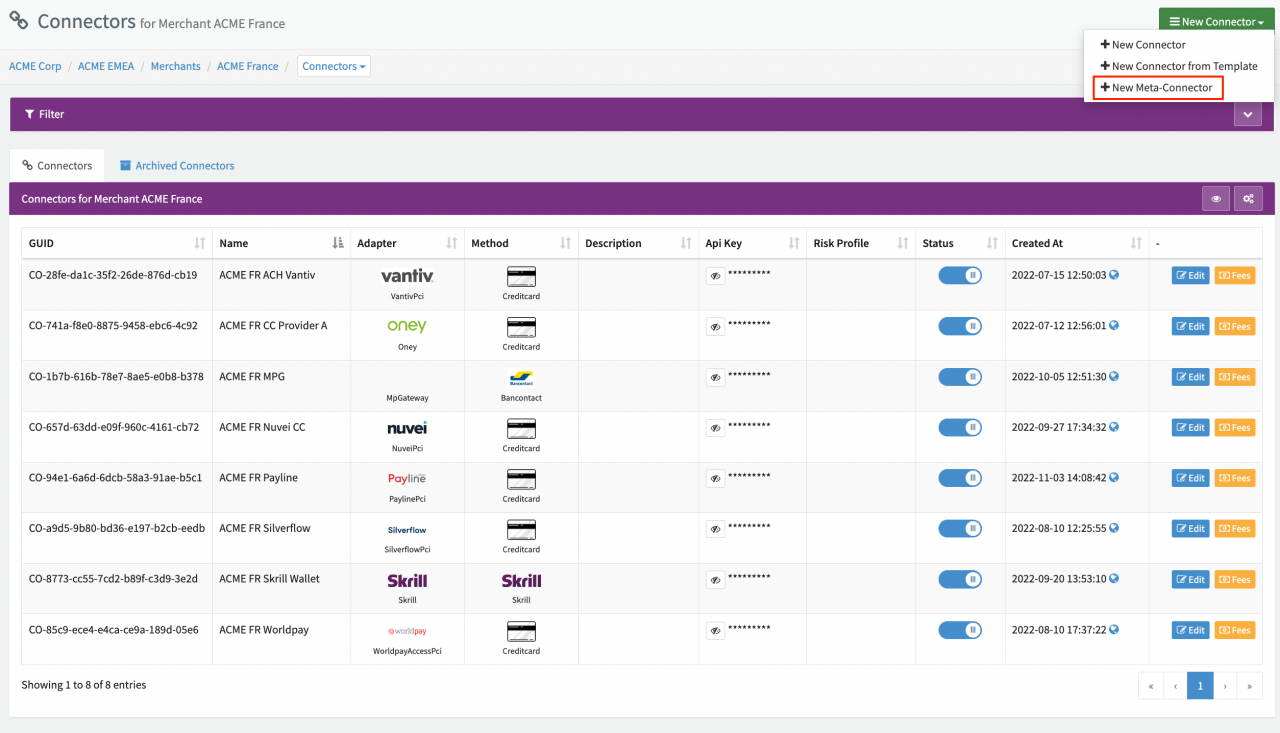
- Navigate to the Connectors Overview of the merchant you want to add the Meta-Connector for.
- Open the New Connector drop-down and select + New Meta-Connector (see Connector Overview).
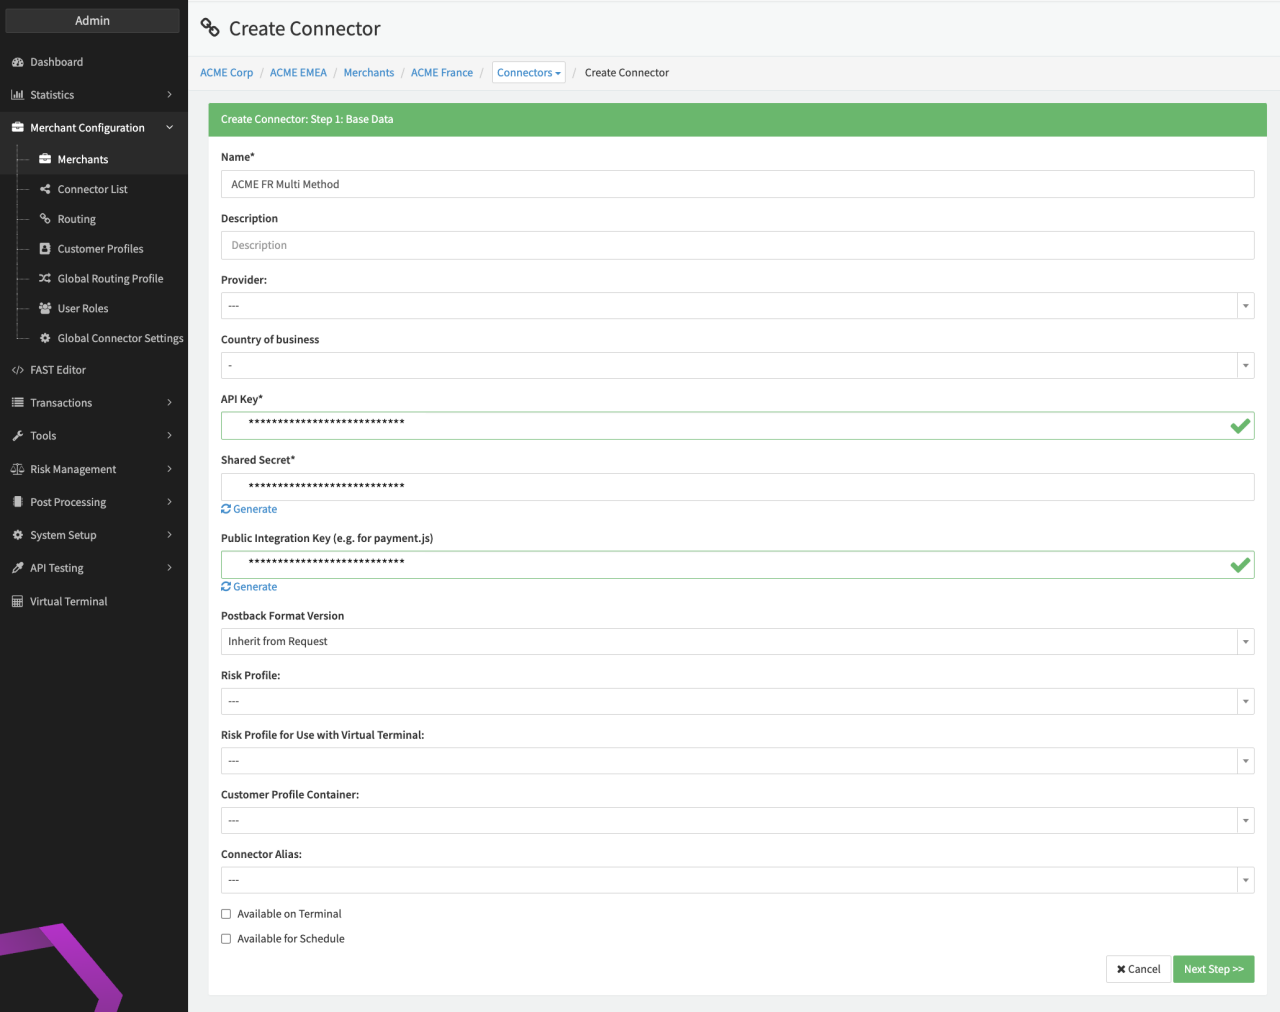
- Enter the Connector Base Data (see Connector Base Data) as for any other Connector and click on Next Step.
- Enable the Multi Method (Payment Selection) option if you want to create a Multi-Method (Meta-)Connector.
- Select a Default Connector from the drop-down. This connector will be used if no Action is defined.
- Optional: Select a Global Routing Profile from the drop-down (see Global Settings for further information).
- Enable Re-route recurring transaction to enable routing strategies in case of recurring transactions. If disabled preauthorize / debit transactions will automatically be routed to the connector of the initial transaction (related (reference) transaction).
- Click Create.
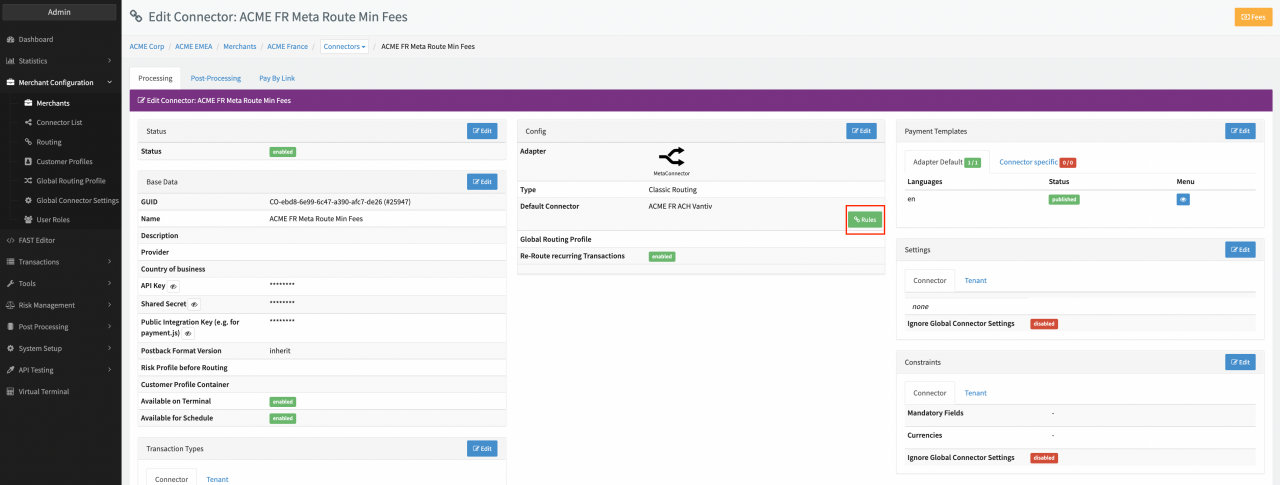
In the Connector Details Overview, click on Rules (in the Connector Config section in the middle of the page) to open the Rule Editor.
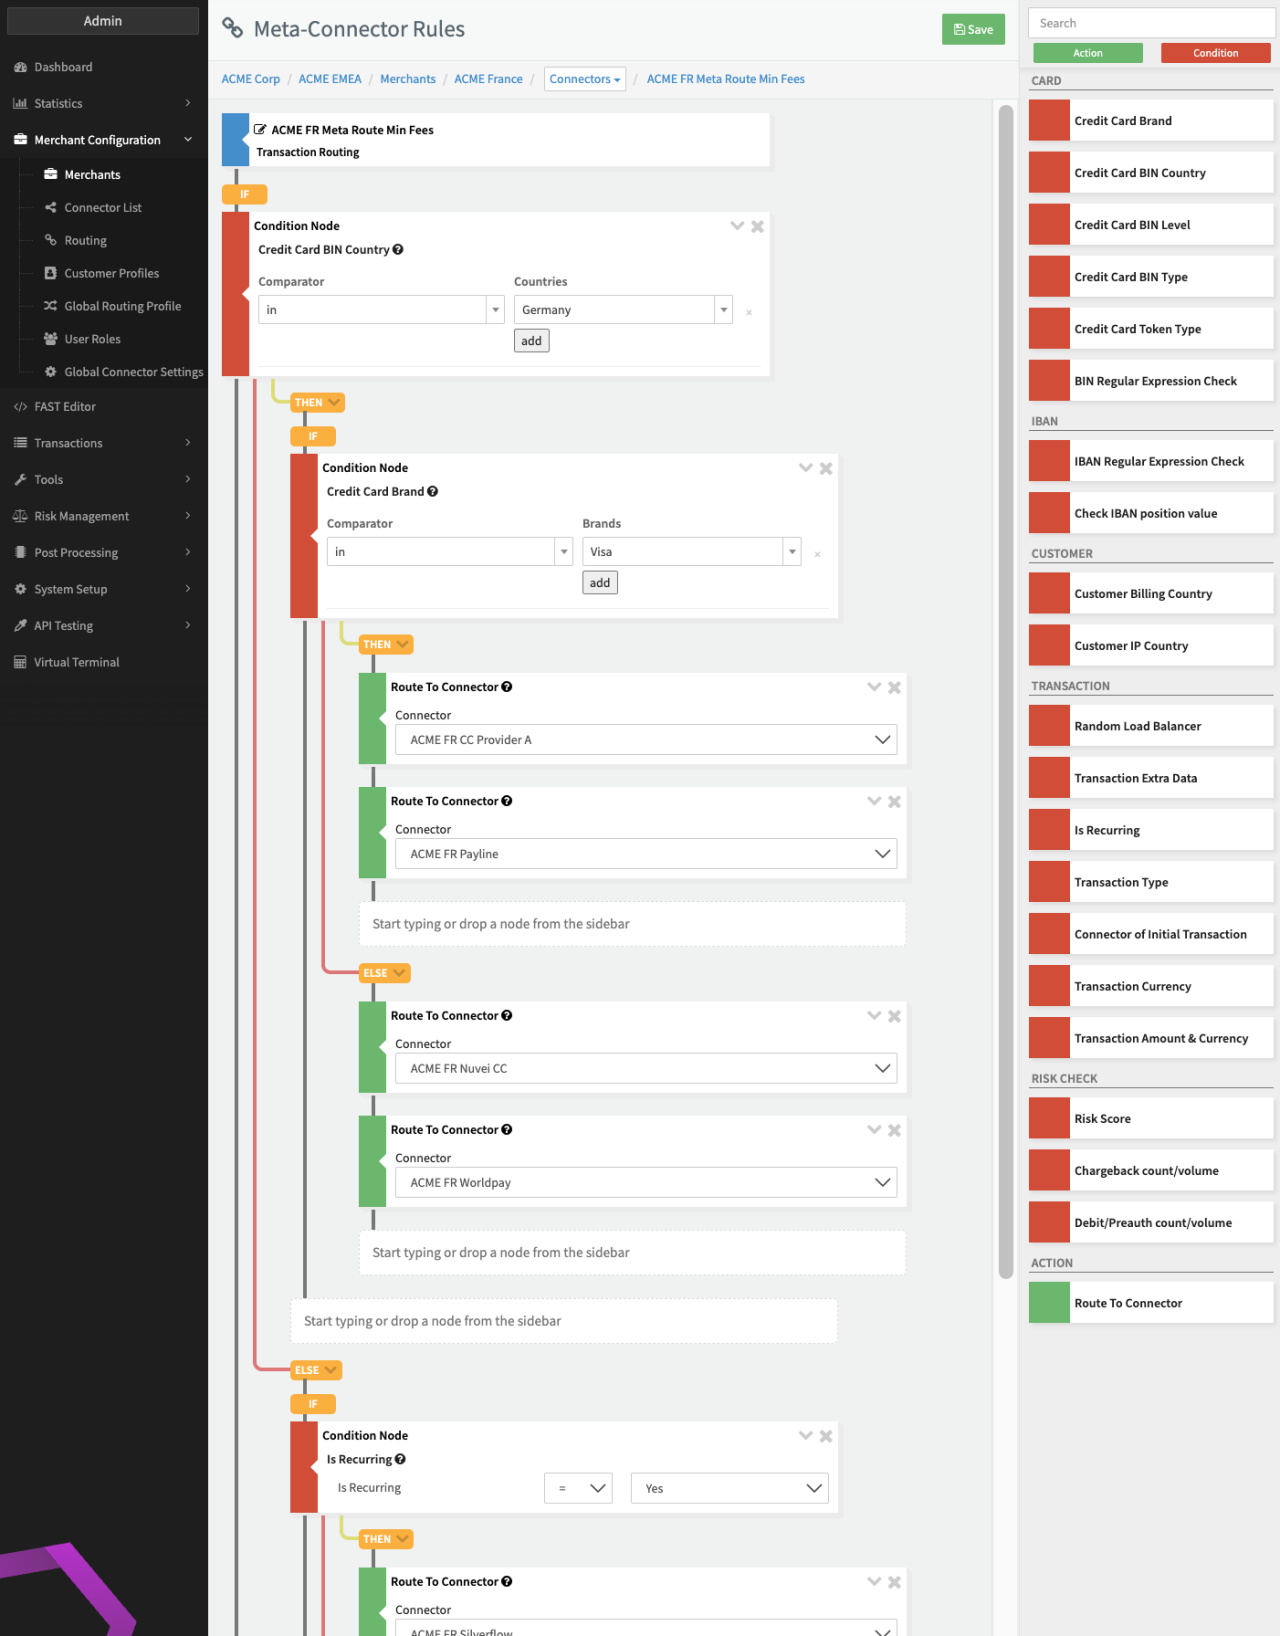
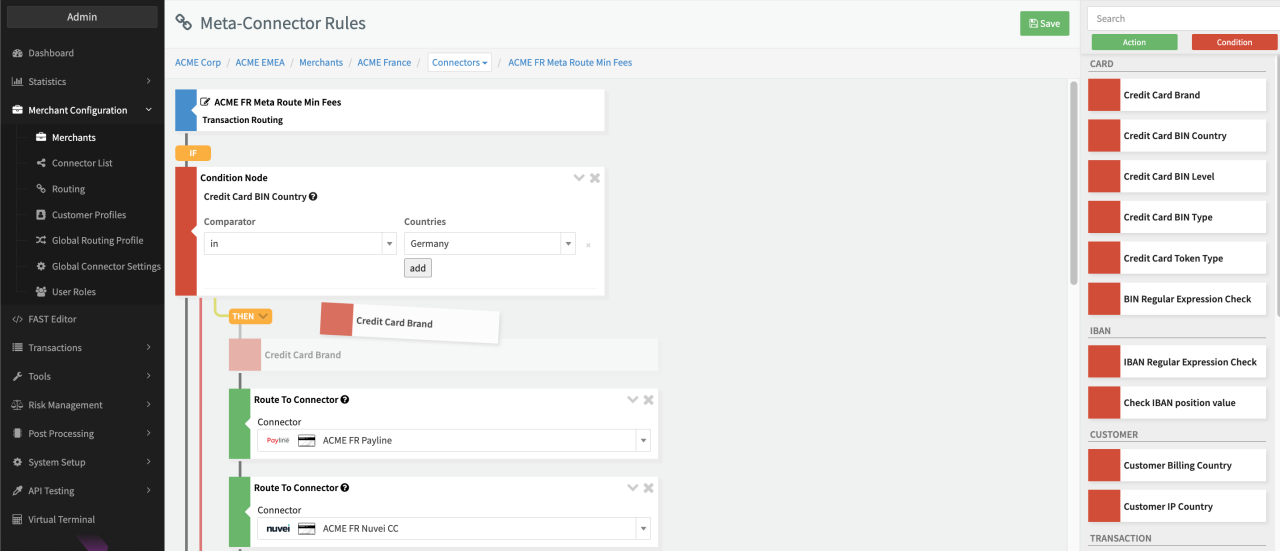
- Set up your individual paths and rules (cascading and routing) (Image 5):
- You can set up various "what if" scenarios such as transaction routing paths to define one or more "Conditions" and their subsequent "Action".
- Drag and drop the "Condition" and subsequent "Action" from the sidebar.
- Click the "Save" button at the top to save your rules.

Available Conditions and Actions
- Conditions:
- Credit Card Brand: Select a brand from the available card brands
- Credit Card BIN Country: Select the BIN country
- Credit Card BIN Level: Select a level from the available card levels/types
- BIN Regular Expression Check: Use regular expressions to route transactions based on the BIN
- IBAN Regular Expression Check: Use regular expressions to route transactions based on the IBAN
- Check IBAN position value: Route transactions based on a specific value at a specific position in the IBAN
- Customer Billing Country: Select the billing country
- Random Load Balancer: Distributes and balances the transaction volume (in percent)
- Transaction Extra Data: Key value based on extra data provided by the merchant in the transaction details
- Is Recurring: Evaluates whether the transaction is a pre-authorize or debit transaction is recurring (having a related (reference) UUId)
- Transaction Type: Select from the available transaction types
- Connector of Initial Transaction: Allows you to use one connector for the very first transaction and a second connector for subsequent transactions
- Risk Score: Perform a risk check before routing. You can choose a different connector for the transaction based on its risk score (e.g. one provider for low risk transactions, and another one for high risk transactions)
- Action:
- Route to Connector: Select the connector you want to use if the conditions is met or in case of failure. If you have two consecutive instances of this action, the second one is only used if the transactions fails with a reasonable decline code via the first connector ("Fail-Over").
Rule Editor
Set up your individual routing, cascading and balancing strategies using the Rule Editor:
- Click on Rules in the Connector Details Overview to open the Rules Editor.
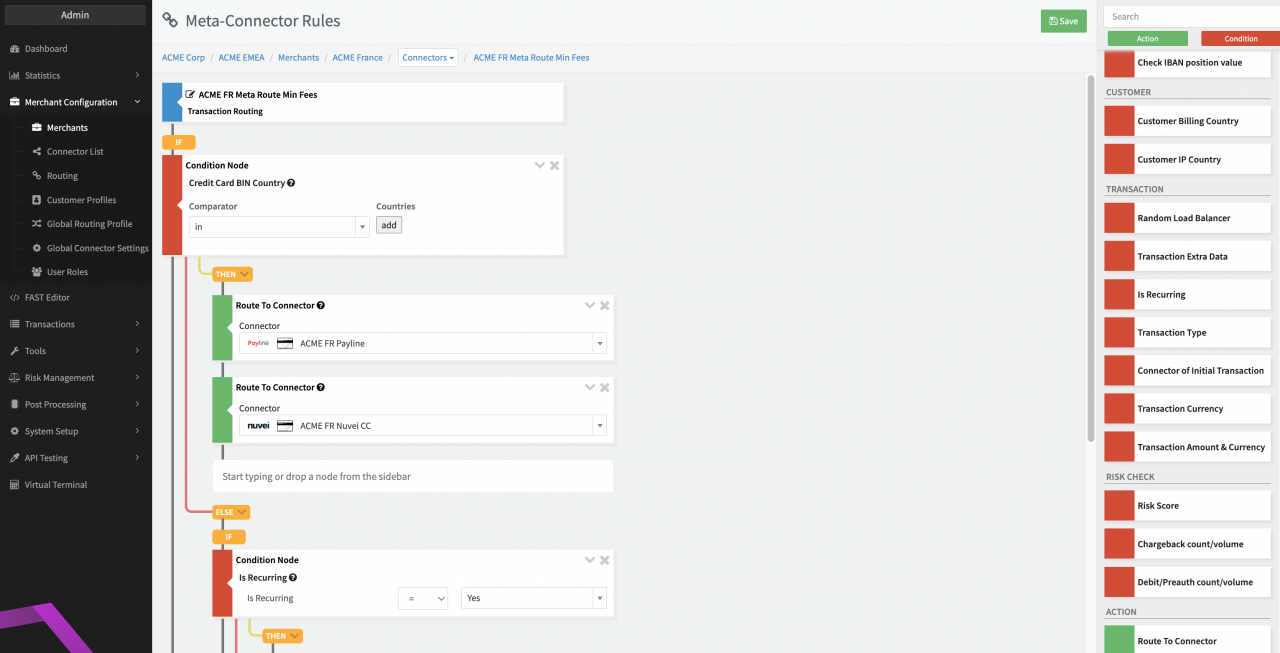
- Select a Condition from the sidebar on the right (see Rule Editor - Routing) and drag it from the sidebar into the existing rule structure on the left. Alternatively, click on the target node in the structure and start typing the name of the condition you want to add (see Rule Editor - Condition Configuration).
- Configure the Condition Node accordingly (see section Conditions & Actions).
- Each added condition will automatically generate an then / else branch were you can either
- Add further conditions, or
- Add an action to be performed
- Click Save to save your Routing Rule Configuration
In theory there is no limitation regarding the depth of branches, but we recommend to keep the structure as simple as possible in order to maintain the Routing Rules properly. You can hide the content of nodes or even delete nodes any time.
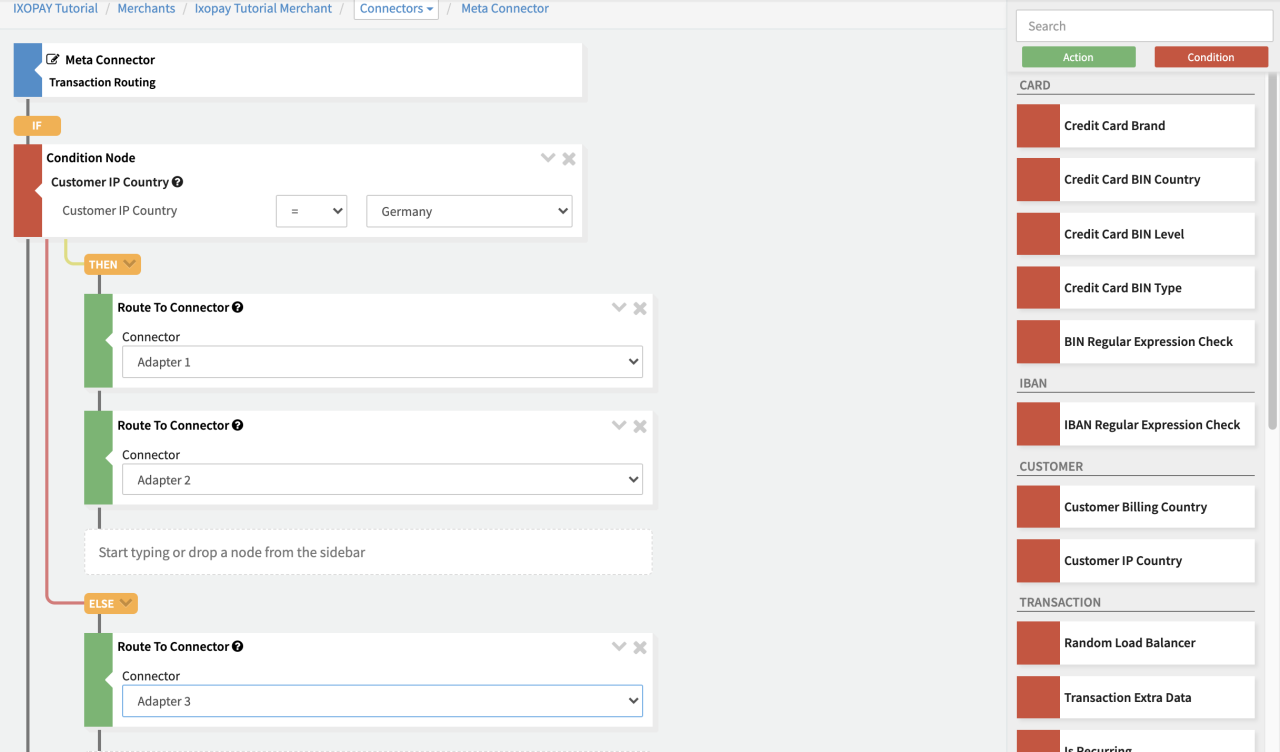
Conditions & Actions
For each Condition, the transactions' card, IBAN, customer, transaction or risk data is compared with the configured rule. The outcome (either true or false) defines which path/branch (then or else) is taken. As described above, each branch can either be an Action, or another Condition. Actions do not branch further and are the final step of a branch. They determine which connector is used to process the transaction. You can configure Fallback Actions (see Rule Editor - Fallback) by adding another action directly following an action. These fallback actions will only be executed if the transaction fails with a reasonable decline code (see Fallback section).
Conditions split into additional branches until ending with an action as the final step or. If no action is defined, the selected default connector is used.
| Card Data | Description |
|---|---|
| Credit Card Brand | Compares the brand of the credit card |
| Credit Card BIN Country | Compares the BIN country of the credit card |
| Credit Card BIN Level | Compares the BIN level of the credit card |
| Credit Card BIN Type | Compares the BIN type of the credit card |
| Credit Card Token Type | Compares the token type (Creditcard, Passthrough, Apple Pay, Google Pay) |
| BIN Regular Expression Check | Compares the BIN with the defined regular expression |
| IBAN Data | Description |
|---|---|
| IBAN Regular Expression Check | Compares the IBAN with the defined regular expression |
| Check IBAN position value | Compares the IBAN with a specific value at a specific position |
| Customer Data | Description |
|---|---|
| Customer Billing Country | Compares the billing country of the customer |
| Customer IP Country | Compares the country of the customer's IP address |
| Transaction Data | Description |
|---|---|
| Random Load Balancer | This condition has a random chance to be true based on the given percentage |
| Transaction Extra Data | This condition compares an extra data value with the given value |
| Is Recurring | Checks if the transaction is recurring (having a related (reference) UUId) |
| Transaction Type | Compares the type of transaction |
| Connector of Initial Transaction | Checks if the connector in the initial Transaction is the specified connector |
| Transaction Currency | Compares the transaction currency |
| Transaction Amount & Currency | Compares the transaction (base or specific currency) amount |
| Has Reference Scheme Transaction | Compares if a credit card transaction has a reference scheme transaction ID, either directly provided or taken from the related / referenced transaction |
| Risk Check Data | Description |
|---|---|
| Risk Score | Compares the transactions risk score |
| Chargeback count/volume | Compares either the chargeback count or value of either the merchant or a specific connector. A reference time can be specified. |
| Debit/Preauth count/volume | Compares either the debit/preauth count or value of either the merchant or specific connector. A reference time can be specified. |
| Comparison Operator | Description |
|---|---|
| in | Compares the value against the list of specified values. Returns true if the value is in the list. |
| not in | Compares the value against the list of specified values. Returns true if the value is NOT included in list. |
| = | Compares the value against a specific value. Returns true if the values are equal. |
| != | Compares the value against a specific value. Returns true if the values are NOT equal. |
| > | Compares the value against a specific value. Returns true if the transaction value is greater than the comparison value. |
| >= | Compares the value against a specific value. Returns true if the transaction value is greater than or equal to the comparison value. |
| < | Compares the value against a specific value. Returns true if the transaction value is less than the comparison value. |
| <= | Compares the value against a specific value. Returns true if the transaction value is less than or equal to the comparison value. |
| Actions | Description |
|---|---|
| Route to Connector | Select the connector to route the transaction to from the list of available connectors |
Deleting a node removes all child nodes and branches.
Configuring Fallback Routing
Certain error codes are considered "recoverable" failures, because the reason for failure is down to either a misconfiguration or a technical issue upstream at the provider level. Non-recoverable errors will occur irrespective of the provider.
Unlike the smart routing configuration, where you need to define conditions in order to apply routing, fallback routing does not require any conditions. The purpose of fallback routing is to recover transactions declined by one provider (Provider A) and send the same transaction to another provider (Provider B) without any customer interaction. Customers will not notice any issues with the first provider, as the transaction is routed to another PSP by the IXOPAY platform in the background.
Set up your backup provider
Create your Meta-Connector or use an existing one (see above).
- Open the rules for the Meta-Connector.
- Define the desired conditions used for smart routing (optional).
- Add the action "Route to Connector".
- Select the first connector you want to send transactions to.
- Add the backup connector immediately after the primary connector, without any additional conditions.
What happens to transactions processed via this Meta-Connector?
- Based on the conditions you defined, your transaction is sent to Provider A.
- If Provider A declines your transaction with a soft decline reason code, the transaction is automatically routed to Provider B.
- If Provider A declines your transaction with a hard decline reason code (meaning a non-recoverable failure), your transaction will always fail and therefore is not routed to Provider B to reduce your costs.
Hard decline messages (non-recoverable failures)
- 2006 - INSUFFICIENT_FUNDS
- 2010 - FRAUDULENT_CARD
- 2008 - INVALID_CARD
- 2009 - EXPIRED_CARD
- 2001 - ACCOUNT_CLOSED_EXTERNALLY
- 2004 - QUOTA_REGULATION
- 2013 - RISK_CHECK_BLOCK
- 2014 - PICKUP CARD
- 2015 - LOST CARD / CARD IS CLAIMED AS LOST
- 2016 - STOLEN CARD
- 2021 - SECURE_3D_FAILED
Fallback does not apply for transactions of type: void, capture, refund