Multi-Method Connector
Beside customizable payment pages, it is possible to create a payment page which prompts the customer to choose his/ her desired payment method. In a nutshell a Multi-Method (Meta-)Connector can present any payment method available on the Merchant's website using configured Connectors. In the Meta-Connector configuration you can decide which payment methods should be available for customers (Availability Rules) and which Connector should be used (Routing Rules) based on different predefined criteria. This section will guide you through the configuration of a Multi-Method (Meta-)Connector and creation of an appropriate payment selection page.
Video: Meta Connector

Before we get started with the Multi-Method (Meta-)Connector and related payment selection page, it is important to note that the setup requires already created Connectors. The very first step for you is therefore to create connectors for each payment method you want to offer. If you already have configured Connectors you may use those of course instead of creating new ones. However, it is advisable to create new Connectors if you wish to use different Connector configurations (especially for the payment selection page).
Create Multi-Method (Meta-)Connector
Before you can setup a payment selection page, you need to create a so-called Meta-Connector:
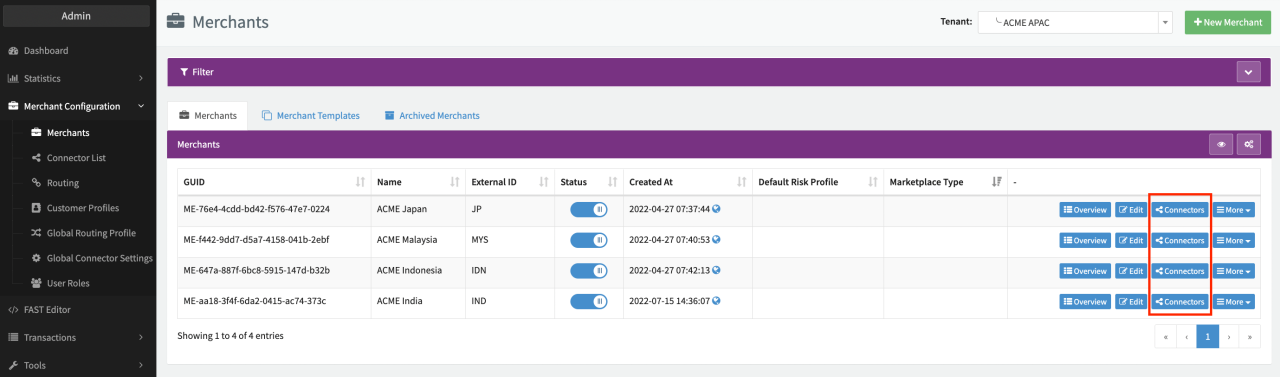
- From the Merchant Overview navigate to the Connectors Overview of the Merchant for which you want to create the Multi-Method (Meta-)Connector
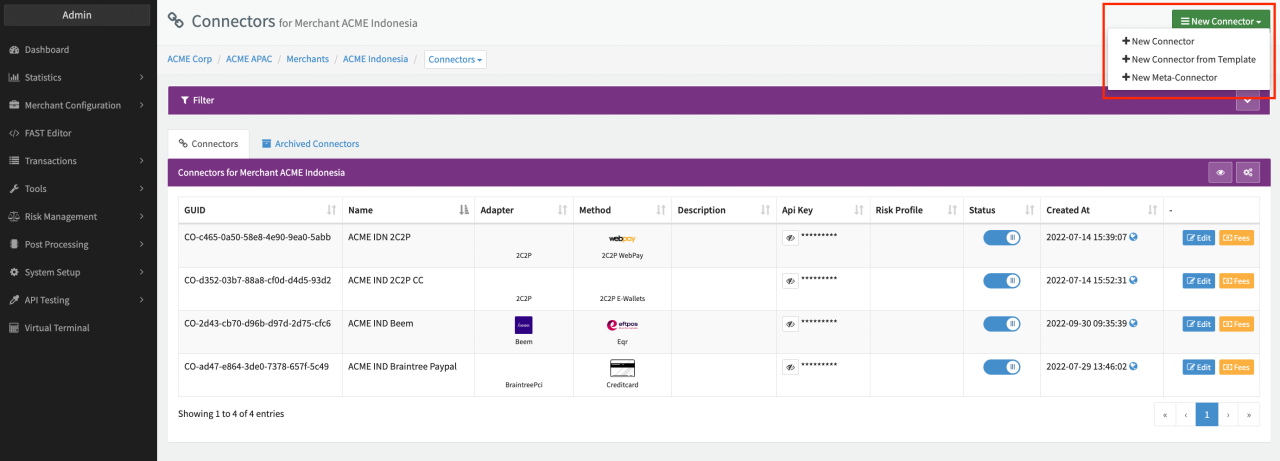
- From the New Connector dropdown select the option + New Meta-Connector (see Connector Overview)
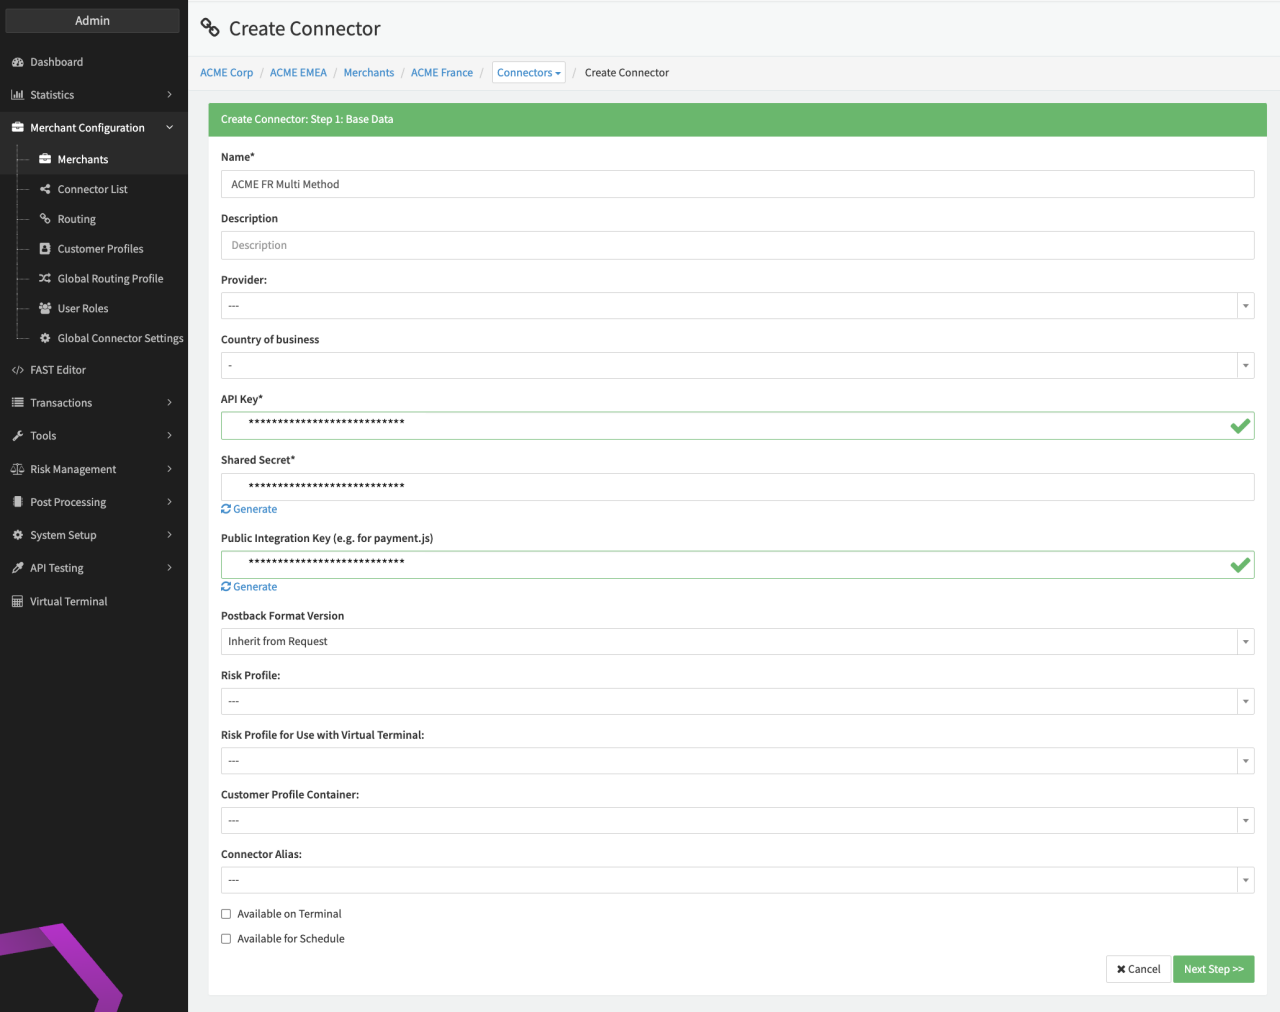
- Fill in the Connector Base Data (see Connector Base Data)
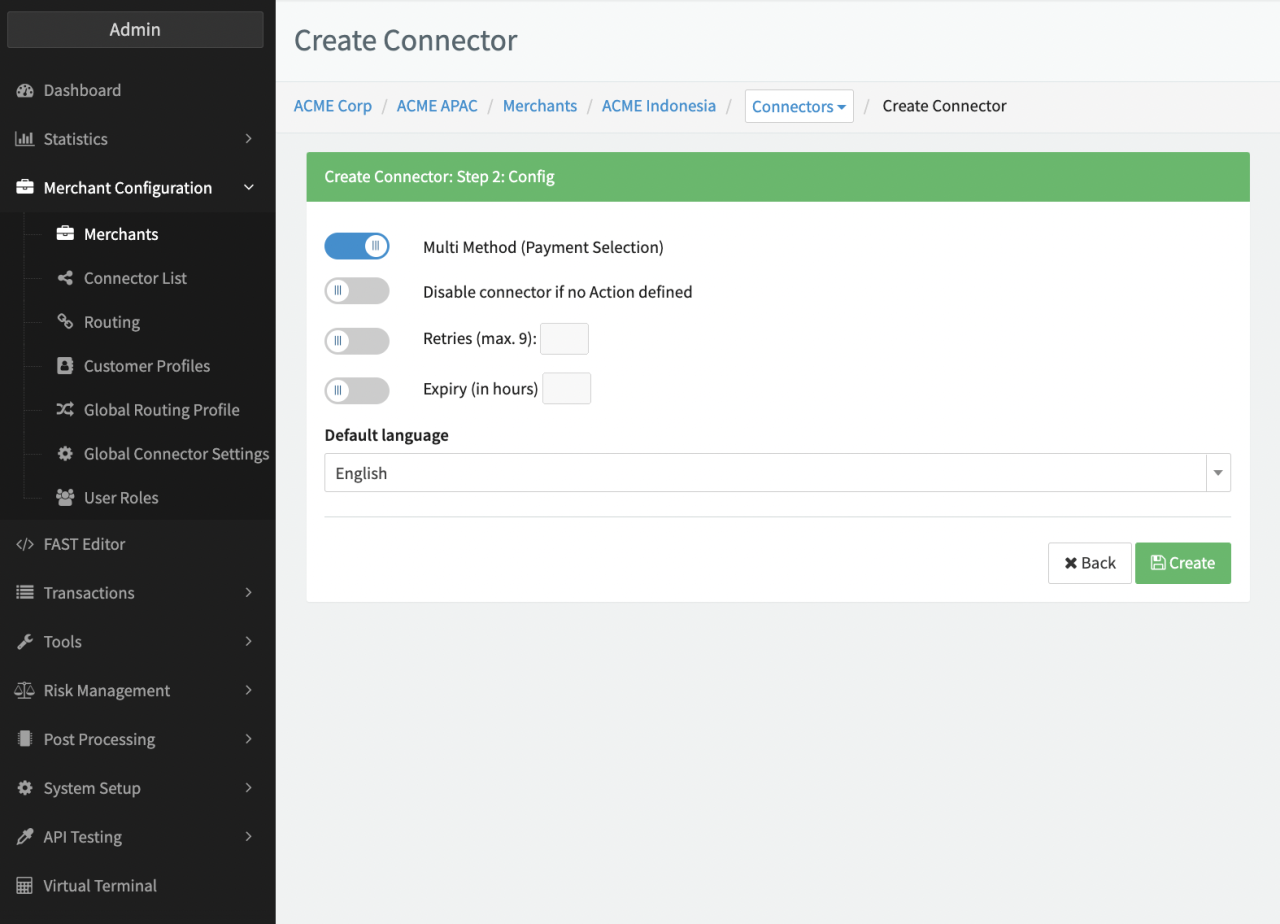
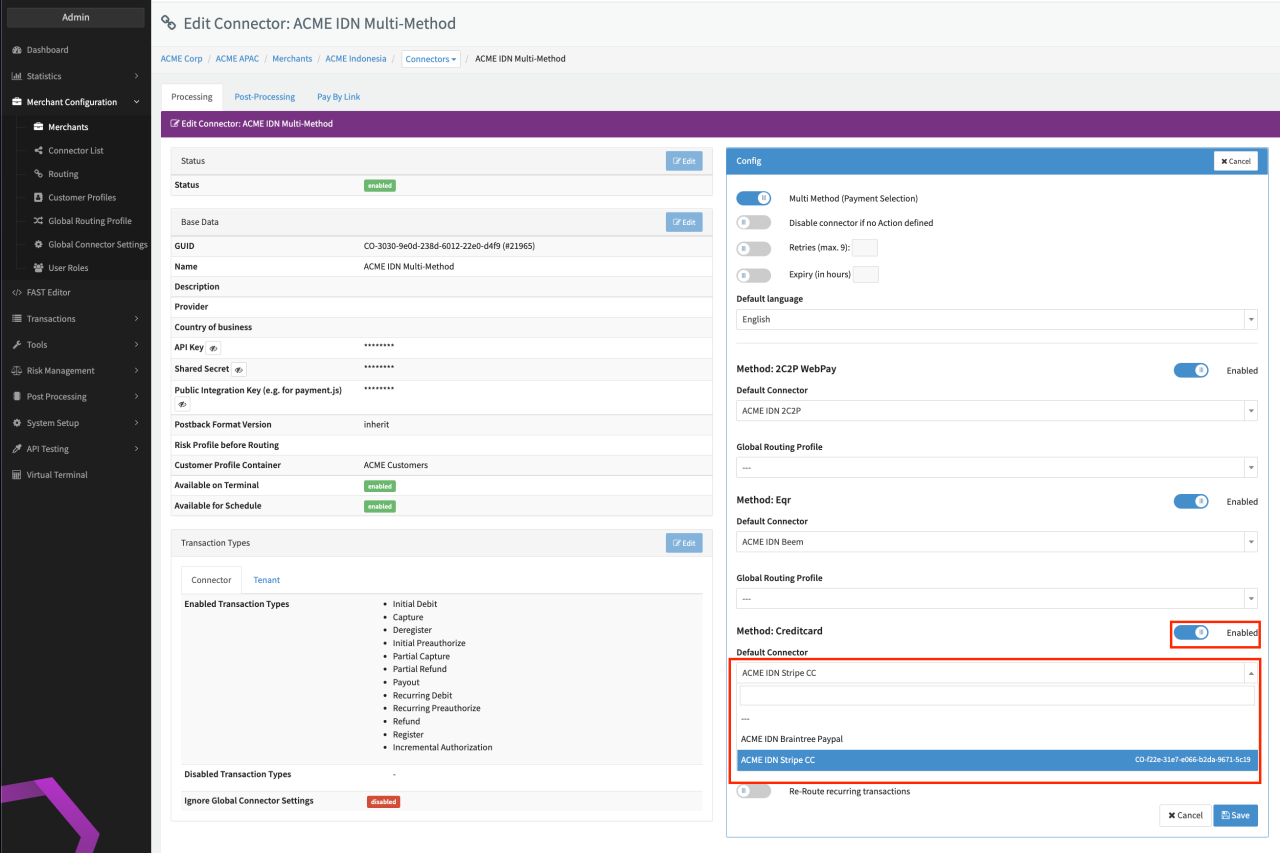
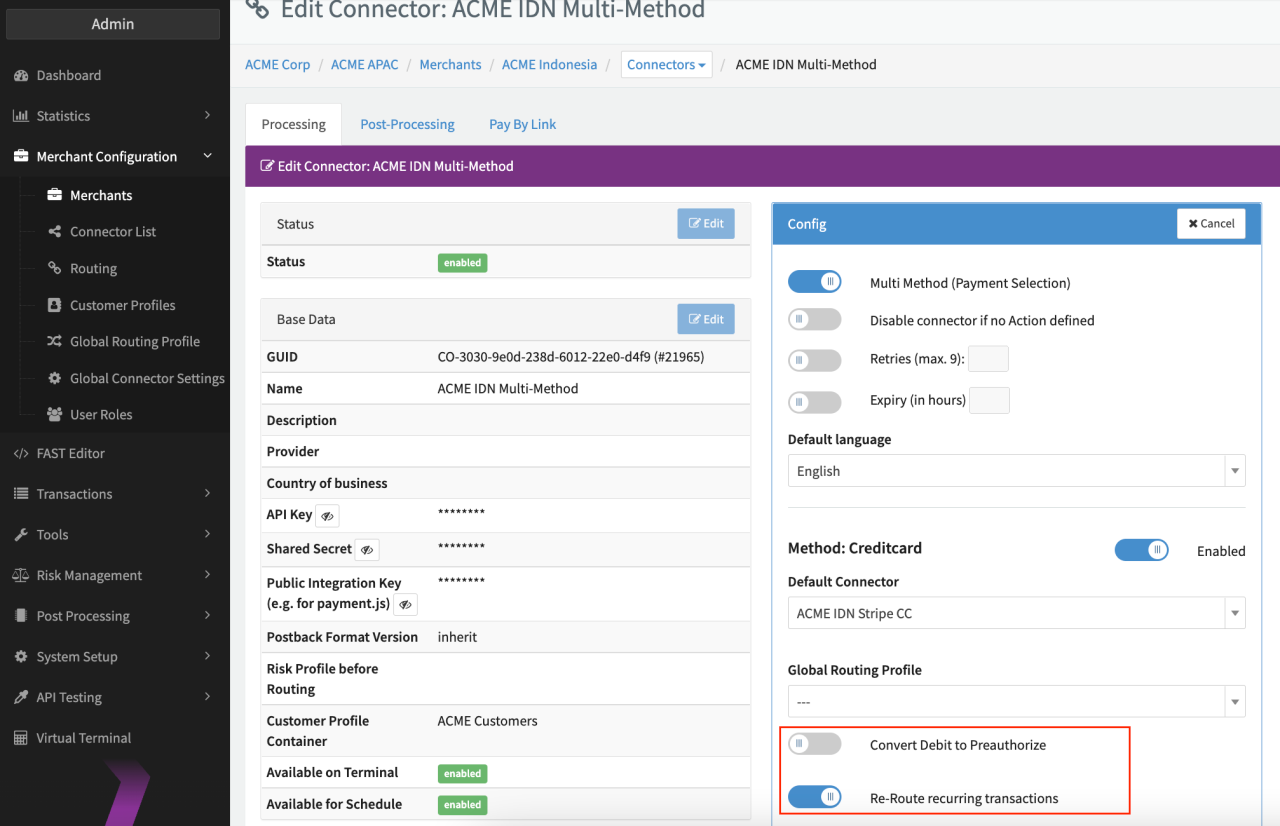
- Enable the option Multi Method (Payment Selection) and all other applicable options:
- Enable/Disable option Disable connector if no Action defined (see section Availability Rules - Payment methods)
- Enable/Disable option Retries (max. 9) and fill in the desired value
- Enable/Disable option Expiry (in hours) and fill in the desired value —This parameter will set the Hosted Payment Page as expired (no impact on transaction states).
- Click Create
The Meta-Connector is now considered a Multi-method Meta-Connector and you will get redirected to the Connector Details Overview.
After creation your Multi-Method (Meta-)Connector can be edited any time as described for Connectors.
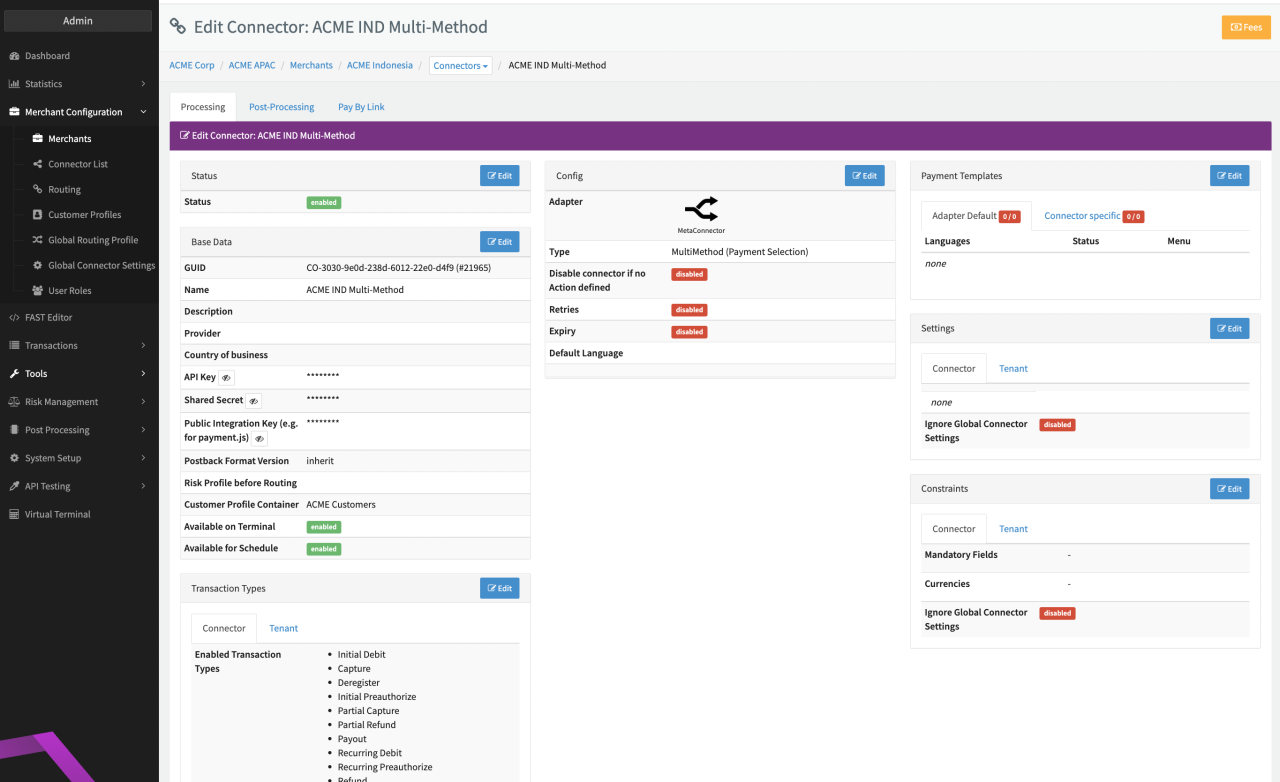
Connector Configuration - Payment methods
Let's start with the configuration of payment methods.
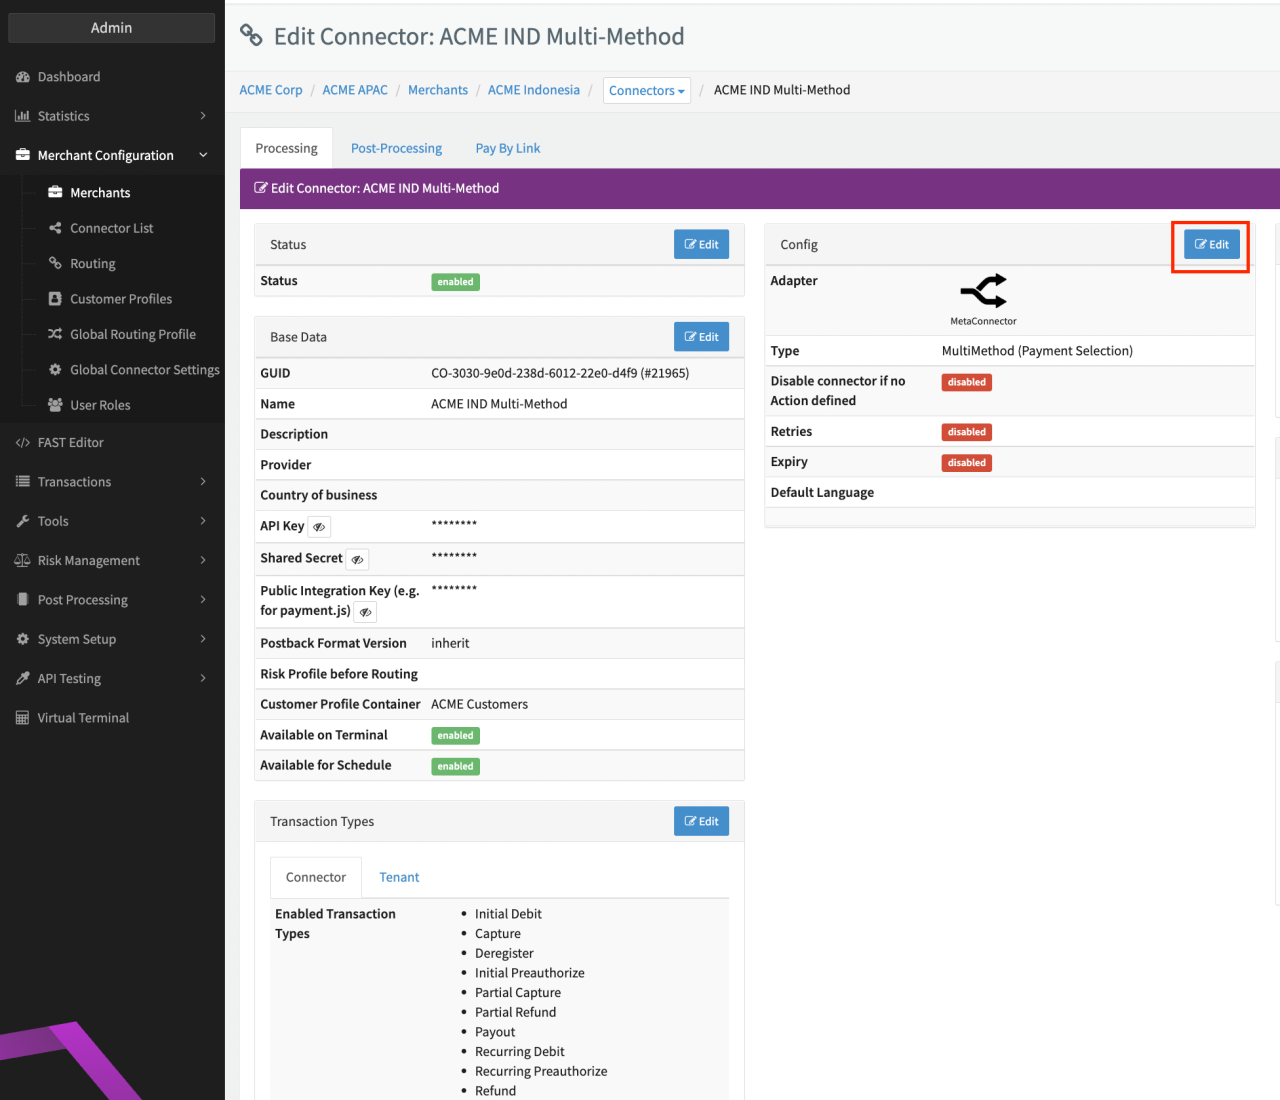
- Click Edit in the Connector Details Overview of your Multi-Method Connector
- Select a Default Connector per payment method from the drop-down. All configured Connectors for this payment method are shown in the drop-down (see Default Drop-down).
- Enable/Disable the payment method
- Optional select a Global Routing Profile from the drop-down (see Global Settings for further information)
- Click Save
The list of available payment methods will vary, depending on the configured Connectors for this Merchant. If you do not want to include a payment method in your payment selection page independently of Availability Rules, do not enable the payment method, otherwise see the Availability Rules section for advanced configuration options to show payments method in the payment selection page. Apart from a Default Connector, you can also configure advanced Routing Rules per payment method (see section Routing Rules).
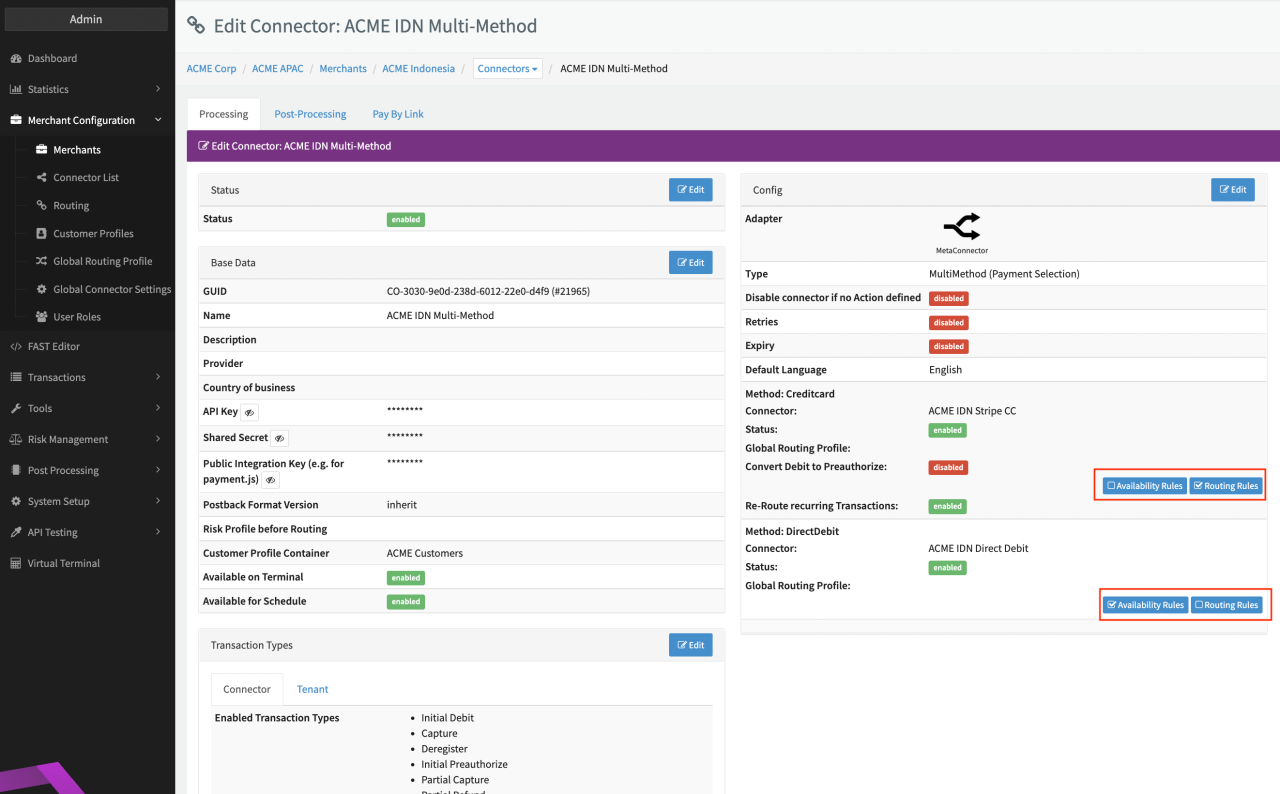
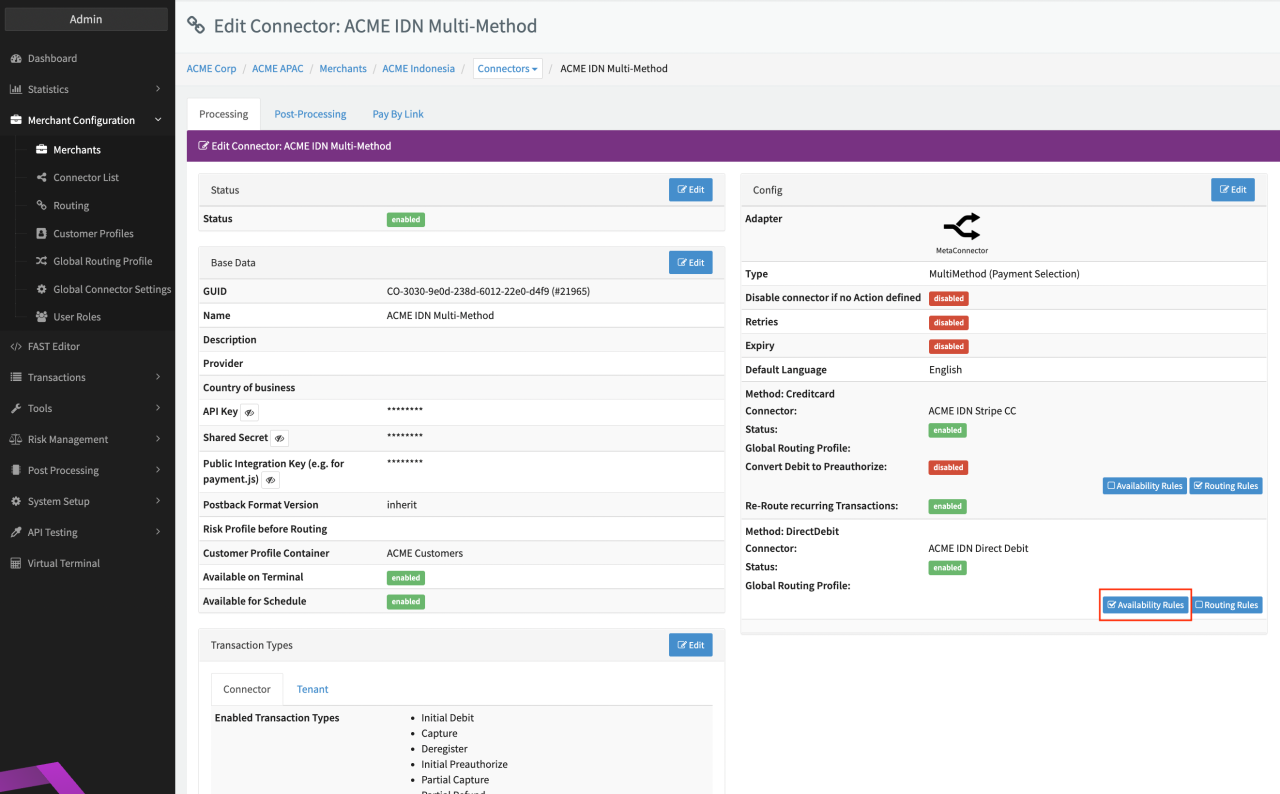
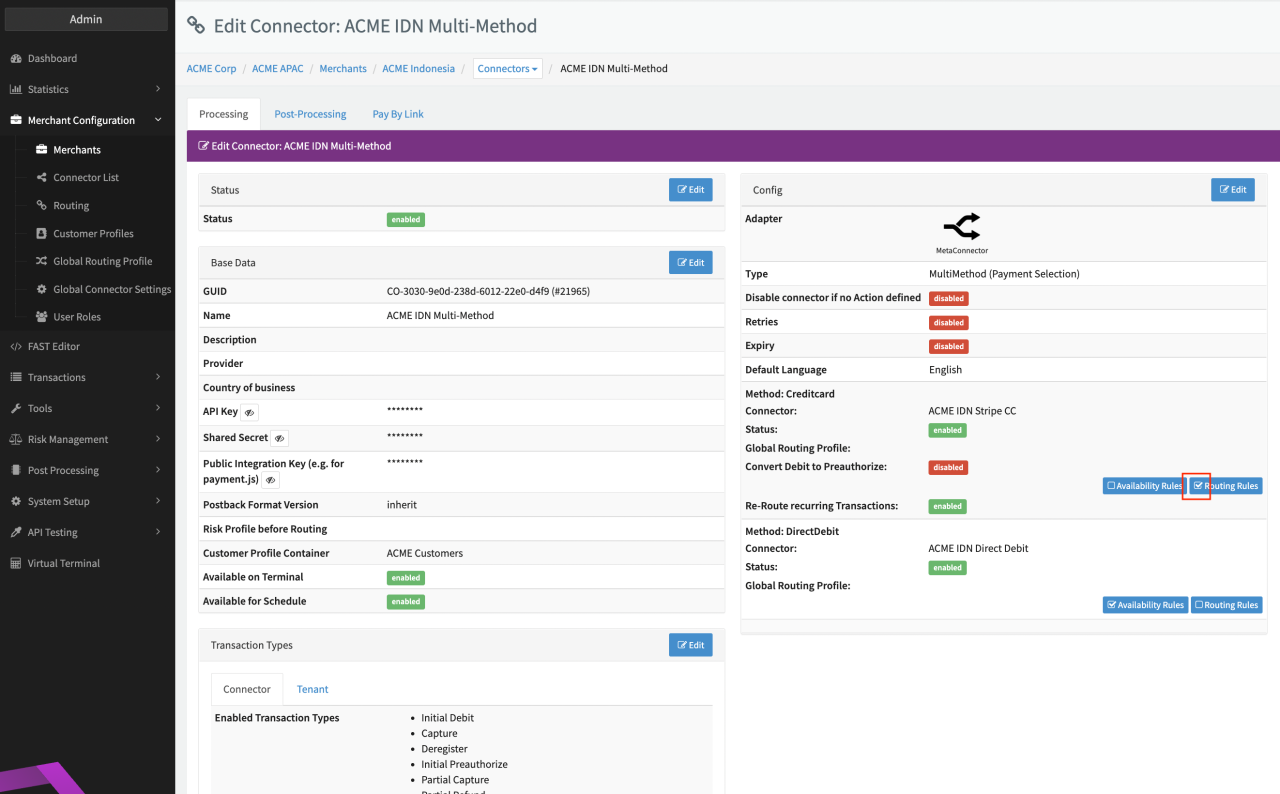
For each enabled payment method the Config section of the Connector Details Overview shows now to Buttons Availability Rules and Routing Rules.
When adding new Connectors to Merchants, the configured payment method will automatically become available on the Multi-Method (Meta-)Connector in case it was not available before. The payment method will be disabled per default. Payment methods will be automatically disabled if no Default Connector is configured.
Availability Rules — Payment methods
For all enabled payment methods you have the option to configure rules to define if the payment method is available for selection in the payment selection page (e.g. the Direct Debit payment option should only be made available for customers where the Transaction uses EUR as currency). Follow these steps to configure Availability Rules:
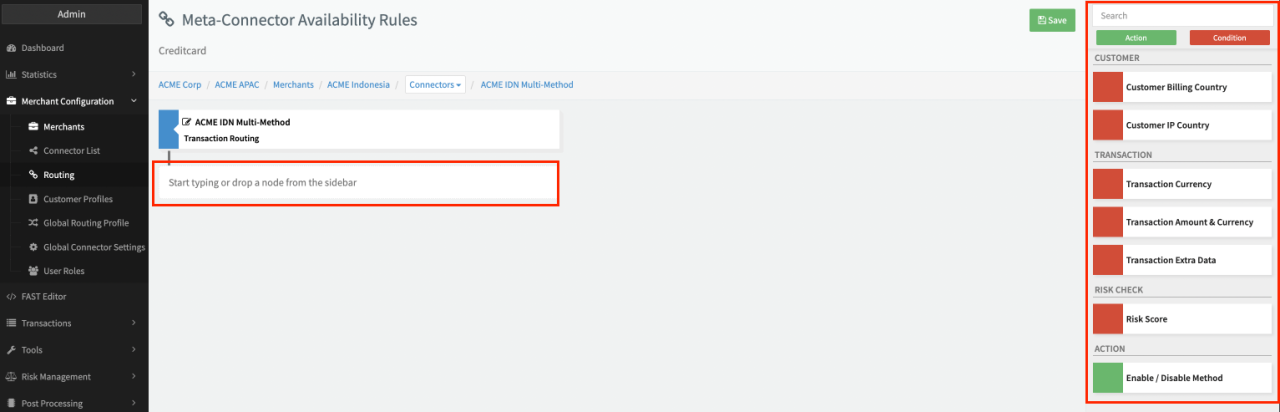
- Click Availability Rules for the payment method you wish to configure (see Connector Details Overview - Availability Rules and Routing Rules)
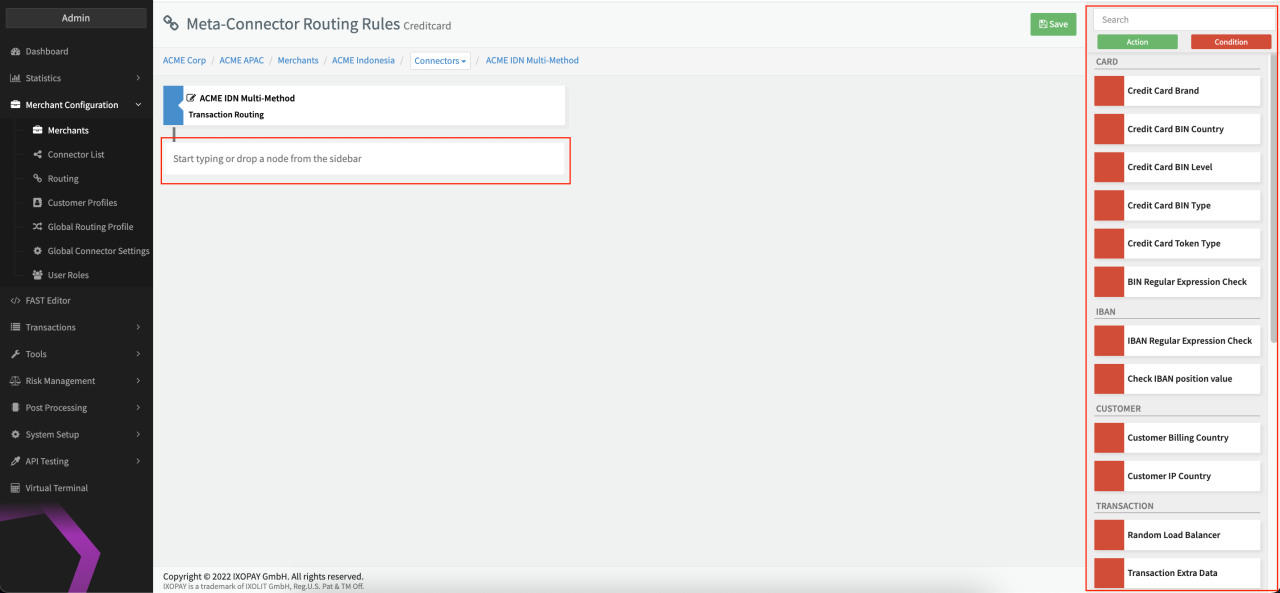
- In the Rule Editor, select a condition from the sidebar on the right (see Rule Editor - Availability)
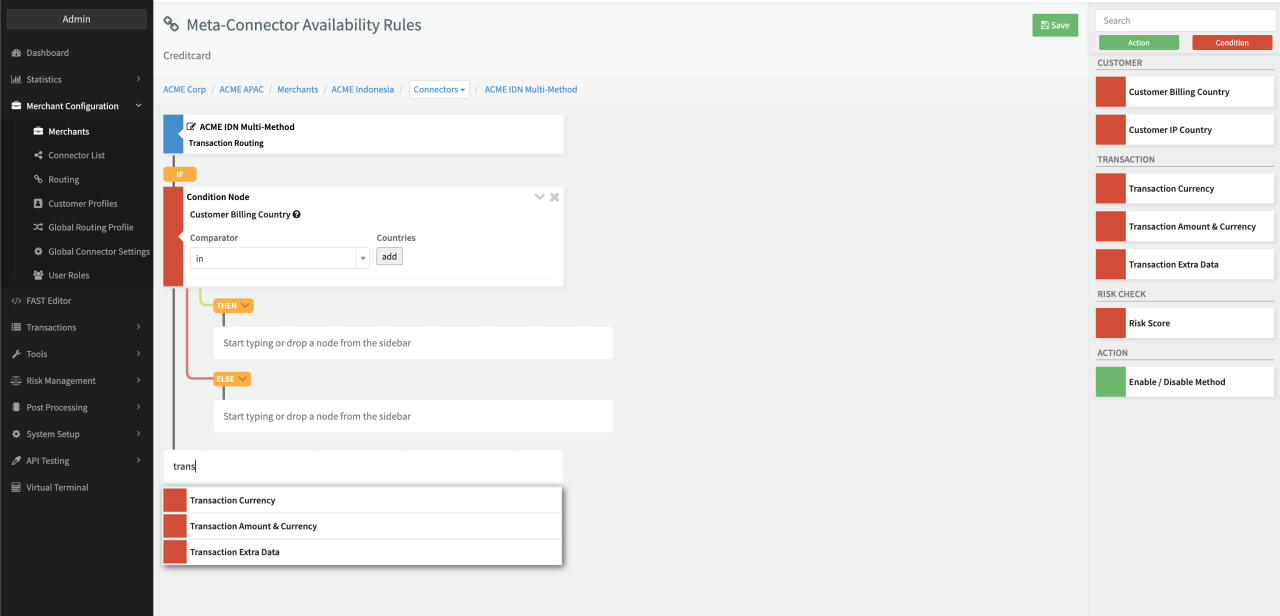
- Place the condition via drag and drop from the sidebar in the existing rule structure on the left. Alternatively, click on the node and start typing the condition you want to add. (see Rule Editor - Condition Configuration)
- Configure the Condition Node accordingly (see section Conditions & Actions)
- Each added condition will automatically generate an then / else branch were you can either
- Add further conditions, or
- Add an action to be performed (see Rule Editor - Rule Tree)
- Click Save to save your Availability Rule Configuration
In theory there is no limitation regarding the depth of branches, but we recommend to keep the structure as simple as possible in order to maintain the Availability Rules properly. You can hide the content of nodes or even delete nodes any time.
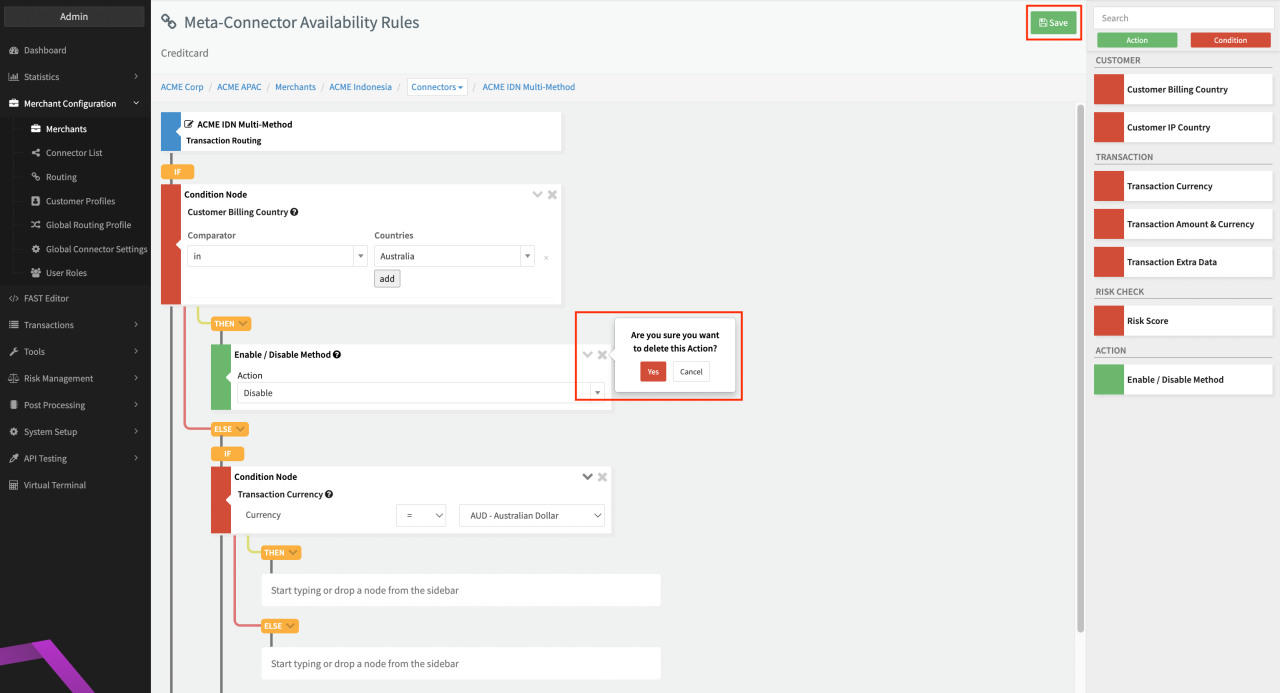
Deleting a node with branches removes all following nodes of this branch.
Conditions & Actions
For each Condition the transactions' customer, transaction or risk data is evaluated against the configured rule. The outcome (either true or false) defines which path/branch (then or else) is taken. As described above, each branch can either be an Action, or another Condition. Actions do not branch further and thereby mark the final step for this branch. They determine if the payment method will be Enable[d] or Disabled[d] and therefore will be available to customers. Consequently, Conditions will split in further branches until ending in an Action as final step or, in case no Action is defined, will automatically enable this payment method using the selected Default Connector.
Enable the setting Disable Connector if no Action defined (see section Create Multi-Method (Meta-)Connector), if you do not want to enable Payment Methods in case conditions lead to a node with no defined Action.
Customer conditions
| Customer conditions | |
|---|---|
| Customer Billing | Checks the customer's billing country against the selected Countries |
| Customer IP Country | Checks the customer's country based on their IP against the selected Country |
Transaction Conditions
| Transaction Conditions | |
|---|---|
| Transaction Currency | Checks the Transaction currency against the selected Currency |
| Transaction Amount & Currency | Checks the Transaction amount Base Amount or selected currency against a configured amount. Comparator for check can be selected. (Transaction amount will be converted into the selected currency) |
| Transaction Extra Data | Checks the Transaction Extra Data (to be sent by Merchant) against a configured value. Comparator for check can be selected. |
Risk Conditions
| Risk Conditions | |
|---|---|
| Risk Score | Checks the Risk Score against the configured score. Comparator for check can be selected. |
Actions
| Actions | |
|---|---|
| Enable/ Disable Method | Enables/Disables the method to be available for customer based on the conditions you have defined. |
Comparator
| Comparator | |
|---|---|
| in | Checks the value against the list of specified values. Results true if value is included in list. |
| not in | Checks the value against the list of specified values. Results true if value is NOT included in list. |
| = | Checks the value against a specific value. Results true if values are equal |
| != | Checks the value against a specific value. Results true if values are NOT equal |
| > | Checks the value against a specific value. Results true if the checked value is greater than the specific value. |
| >= | Checks the value against a specific value. Results true if the checked value is greater or equal than the specific value. |
| < | Checks the value against a specific value. Results true if the checked value is smaller than the specific value. |
| <= | Checks the value against a specific value. Results true if the checked value is smaller or equal than the specific value. |
Availability Rules — Example
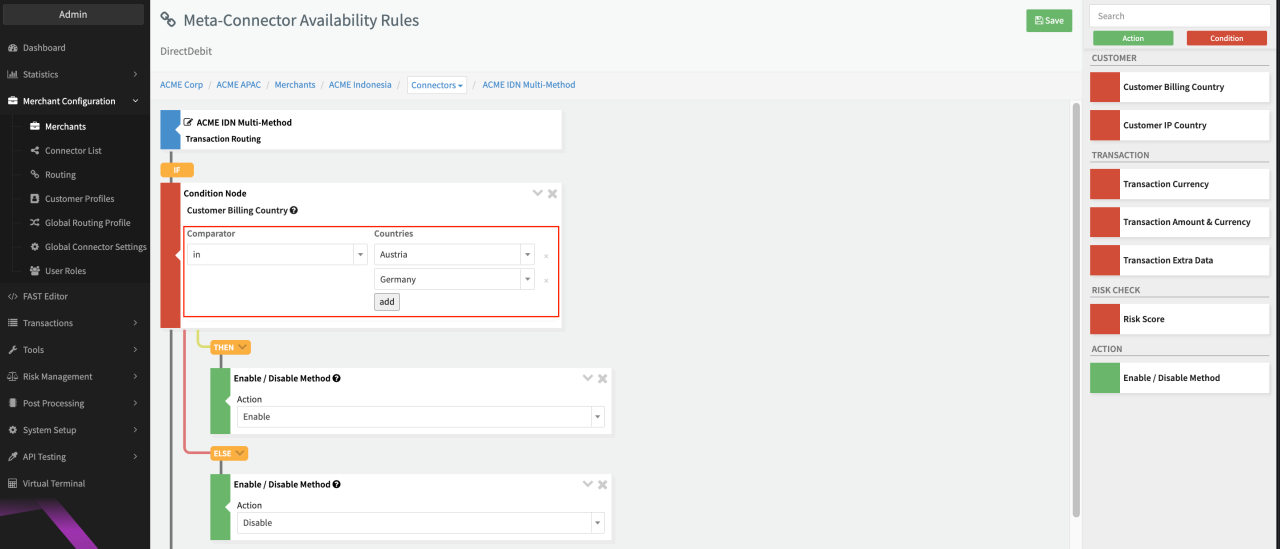
Let's assume we want to offer Direct Debit payments only to customers with billing country Austria or Germany. This is done by adding a condition to check the billing country of the customer.
- Navigate to the Availability Rules for Payment Method Direct Debit of your Mulit-Method (Meta-)Connector (see Connector Details Overview - Multi-Method)
- Either drag&drop or type the Condition Customer Billing Country
- Configure the Condition by selecting the Comparator in and adding Countries Austria and Germany (see Availability Rule - Example)
- Either drag&drop or type the Action Enable/Disable to both, the then / else branch:
- For the then branch select the Action Enable, since this branch will be taken if the Condition evaluation results in true.
- For the else branch select the Action Disable, since this branch will be taken if the Condition evaluation results in false.
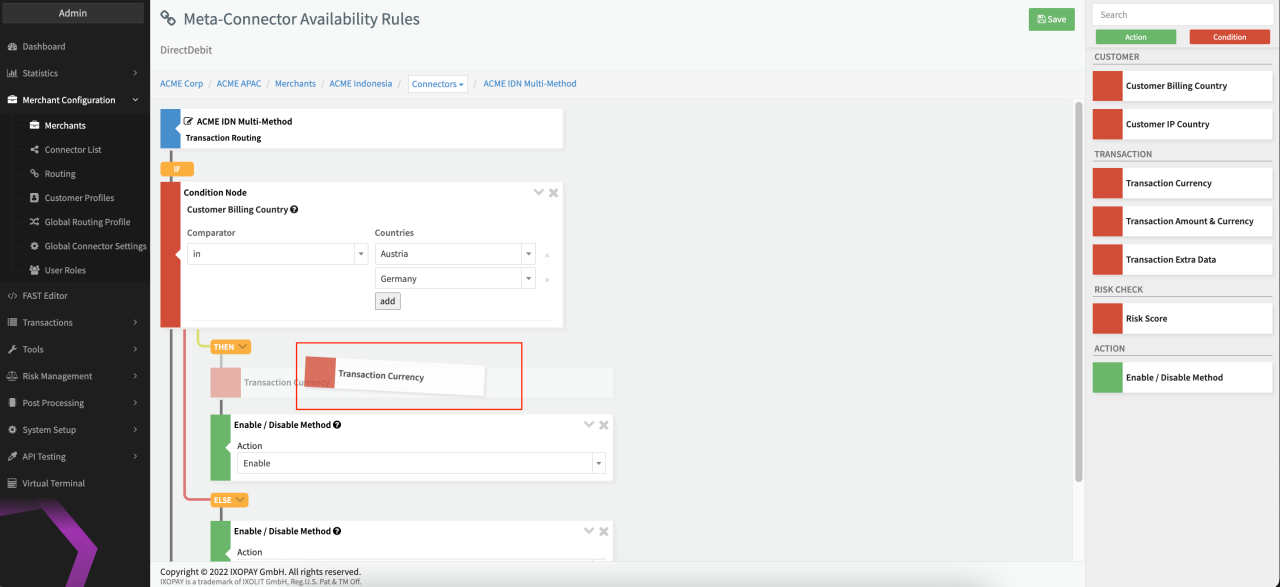
We have now created a working rule set which exclusively allows customers with their billing country being Austria or Germany to choose Direct Debit payments! Let's adjust our rule set by adding another step to this Condition to make sure only Transactions in EUR currency are allowed:
- Drag&drop the Condition Transaction Currency between the then label and the Enable/ Disable Action branch (see NestedCondition) to create a nested Condition
- Configure the Condition adjusting the Transaction Currency to EUR - Euro
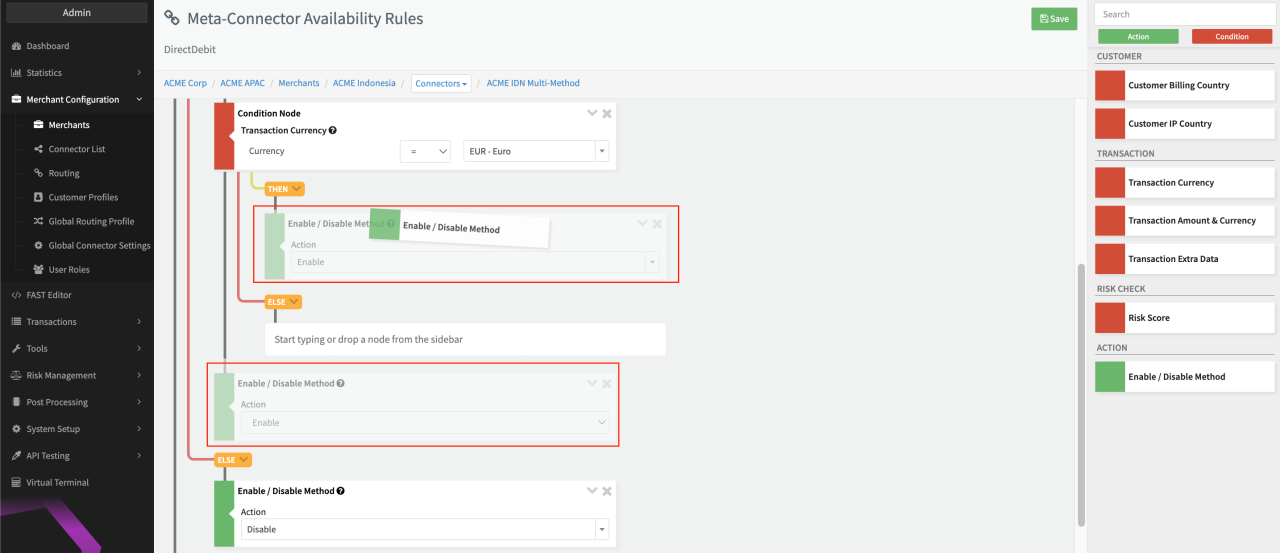
- Move the Enable Action used in the original then branch of the condition Customer Billing Country to the then branch of the condition Transaction Currency (see Moving Nodes)
- Either drag&drop or type the Action Enable/Disable to the else branch of the condition Transaction Currency and select Disable (see Availability Rule - Example adjusted)
- Click Save
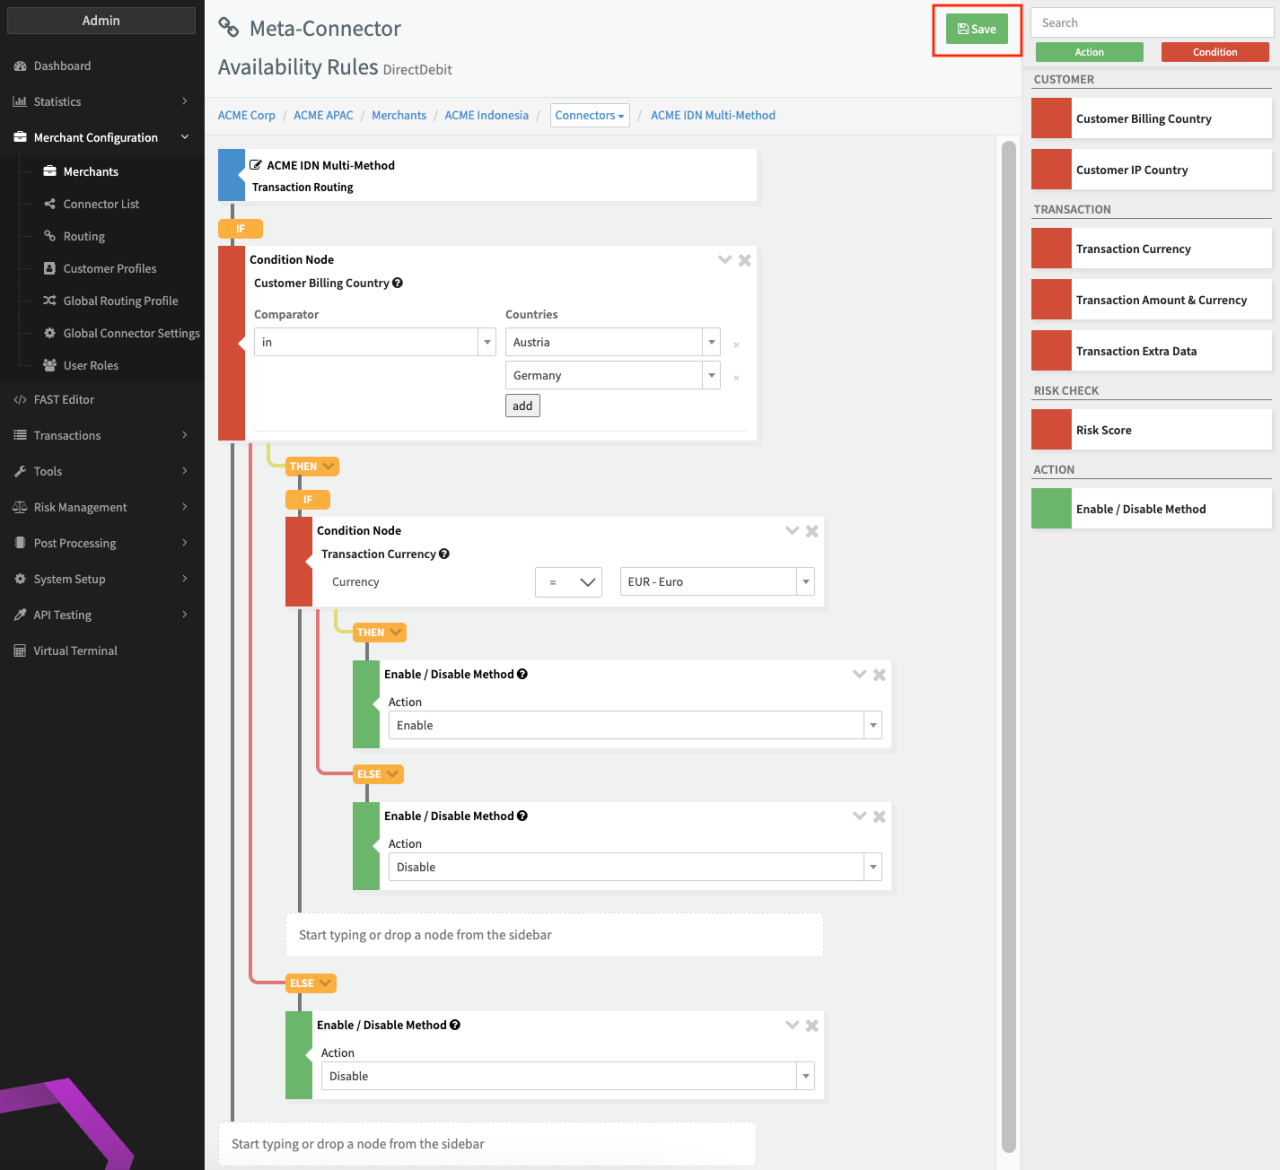
It might look confusing at first, but it is actually quite straightforward. What this rule set does is:
- Check if the Customer Billing Country in the list of accepted countries (Austria, Germany)
- If yes: Is the Transaction Currency EUR - Euro?
- If yes: Enable the payment method
- if no: Disable the payment method
- If no: Disable the payment method
- If yes: Is the Transaction Currency EUR - Euro?
By nesting multiple conditions it is possible to make complex and dynamic decisions on whether a payment method should be made available to a customer or not.
Conditions or Actions which are logically invalid are automatically discarded upon saving.
Filter via Extra Data
You can also narrow the set of visible payment methods at request time by passing a paymentMethod or paymentMethods
key in the extraData field of the transaction request — without touching the connector's Availability Rules.
To show a single payment method only:
{
  "extraData": {
    "paymentMethod": "Creditcard"
  }
}
To show multiple payment methods, pass a comma-separated list:
{
  "extraData": {
    "paymentMethods": "Creditcard,BankTransfer,DirectDebit"
  }
}
The identifier for each payment method (e.g. Creditcard, BankTransfer) is shown in the Method column
of the Multi-Method Connector configuration.
extraData filtering and Availability Rules are both applied. A method is shown only if it passes both checks.
E.g. if you pass paymentMethods=DirectDebit but an Availability Rule disables Direct Debit,
Direct Debit will not appear. The two mechanisms do not override each other.
Routing Rules — Payment Methods
For all enabled payment methods you have the option to configure rules to define which Connector should be used. Consequently this feature is only useful in case of multiple Connectors configured for the same payment method. Follow these steps to configure Routing Rules:
- Click Routing Rules for the payment method you wish to configure (see Connector Details Overview - Availability Rules and Routing Rules)
- In the Rule Editor, select Conditions and Actions from the sidebar on the right (see Rule Editor - Routing)
- Click Save to save your Routing Rule Configuration
You can check, if Routing Rules are configured for a Payment Method in the Connector Details Overview (see Routing Rules Check). If the Routing Rules Box is checked, Routing Rules are available.
In general setting up a rule set works the same way as for Availability Rules with different Conditions and Actions available. You may also refer to Routing, Cascading, Balancing, Fallback (Connectors) for further information about how to set up a rule set. In this section we focus on Conditions and Actions specific to Routing Rules.
One difference between Routing Rules and Availability Rules is the Action element: Route To Connector specifies to which Connector a Transaction is routed. Additionally you may also add a second Route To Connector Action to define a backup Connector in case the first one experiences issues. This is done as follows:
- Either drag&drop or type the Action Route to Connector in the then/else branch, depending for which branch you want to define a backup Connector
- Either drag&drop or type the Action Route to Connector for the node below the first Action (see Define Backup Connector)

Routing Rules — Example
Let's assume we want to route Transactions based on the BIN country of the credit card. If the BIN Country is Austria, the Connector ACME IDN Braintree CC is used (see Routing Rule - Example). If this Connector experiences issues the Transaction would be routed to ACME IDN Stripe CC. Lastly, in case the BIN Country is not Austria, the Transaction will be routed to ACME IDN PayU CC.

Conditions & Actions
Similar as for Availability Rules, for Routing Rules with each Condition the card, IBAN, customer data, transaction or risk check data is evaluated against the configured rule. The outcome (either true or false) defines which path/branch (then or else) is taken. As for Availability Rules also for Routing Rules, each branch can either be an Action, or another Condition with the exception that two Actions can be defined for the same branch in case of backup Connectors (see section Routing Rules - Payment Methods). Actions do not branch further and thereby mark the final step for this branch. They determine to which connector the transaction will be routed to. Consequently, Conditions will split in further branches until ending in an Action as final step or, in case no Action is defined, will automatically route to the selected Default Connector.
For payment method credit card you might want to enable the settings Re-Route Recurring Transactions to ensure that recurring transactions do not use the connector of the initial register transaction, but get routed according to the configured routing rules. Convert Debit to Preauthorize should be enabled in case connectors do only support transaction types pre-auth.
Card Data
| Card Data | |
|---|---|
| Credit Card Brand | Checks the brand of the Credit Card |
| Credit Card BIN Country | Checks the BIN country of the Credit Card |
| Credit Card BIN Level | Checks the BIN level of the Credit Card |
| Credit Card BIN Type | Checks the BIN type of the Credit Card |
| Credit Card Token Type | Checks the Token Type (Creditcard, Passthrough, Apple Pay, Google Pay) |
| BIN Regular Expression Check | Checks the BIN against a defined Regular Expression |
IBAN Data
| IBAN Data | |
|---|---|
| IBAN Regular Expression Check | Checks an IBAN against a defined Regular Expression |
| Check IBAN position vaule | Checks an IBAN against a specific value on a specific position |
Customer Data
| Customer Data | |
|---|---|
| Customer Billing Country | Checks the billing country of the customer |
| Customer IP Country | Checks the customers IP Country |
Transaction Data
| Transaction Data | |
|---|---|
| Random Load Balancer | The condition has a random chance to be true based on the given percentage |
| Transaction Extra Data | The condition compares an extra data value with the given value |
| Is Recurring | Checks if the Transaction is Recurring |
| Transaction Type | Checks the type of Transaction |
| Connector of Initial Transaction | Checks if the Connector of the initial Transaction is the specified Connector |
| Transaction Currency | Checks the Transaction Currency |
| Transaction Amount & Currency | Checks the Transaction (Base or Currency) Amount against a specific value. |
Risk Check Data
| Risk Check Data | |
|---|---|
| Risk Score | Checks the Transactions risk score against a specific value |
| Chargeback count/volume | Checks either the chargeback count or value of either the Merchant or specific Connector against a specifc value. Reference time can be specified. |
| Debit/Preauth count/volume | Checks either the debit/preauth count or value of either the Merchant or specific Connector against a specifc value. Reference time can be specified. |
Actions
| Actions | |
|---|---|
| Route to Connector | Specify the connector to be routed to from the list of available Connectors configured for the payment method |
Comparator options are equal to the Availability Rule Comparators. As for Availability Rules you can also hide or delete Routing Rules (see Rule Editor - Rule Tree)
Advanced Configuration
Advanced configurations can either be set up during the initial Connector Creation (see Connector Config) or edited in the Connector Details Overview (Default Drop-down).
Retries
Using Retries you can allow the customers to retry the payment with a different payment method in case the payment has failed. In this case, the customer is redirected back to the payment selection page. You can configure the max. number of retries (max. 9).
You may also want to adopt the payment selection page in this case to inform the customer about the failed attempt. Insert the following placeholder into your payment template:
{{ isRetry }}
or alternatively use:
{% if isRetry %}
In addition you might want to show the customer previous transaction errors (only available for retries) using the
{{ previousTransactionErrors }} array of all previous transaction error objects:
 "previousTransactionErrors" => [
    0 => [
      "code" => "2006"
      "message" => "The card has insufficient funds"
      "adapter_code" => "insufficient_funds"
      "adapter_message" => "Insufficient funds"
    ]
    1 => [
      "code" => "2003"
      "message" => "The transaction was declined"
      "adapter_code" => "transaction_declined"
      "adapter_message" => "Test decline"
    ]
    // ...
  ]
You can loop through the array to show all previous errors to the customer:
{% for err in previousTransactionErrors %}
  <pre>
    Code: {{ err.code }}
    Message: {{ err.message }}
    Adapter Code: {{ err.adapter_code }}
    Adapter Message: {{ err.adapter_message }}
  </pre>
{% endfor %}
Or even changing or translating the error message, based on the error code (refer to /docs/reference/appendix/error-codes)
{% if err.code == '2003' %}
  Transaction declined
{% endif %}
In case you just want to retrieve the last error, simply use
{% set lastErr = previousTransactionErrors|last %}
Expiry time
Lastly, you can define an expiry time in hours. The payment selection page will be valid and can be accessed within the given time frame.
You may also want to adopt the payment selection page in this case to inform the customer about the remaining time. Insert the following placeholder into your payment template:
{{ expirationDate }}
The expiration date will be a string containing the date and time of expiry in the given format:
YYYY-MM-DD hh:mm:ss Timezone, e.g. 2020-01-01 00:00:00 UTC.
Once the the payment selection page is expired, it is recommended to add an expiry check inside the payment template to display an appropriate error screen to customers, e.g.
{% if isExpired %}
  This page has expired.
{% endif %}