Pay By Link
If you want to use this setting, please contact your the Customer Success Manager directly, or contact our Support Team in the IXOPAY Customer Experience Portal.
To utilize the email features of Pay By Link, please provide SMTP email server details and request the Pay By Link email permissions be enabled. It is by design that Pay By Link emails will not be sent until these requirements have been met.
Pay By Link Permissions
In order to be able to use the Pay By Link feature, the corresponding permissions need to be set.
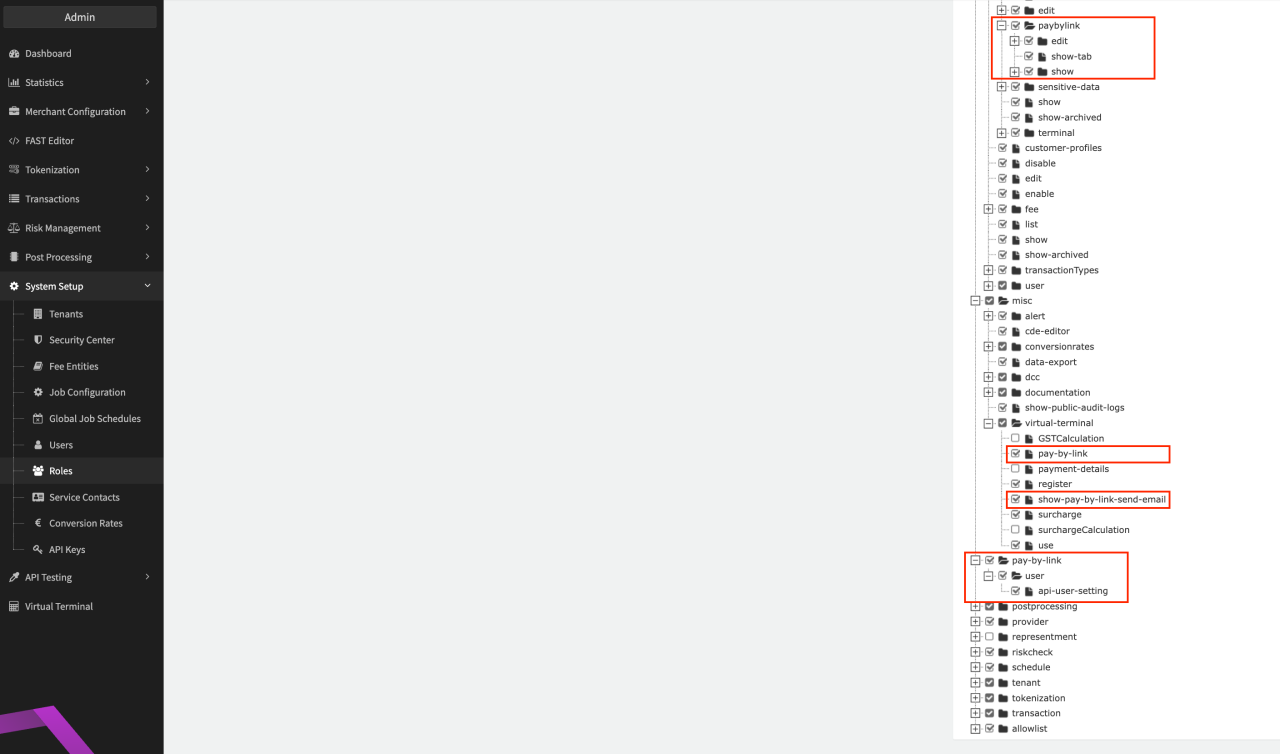
To configure the Pay By Link feature (see section Pay By Link Configuration) the Admin User must activate the merchant.connector.paybylink and pay-by-link.user.api-user-setting permissions for his/her role (see Permission Admin User). Once activated a new tab Pay By Link will appear for each connector. In this tab, you can find specific configuration settings for the feature. Furthermore Merchant API users can be granted the Enable Pay By Link API user setting.
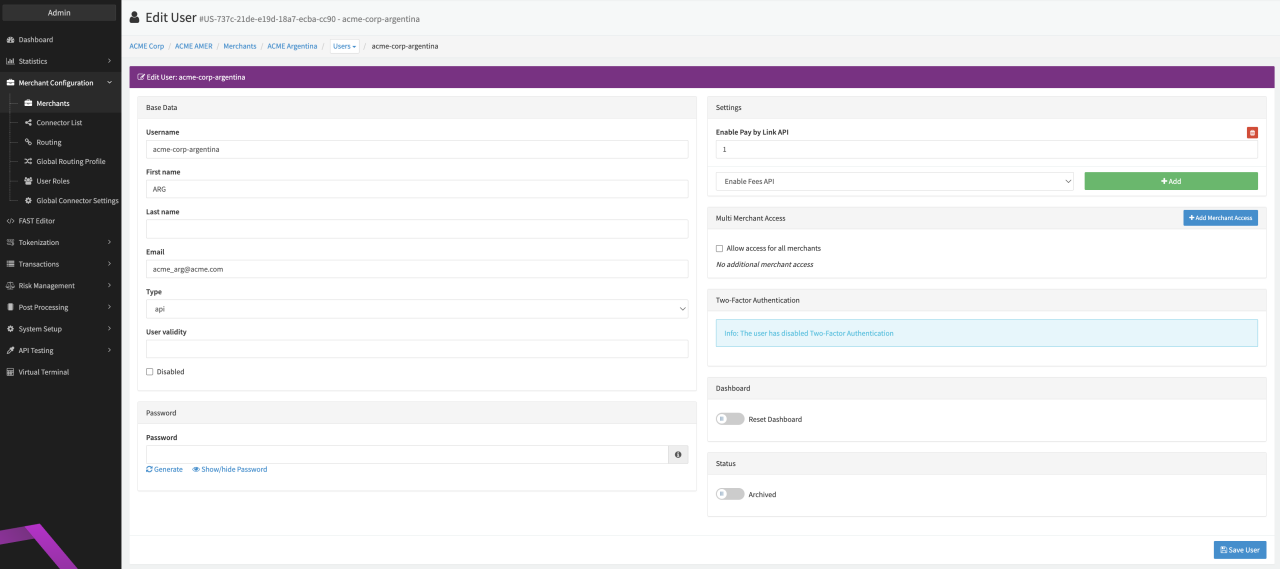
To be able to send Pay By Link API requests the Enable Pay By Link API user setting must be activated for the Merchant API user (see Permission Merchant API User).
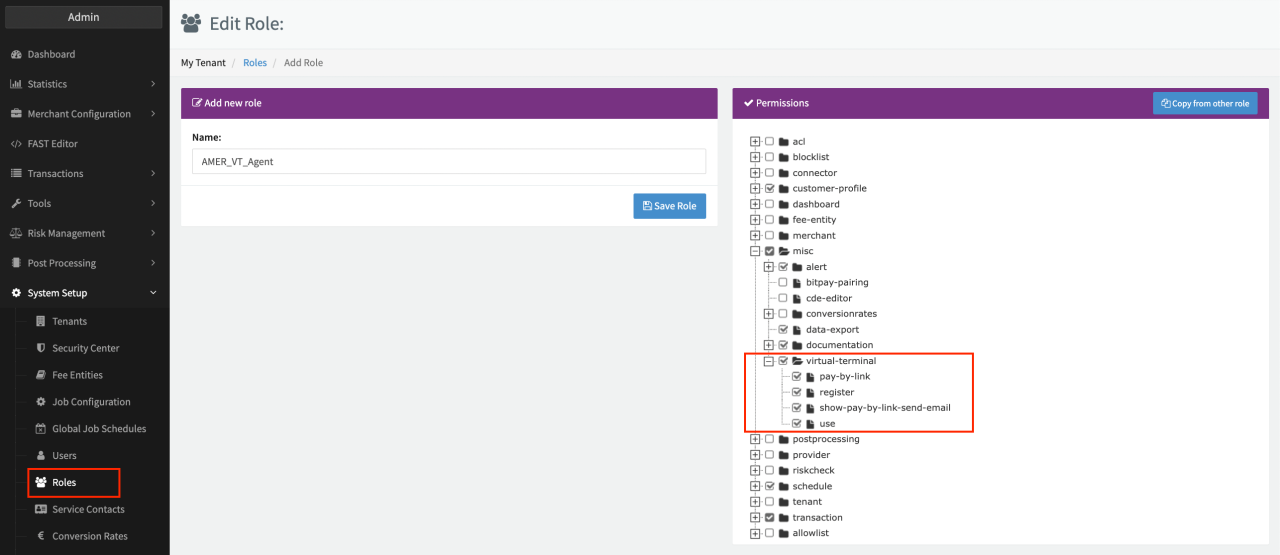
To be able to use the Pay By Link feature with the Virtual Terminal, Merchant Users must have the permission misc.virtual-terminal.pay-by-link and misc.virtual-terminal.show-pay-by-link-send-email activated (see Permission Merchant User). With that, users will see an additional Button Pay By Link in the Virtual Terminal (see Virtual Terminal).
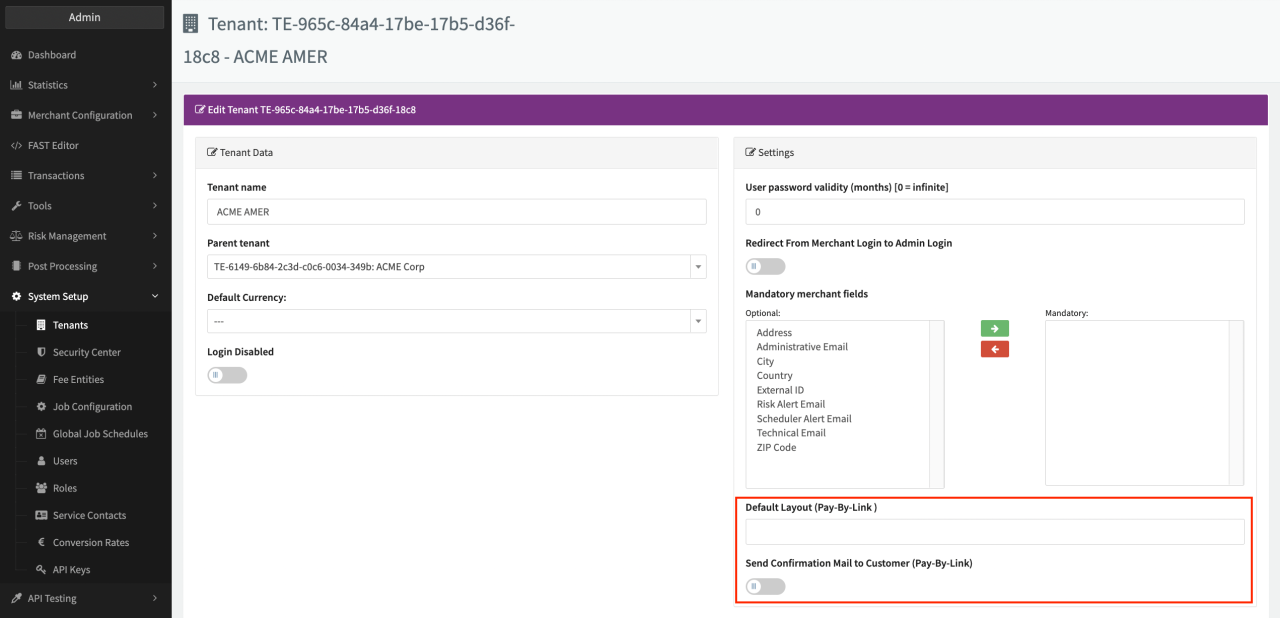
Default settings can be configured at the tenant level, such as the Default Layout (insert path to the template within the Fast Editor) and to Send Confirmation Mail to Customer (see Default Pay By Link settings). These settings can be overruled at the connector level if needed.
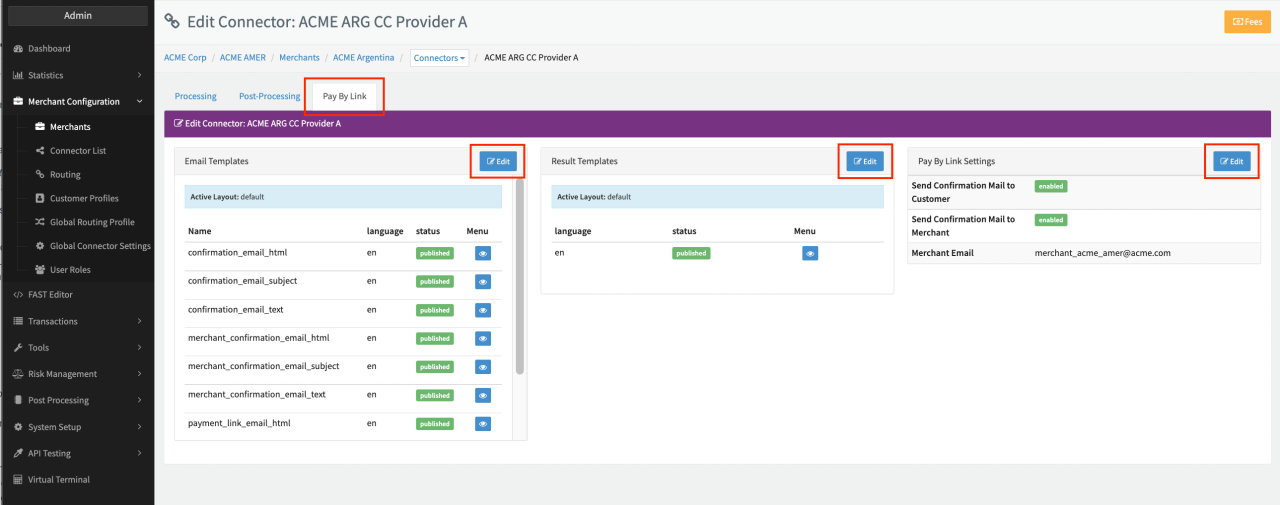
Pay By Link Configuration
After activating the admin user permission, a new Pay By Link tab is displayed in the Connector Detail Overview (see Tab Pay By Link) of each connector. Options to configure are:
- Email Templates
- Result Templates
- Pay By Link Settings
To send emails via the IXOPAY platform the mail settings on tenant level needs to be configured.
Pay By Link Settings
If not configured differently in the tenant settings, Confirmation emails won’t be sent to customers or merchants. In the Pay By Link Settings section you can enable the setting if needed. Keep in mind to also configure the Email Templates if enabled.
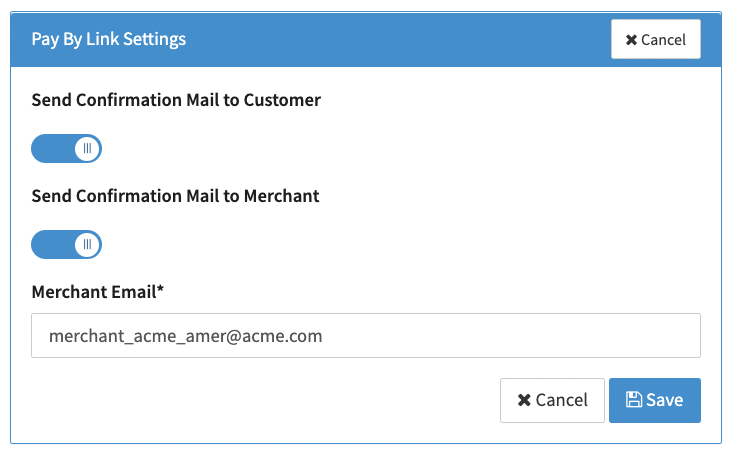
The setting to send confirmation emails can also be enabled for non Pay By Link Transactions in the Connector Settings.
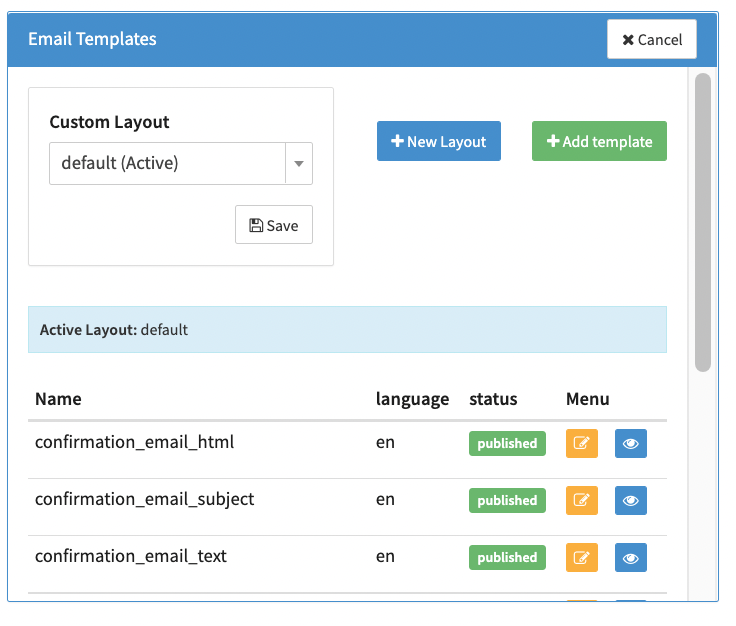
Templates can be used in different ways. Either you create Templates for each connector using some simple CSS, HTML, Javascript skills to design your templates and publish them via the Fast Editor, or use a Layout. Think of a Layout as a container to store and attach templates. Once templates belong to a layout, you can assign this layout to other connectors and therefore do not need to create new templates for each language for each connector.
Example:
If you create only one template A. This template A is only visible for one connector.
However, if you create a layout A that contains template A, you can assign layout A to other connectors. So all the connectors with layout A, automatically have template A. Changing the template in the layout automatically changes it for all connectors with the layout assigned to it.
To configure the Templates sections follow this steps:
Click Edit
- Either click + Add template to add individual templates to the connector
- Or click + New Layout to create a new Layout
- Or select an already created Custom Layout from the dropdown menu.
Email Templates
Define various templates, which will be used to sent emails to your customers and merchants. Email templates need to be created for each connector. You can use the prefill template or create your own from scratch and publish it via the FAST editor.
Confirmation Email:
- confirmation_email_html: Once the customers complete the checkout process, they will receive following template. (HTML + CSS Styling)
- confirmation_email_subject: Defines the subject of the confirmation email.
- confirmation_email_text: Once the customers completes the checkout process, they will receive following template. (Plain Text)
Merchant Email:
- merchant_confirmation_email_html: Once the customers complete the checkout process, the merchant email specified in the Pay By Link Settings will receive following template. (HTML + CSS Styling)
- merchant_confirmation_email_subject: Defines the subject of the confirmation email
- merchant_confirmation_email_text: Once the customers completes the checkout process, the merchant email specified in the Pay By Link Settings will receive following template. (Plain Text)
Payment Link Email:
- payment_link_email_html: Email which includes the payment link and the text. (HTML + CSS Styling)
- payment_link_email_subject: Includes the subject of the email link.
- payment_link_email_text: Email which includes the payment link and the text. (Plain Text)
Result Templates
In this section the language specific templates can be configured to be shown to the customers after completing the checkout process. In each template, you can configure the design for a successful, failed or cancelled transaction.
Keep in mind to define email templates for each language needed for the connector.
Pay By Link via API
For further information how to send API requests, please check the
Pay By Link API Documentation
.
In order to send a payByLink request, please add payByLink field in the request body and
set the sendByEmail to false or true.
successUrl,cancelUrl,errorUrlare only necessary, if a merchant wants to use their own result pages. Otherwise the result page from the template will be used.callbackUrlcan be omitted, if not needed by merchant
If your Merchant API user does not have the Enable Pay By Link API user setting, no email will be sent to the customer. The URL can be seen though in the Transaction Log for the created Pay By Link transaction.
{
  "merchantTransactionId": "45756756756756",
  "amount": "9.99",
  "currency": "EUR",
  "successUrl": "https://example.com/finalize?SUCCESS=1",
  "cancelUrl": "https://example.com/finalize?CANCEL=1",
  "errorUrl": "https://example.com/finalize?ERROR=1",
  "callbackUrl": "https://example.com/postback",
  "customer": {
    "firstName": "Max",
    "lastName": "Mustermann",
    "email": "[email protected]",
    "company": "Huge Company",
    "ipAddress": "127.0.0.1"
  },
  "language": "en",

  "payByLink": {
    "sendByEmail": false
  }
}
Pay By Link via Virtual Terminal
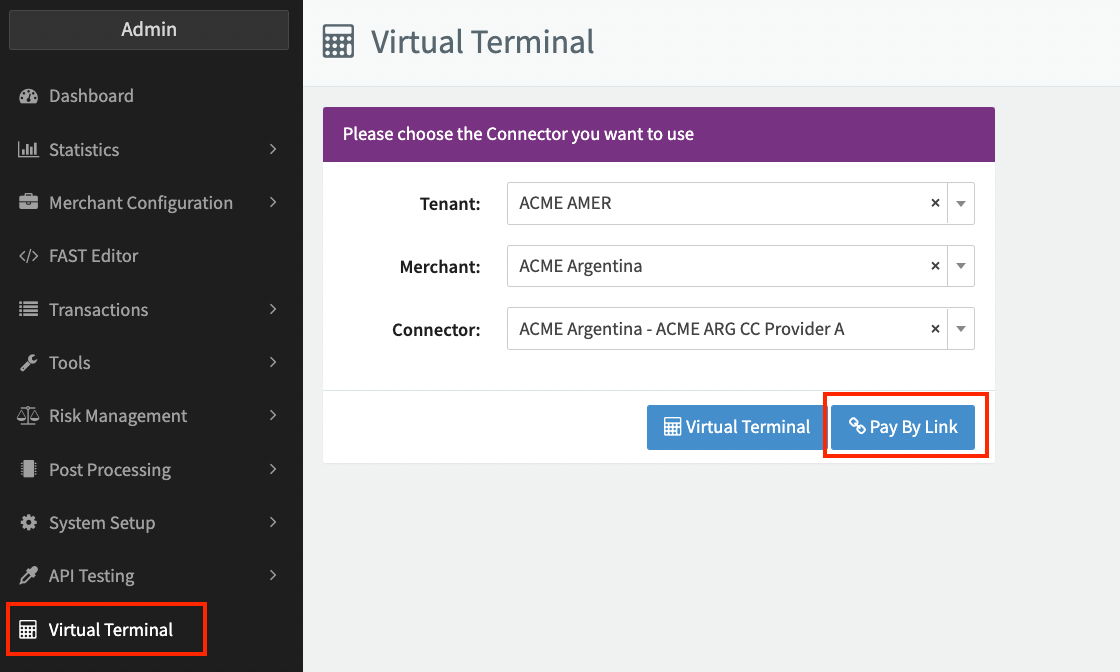
After activating the merchant user permission, users will see an additional Button Pay By Link in the Virtual Terminal (see Virtual Terminal).
To generate a Pay By Link transaction, follow these steps:
- Click on Virtual Terminal
- Choose the configured Connector.
- Click on Pay By Link.
- On the virtual terminal page, please enter the mandatory fields and then click on Create Payment Link.
Following fields are mandatory:
- Transaction Type
- Amount
- Currency
- Identification
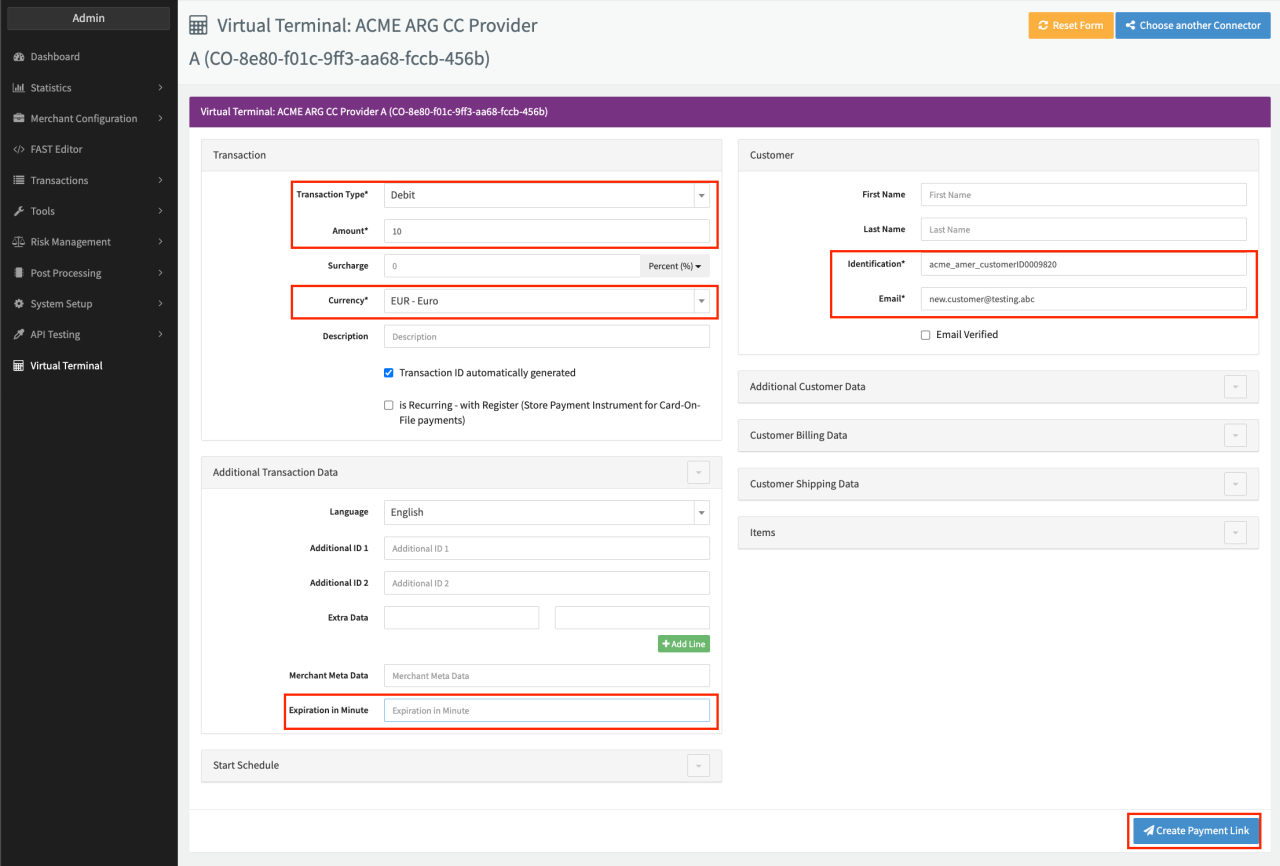
You can also set an Expiration in Minute value for the payment link — this setting does only effect the Link itself and has no effect on the transaction state in contrast to Connector Settings Transactions: Expire automatically after (x) minutes (min. 5 minutes) and Expires pending transactions after given minutes (min. 5 minutes)
If not explicitly set by any parameter or Connector Setting, the link for Multi-Method Connectors will be valid 4 hours, while for individual connectors the link will not expire at all.
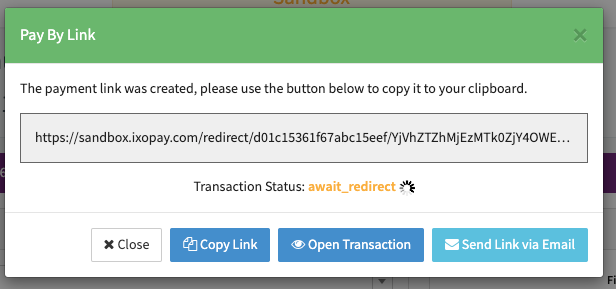
After submitting the transaction data a confirmation window will appear with the generated link (see Image Confirmation popup).
There you can choose to send the link via email or to copy the link and send it manually. The transaction status will automatically update itself, after the customers actions.
For the Send Link via Email option to work, the mail settings need to be configured at the tenant level. You can overwrite the “Email Sender Name” and “Email Sender Address” by using the Connector Settings — Notifications & Postback Settings. However, keep in mind that the sending mail domain should be identical to the configured tenant mail settings in order to avoid your SMTP server being flagged as spam.