Transaction API
After having set up your Connectors you have different options to run tests against the Transaction API. Either use the API Testing directly in the IXOPAY platform or see our
Transaction API documentation for further information.
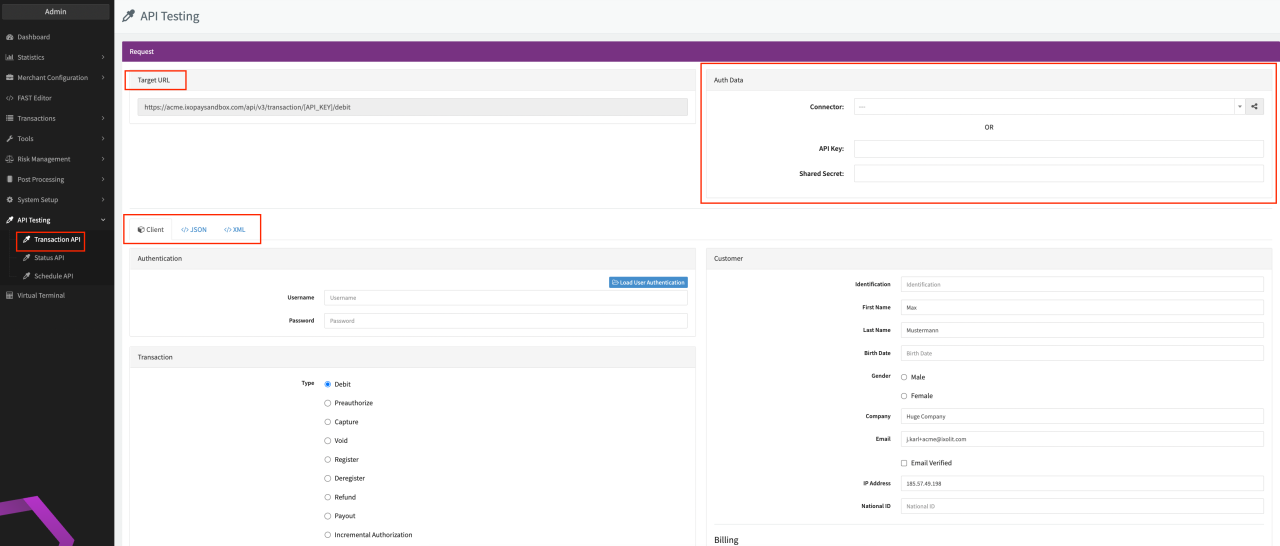
To use the API Testing in the IXOPAY platform, follow these steps:
- Navigate to the API Testing section, sub-section Transaction API
- Select a Connector from the list (API Key and Shared Secret will be filled automatically) or
- Fill in the API Key and Shared Secret (see Create and Assign Connectors & Adapters section)
- Select User in the dropdown list
- Select if you want to use
The Target URL is pre-filled with the URL to the appropriate IXOPAY platform instance and usually does not require any further adjustments. No matter how you test your set up, please keep the following notes in mind:
Before you start your tests, please consider that Transactions performed on Connectors which do not have the Test mode enabled, will be considered as Live Transactions and therefore appear in any reports and statistics.
Be aware that for transactions performed on Connectors with Test mode enabled as well as transactions performed with Connectors SimulatorPci, Simulator or Dummy with Test mode disable do have a rate limit of 5 transactions per 60 seconds.
Transaction API client
The IXOPAY platform Transaction API client tab will be selected by default, with that you can execute tests using different values for the enabled features.
Fill in the necessary parameters for the testing in the Client Form:
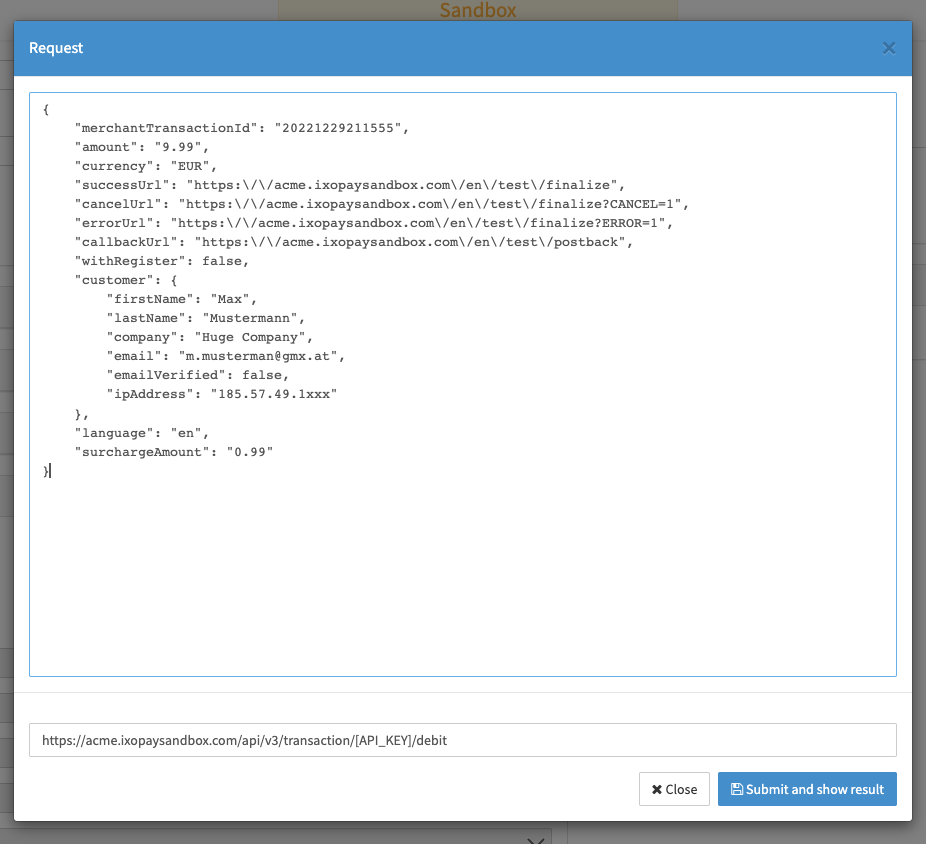
Once you are ready and want to see the requests about to be sent without submitting, click Show JSON (see Show JSON). To initiate the Transaction click Submit. The Transaction will be shown immediately in the Transaction List
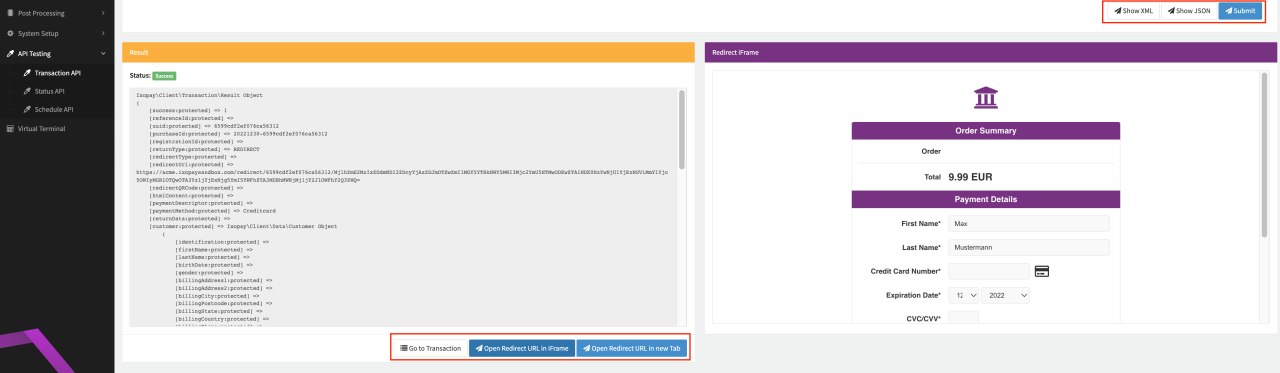
The Result Box will display the response containing information about the Transaction (e.g. current state). Depending on your entered information the transaction can be successful, result in errors due to missing fields or invalid data, or redirected.
In case a redirect is required, you can click Open Redirect URL in new Tab or Open Redirect URL in iFrame in the Transaction API client. Open Redirect URL in iFrame will load the URL in the Redirect iFrame Box next to the result box (see Result and Redirect iFrame Box).
Click Go to Transaction to follow the link to the Transaction Details.
Transaction
In this section you can configure Transaction Details (see Transaction Table).

| Field | Description |
|---|---|
| Transaction Type | Select a mandatory Transaction Type for the scheduled transaction: Debit, Preauthorize, Capture, Void, Register, Deregister, Refund, Payout, Incremental Authorization |
| Language | Fill in the language (optional, two letter language code ) |
| Merchant Transaction ID | Prefilled Merchant Transaction ID (optional) |
| Increase Transaction ID automatically by one | Enable option to automatically increase the Transaction ID |
| Transaction Token | Fill in the Transaction Token for card-on-file/recurring transaction. You can also create a creditcard token (tokenize the card used for the Transaction) or load the Token from (a Customer) Profile by selecting the option. If not filled, the transaction flow will prompt user interaction. If a CC token is created, a red button will appear "Clear CC Token". This button lets you remove the token and select another transaction without refreshing the page. |
| Additional ID 1 | Fill in the Additional ID 1 (adapter-specific) |
| Additional ID 2 | Fill in the Additional ID 2 (adapter-specific) |
| Reference UUID | For card-on-file/recurring transactions (e.g. Recurring Debits, Refunds, Capture, Voids and Deregisters) fill in the Reference UUID |
| Surcharge Amount | Fill in the optional Surcharge Amount. |
| Amount | Fill in a mandatory amount |
| Currency | Select a mandatory currency |
| Auto capture in minutes | Only available for Transaction Type Preauthorize. Fill in a number of minutes after a transaction should be captured automatically |
| Description | Fill in an optional description |
| Success URL | Prefilled URL in case of a successful transaction |
| Cancel URL | Prefilled URL in case of a cancelled transaction |
| Error URL | Prefilled URL in case of a transaction in error state |
| Callback URL | Prefilled Callback URL the platform will send status notifications |
| With Register | Enable this option in case the first transaction of Recurring Payments (not applicable for all transaction types). |
| Add to Customer Profile | Enable this option to add the payment instrument to a Customer Profile (Customer Identification mandatory) or create a new Customer Profile |
| Transaction Indicator | Select an optional Transaction Indicator from the list |
| Extra Data | Fill in additional Key-Value Extra Data pairs. Add new Extra Data lines by selecting + Add Line (adapter-specific) |
| PspPassthroughData | Fill in additional Key-Value PspPassthroughData pairs to be passed through to the PSP without storing it. Add new PspPassthroughData lines by selecting + Add Line. Note: Support for this feature varies by adapter. |
| Merchant Meta Data | Not available by default: Fill in additional Merchant Meta Data (string, max. length of 255 characters) |
| Pay by link | Not available by default: Enable this option to test the Pay By Link Configuration (adapter-specific) |
| Request DCC | Not available by default: Enable this option to enable the DCC request (in hosted payment page or directly as DCC request) (adapter-specific). |
In case the button Create CC Token is greyed out, ensure that the Connector used has set a Public Integration Key see Create and Assign Connectors & Adapters section)
Customer
In this section you can fill in Customer Details (see Customer Details, Customer Billing Data, Customer Shipping Data and Additional Data).
Customer Details
| Field | Description |
|---|---|
| Identification | Fill in the mandatory and unique Identification ID for the Customer |
| First Name | Fill in the Customer First Name |
| Last Name | Fill in the Customer Last Name |
| Birth Date | Fill in the optional Customers Birth Date in the format YYYY-MM-DD |
| Gender | Select optional Male or Female |
| Company | Fill in the optional Customers Company |
| Fill in the Customer Email | |
| Email Verified | Enable if the Customer Email is verified (for example via verification email) |
| IP Address | Prefilled IP Address |
| National ID | Fill in the optional National ID (e.g. social insurance number) |
Customer Billing Data
| Field | Description |
|---|---|
| Address 1 | Fill in Address Line 1 of Customers Billing Address |
| Address 2 | Fill in Address Line 2 of Customers Billing Address |
| City | Fill in the City |
| Post Code | Fill in the Postal Code |
| State | Fill in the State |
| Country | Fill in the Country Code (format depending on the adapter-specific requirements, ususally 2-letter) |
| Phone | Fill in the Phone number |
| IBAN | Fill in the IBAN (adapter-specific) |
| BIC | Fill in the BIC (adapter-specific) |
| Mandate ID | Fill in the Mandate ID (adapter-specific, SEPA mandate Identification) |
| Mandate Date (YYYY-MM-DD) | Fill in the Mandate Date (adapter-specific, Date of the SEPA mandate) |
Customer Shipping Data
| Field | Description |
|---|---|
| First Name | Fill in the First Name |
| Last Name | Fill in the Last Name |
| Company | Fill in the Company of Customers Shipping Address |
| Address 1 | Fill in Address Line 1 of Customers Shipping Address |
| Address 2 | Fill in Address Line 2 of Customers Shipping Address |
| City | Fill in the City |
| Post Code | Fill in the Postal Code |
| State | Fill in the State |
| Country | Fill in the Country Code (format depending on the adapter-specific requirements, ususally 2-letter) |
| Phone | Fill in the Phone number |
Additional Data
| Field | Description |
|---|---|
| Extra Data | Fill in additional Key-Value Extra Data pairs. Add new Extra Data lines by selecting + Add Line (adapter-specific) |
3-D Secure
In this section you can fill in additional 3-D Secure data (see 3-D Secure Data).

3-D Secure Data
| Field | Description |
|---|---|
| 3dsecure | Select the optional 3-D Secure setting: Off, Optional, Mandatory. In case you want to test the 3-D Secure Flow of for payment flow, select Mandatory to enforce 3-D Secure |
| Channel | Select the optional Channel: 01 (App-based), 02 (Browser), 03 (3DS Requestor Initiated) |
| Authentication Indicator | Select the optional Authentication Indicator: 01 (Payment transaction), 02 (Recurring transaction), 03 (Installment transaction), 04 (Add card), 05 (Maintain card), 06 (Cardholder verification as part of EMV token ID&V) |
| Cardholder Authentication DateTime | Select the optional Date and Time of the Cardholders Authentication from the Date-/Time Picker |
| CardHolder Authentication Data | Fill in the optional Authentication Data of the Cardholder |
| Challenge Indicator | Select the optional Challenge Indicator: 01 (no preference), 02 (No challenge requested), 03 (Challenge requested: 3DS Requestor Preference), 04 (Challenge requested: Mandate), 05 (No challenge requested: transaction risk analysis is already performed), 06 (No challenge requested: Data share only), 07 (No challenge requested: strong consumer authentication is already performed), 08 (No challenge requested: utilise whitelist exemption if no challenge required), 09 (Challenge requested: whitelist prompt requested if challenge required) |
| Prior Reference | Fill in the optional Prior Reference |
| Prior Authentication Method | Select the optional Prior Authentication Method: 01 (Frictionless authentication occurred by ACS), 02 (Cardholder challenge occurred by ACS), 03 (AVS verified), 04 (Other issuer methods) |
| Prior Authentication DateTime | Select the optional Date and Time of a Prior Authentication from the Date-/Time Picker |
| Prior Authentication Data | Fill in the optional Prior Authentication Data |
| Cardholder Account Type | Select the optional Account Type of the Cardholder: 01 (Not applicable), 02 (Credit), 03 (Debit), 04 (JCB specific value for Prepaid) |
| Cardholder Account Age Indicator | Select the optional Age Indicator of the Cardholder Account: 01 (No account: guest check-out), 02 (No account: guest check-out), 03 (Less than 30 days), 04 (30-60 days), 05 (More than 60 days) |
| Cardholder Account Date | Select the optional Date and Time of the Cardholders Account Date from the Date-/Time Picker |
| Cardholder AccountChange Indicator | Select the optional Cardholder AccountChange Indicator: 01 (Changed during this transaction), 02 (Less than 30 days), 03 (Less than 30 days), 04 (30-60 days), 05 (More than 60 days) |
| Cardholder Account Last Change | Select the optional Date and Time of the last change of the Cardholders Account from the Date-/Time Picker |
| Cardholder Account Password Change Indicator | Select the optional Cardholder Account Password Change Indicator: 01 (No change), 02 (Changed during this transaction), 03 (Less than 30 days), 04 (30-60 days), 05 (More than 60 days) |
| Shipping Address Usage Indicator | Select the optional Shipping Address Usage Indicator: 01 (This transaction), 02 (Less than 30 days), 03 (30-60 days), 04 (More than 60 days) |
| Shipping Address First Usage | Select the optional Date and Time of the Shipping Address First Usage from the Date-/Time Picker |
| Transaction Activity Day | Fill in the optional Transaction Activity Day |
| Transaction Activity Year | Fill in the optional Transaction Activity Year |
| Add Card attempts Day | Fill in the optional Add Card attempts Day |
| Purchase Count Six Months | Fill in the optional Purchase Count Six Months |
| Suspicious Account Activity Indicator | Select the optional Suspicious Account Activity Indicator: 01 (No suspicious activity has been observed), 02 (Suspicious activity has been observed) |
| Shipping Name Equal Indicator | Select the optional Shipping Name Equal Indicator: 01 (Account Name identical to shipping Name), 02 (Account Name different than shipping Name) |
| Payment Account Age Indicator | Select the optional Payment Account Age Indicator: 01 (No account: guest check-out), 02 (During this transaction), 03 (Less than 30 days), 04 (30-60 days), 05 (More than 60 days) |
| Payment Account Age Date | Select the optional Date of the Payment Account Age Date from the Date-Picker |
| Billing Address Line3 | Fill in the optional Billing Address Line3 |
| Shipping Address Line3 | Fill in the optional Shipping Address Line3 |
| Billing Shipping Address Match | Select the optional Billing Shipping Address Match: Y (Shipping Address matches Billing Address), N (Shipping Address does not match Billing Address |
| Home Phone Country Prefix | Fill in the optional Home Phone Country Prefix |
| Home Phone Number | Fill in the optional Home Phone Number |
| Mobile Phone Country Prefix | Fill in the optional Mobile Phone Country Prefix |
| Mobile Phone Number | Fill in the optional Mobile Phone Number |
| Work Phone Country Prefix | Fill in the optional Work Phone Country Prefix |
| Work Phone Number | Fill in the optional Work Phone Number |
| Purchase Instal Data | Fill in the optional Purchase Instal Data |
| ship Indicator | Select the optional ship Indicator: 01 (Ship to cardholder's billing address), 02 (Ship to another verified address on file with merchant), 03 (Ship to address that is different than the cardholder's billing address), 04 ("Ship to Store" / Pick-up at local store: Store address shall be populated in shipping address fields), 05 (Digital goods: includes online services, electronic gift cards and redemption codes), 06 (Travel and Event tickets, not shipped, 07 (Other: for example, Gaming, digital services not shipped, emedia subscriptions, etc.) |
| Delivery Timeframe | Select the optional Delivery Timeframe: 01 (Electronic Delivery), 02 (Same day shipping), 03 (Overnight shipping), 04 (Two-days or more shipping) |
| Delivery Email Address | Fill in the optional Delivery Email Address |
| Reorder Items Indicator | Select the optional Reorder Items Indicator: 01 (First time ordered), 02 (Reordered) |
| Pre-order Purchase Indicator | Select the optional Pre-order Purchase Indicator: 01 (Merchandise available), 02 (Future availability) |
| Pre-order Date | Select the optional Pre-order Date from the Date-Picker |
| Gift Card Amount | Fill in the optional Gift Card Amount |
| Gift Card Currency | Fill in the optional Gift Card Currency |
| Gift Card Count | Fill in the optional Gift Card Count |
| Purchase Date | Select the optional Date and Time of the Purchase from the Date-/Time Picker |
| Recurring Expiry | Select the optional Recurring Expiry Date from the Date-Picker |
| Recurring Frequency | Fill in the optional Recurring Frequency |
| Transaction Type | Select the optional Transaction Type: 01 (Goods / Service purchase), 03 (Check Acceptance), 10 (Account Funding), 11 (Quasi-Cash Transaction), 28 (Prepaid activation and Loan) |
| Exemption Indicator | Select the optional Exemption Indicator: 01 (Low Value Transaction: amount under 30 EURs), 02 (Low Risk Transaction), 03 (Whitelisted transaction, merchant is added as "Trusted Beneficiary" by cardholder), 04 (Secure Corporate Payment), 05 (Recurring or Merchant-initiated transaction), 06 (Mail or Telephone Order), 07 ( Anonymous payment card) |
DCC
In this section you can fill in additional DCC data (see DCC Data).
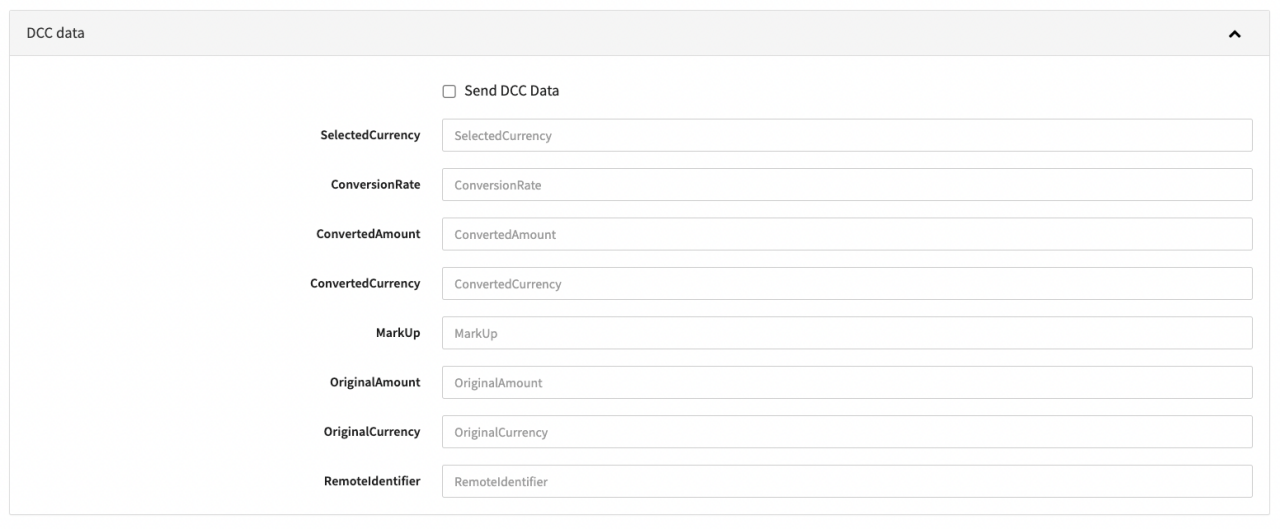
This section is only relevant if Dynamic Currency Conversion is supported for the Connector used for Testing.
DCC Data
| Field | Description |
|---|---|
| Send DCC Data | Enable option to send DCC data |
| SelectedCurrency | Fill in the selected Currency |
| ConversionRate | Fill in the conversion rate |
| ConvertedAmount | Fill in the converted amount |
| ConvertedCurrency | Fill in the converted Currency |
| MarkUp | Fill in the MarkUp |
| OriginalAmount | Fill in the Original Amount |
| OriginalCurrency | Fill in the Original Currency |
| RemoteIdentifier | Fill in the remote identifier (adapter-specific) |
Level 2/3
In this section you can fill in additional Level 2/3 data (see Level 2/3 Data and Tax Details).
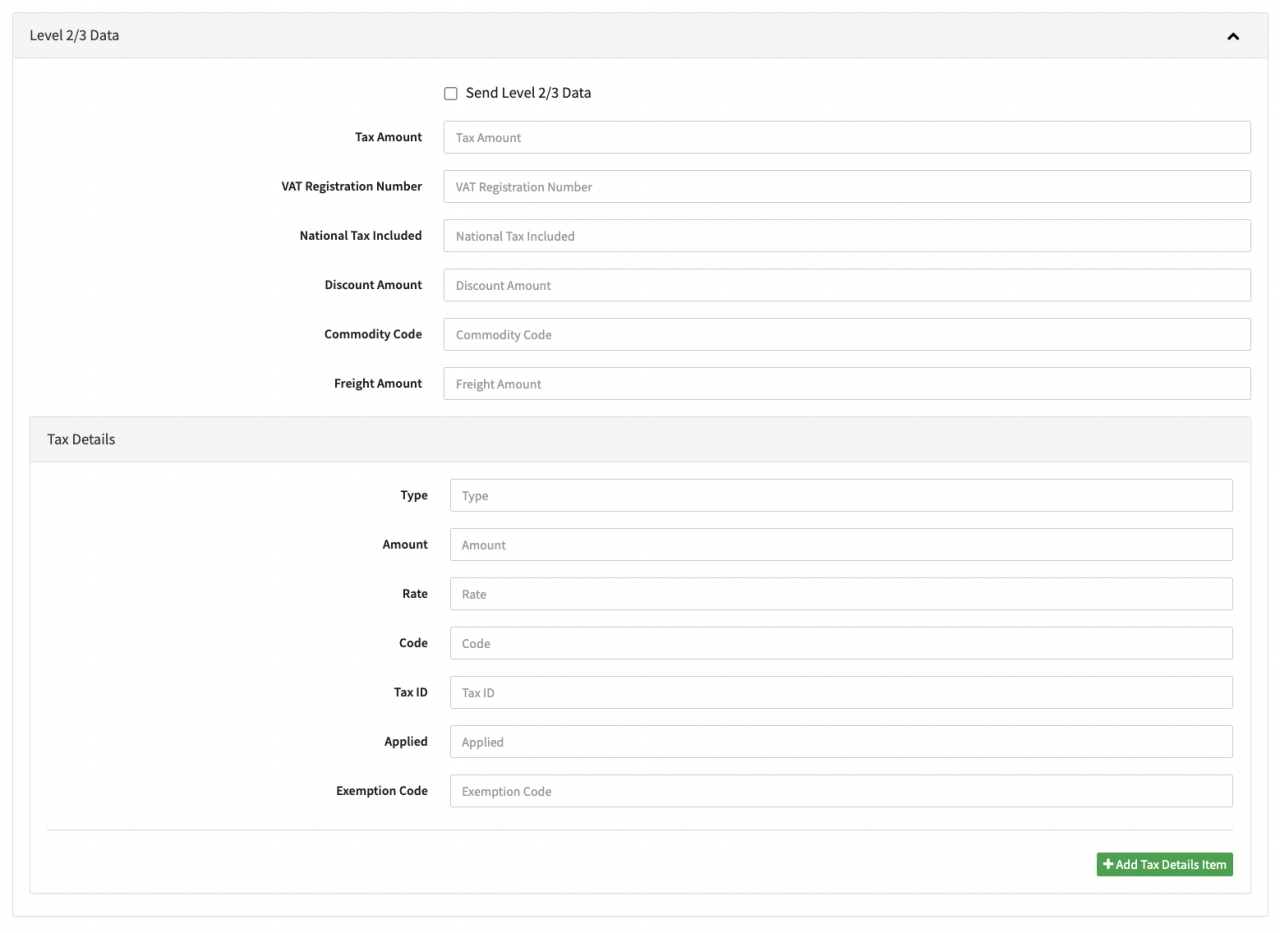
This section is only relevant if Level 2/3 data is supported for the Connector used for Testing.
Level 2/3 Data
| Field | Details |
|---|---|
| Send Level 2/3 Data | Enable option to send Level 2/3 Data |
| Tax Amount | Fill in the Tax Amount |
| VAT Registration Number | Fill in the VAT Registration Number |
| National Tax Included | Fill in the National Tax |
| Discount Amount | Fill in the Discount Amount |
| Commodity Code | Fill in the Commodity Code |
| Freight Amount | Fill in the Freight Amount |
| Tax Details | Fill in additional Tax Detail items. Add new Tax Detail items by selecting + Add Tax Detail items |
Tax Details
| Field | Description |
|---|---|
| Type | Fill in the Type |
| Amount | Fill in the Amount |
| Rate | Fill in the Rate |
| Code | Fill in the Code |
| Tax ID | Fill in the Tax ID |
| Applied | Fill in the Applied value |
| Exemption Code | Fill in an Exemption Code |
Schedule
In this section you can fill in additional Schedule — data (see Schedule Data and also Create a Schedule section).
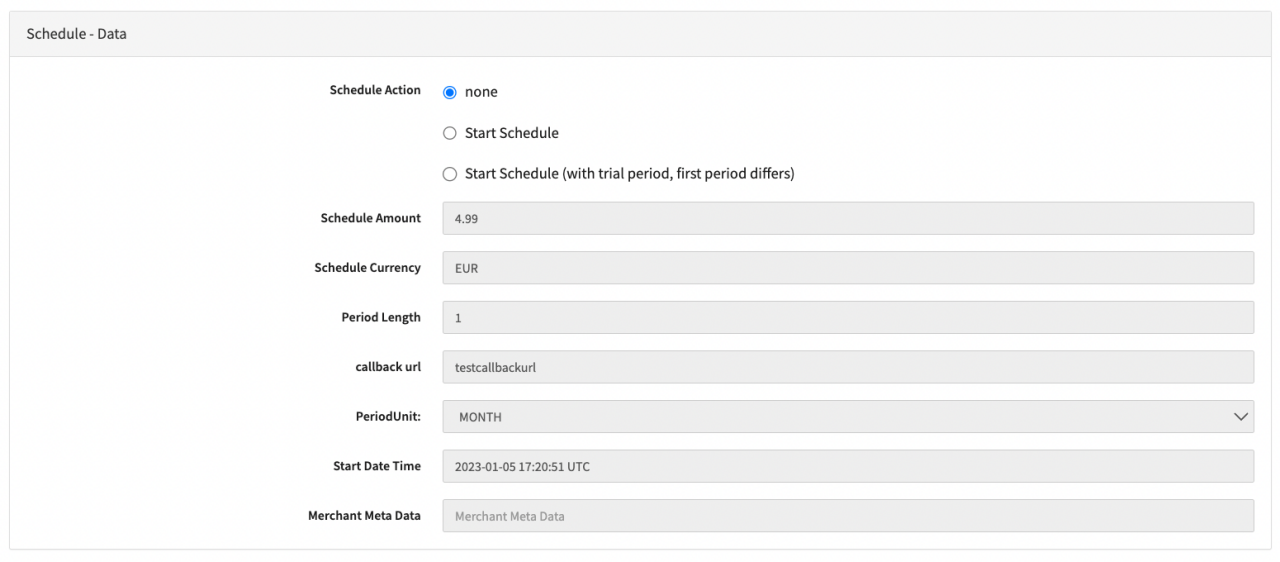
Schedule Data
| Field | Description |
|---|---|
| Schedule Action | Select the Schedule Action: None, Start Schedule, Start Schedule (with trial period, first period differs) |
| callback URL | Prefilled Callback URL the platform will send status notifications |
| Merchant Meta Data | Not available by default: Fill in additional Merchant Meta Data |
Items
In this section you can fill in additional Items data (see Item Data, Tax Details).
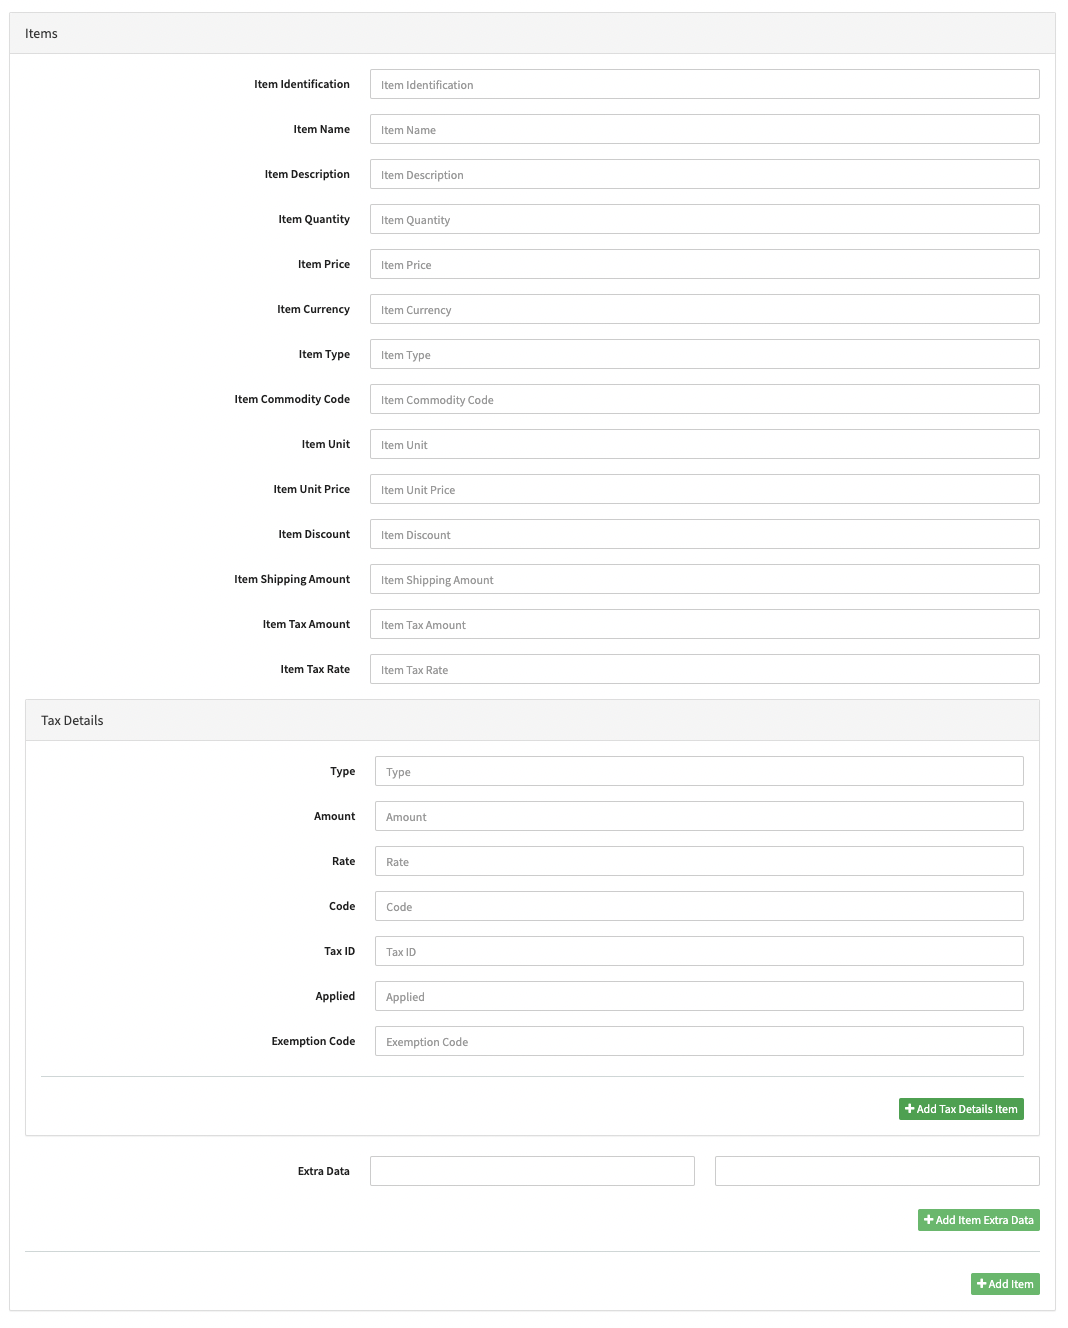
Item Data
| Field | Description |
|---|---|
| Item | Fill in additional Items. Add new Items by selecting + Add Item |
| Item Identification | Fill in the Item identification |
| Item Name | Fill in the Item Name |
| Item Description | Fill in the Item Description |
| Item Quantity | Fill in the Item Quantity |
| Item Price | Fill in the Item Price |
| Item Currency | Fill in the Item Currency |
| Item Type | Fill in the Item Type |
| Item Commodity Code | Fill in the Item Commodity Code |
| Item Unit | Fill in the Item Unit |
| Item Unit Price | Fill in the Item Unit Price |
| Item Discount | Fill in the Item Discount |
| Item Shipping Amount | Fill in the Item Shipping Amount |
| Item Tax Amount | Fill in the Item Tax Amount |
| Item Tax Rate | Fill in the Item Tax Rate |
| Tax Details | Fill in additional Tax Detail items. Add new Tax Detail items by selecting + Add Tax Detail items |
| Extra Data | Fill in additional Key-Value Extra Data pairs. Add new Extra Data lines by selecting + Add Line (adapter-specific) |
Tax Details
| Field | Description |
|---|---|
| Type | Fill in the Type |
| Amount | Fill in the Amount |
| Rate | Fill in the Rate |
| Code | Fill in the Code |
| Tax ID | Fill in the Tax ID |
| Applied | Fill in the Applied value |
| Exemption Code | Fill in an Exemption Code |
Transaction API JSON
Instead of using the Transaction API client, you may also use the Transaction API JSON.
- Select the transaction type from the list
- Click Load JSON Example to see the example request (using prefilled parameters)
To initiate the Transaction click Submit.
Transaction API XML
API V2 (XML) is a Legacy Version. New features and functionality will only be available using API V3 (JSON)