Redsys
Redsys Bizum
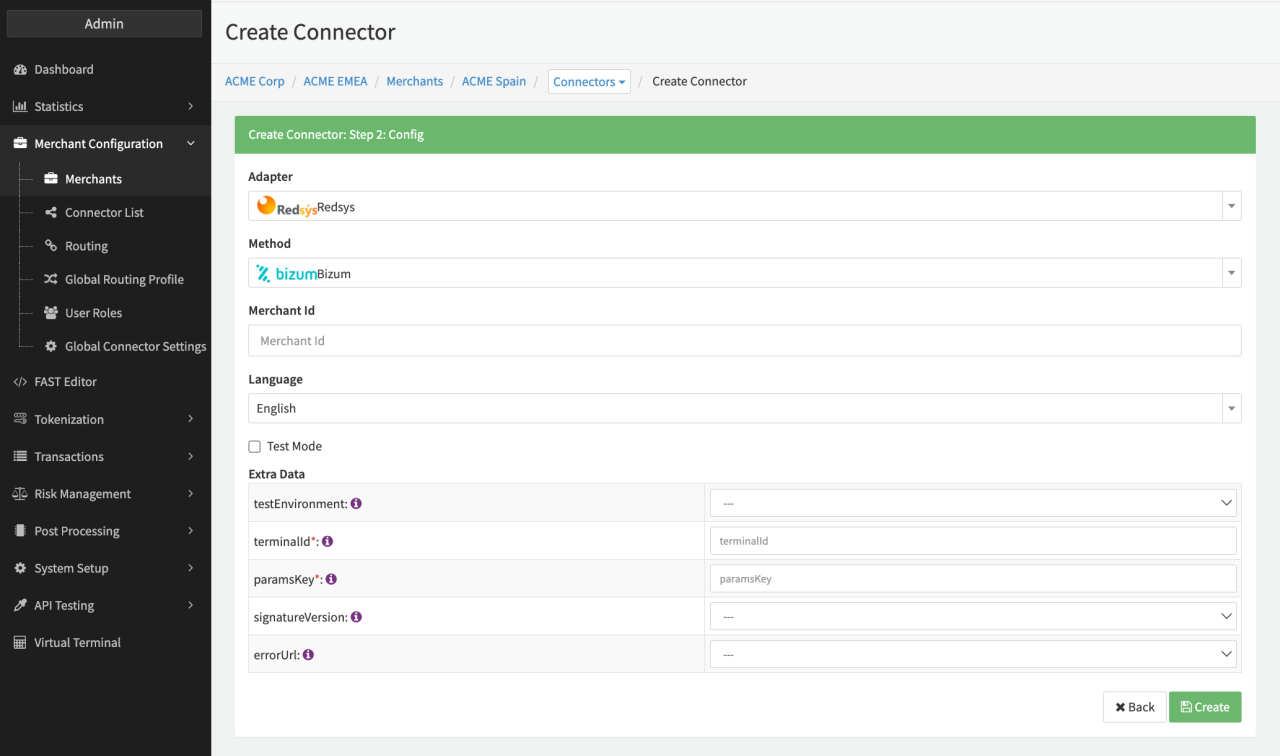
Configure the following parameters for the Connector (see Connector Config - Redsys Bizum):
- Fill in the Merchant Id
The merchantId is a unique ID, assigned to the merchant from Redsys after registration, to identify the merchant. - Select the Language
- Check option the Test Mode (see also https://pagosonline.redsys.es/bizum.html)
If you enable the Test Mode transactions will be sent to corresponding testEnvironment: - Select the testEnvironment
- TEST_SYS_I
- TEST_SYS_T
- Fill in the mandatory terminalId
- Fill in the mandatory paramsKey
Key to sign MerchantParameters. - Fill in the optional merchantDescriptor
Will be sent as DS_MERCHANT_MERCHANTDESCRIPTOR if configured. - Fill in the optional registerAmount
Mandatory for register transactions. - Fill in the optional registerCurrency
Mandatory for register transactions. - Select the optional Extra Data: signatureVersion
Default Version is T25V1 if none is selected.
Use HMAC_SHA256_V1 for the merchant integration.
Use T25V1 for the provider integration.
Note: Check with your Redsys account manager to find out which is the correct one for your account. - Select the optional errorUrl
Only set totrueto send the error URL. - Select the optional make_separate_RTP_request
For Debit and Register Transactions.
If set totrue, an extra Ready To Pay (RTP) call will be executed before the actual register/payment call to the PSP. The call does not affect the transaction and is used to check whether the customer has Bizum activated or not based on the provided billing phone number. The result of the RTP call will be added asextraDatain the result. - Select the optional requestMerchantCofTxnId
Enable this setting to send following parameters for register transactions:DS_MERCHANT_COF_TYPE=RDS_MERCHANT_COF_INI=S
note
For the RedsysPci adapter Fallback / Cascading only works for the adapter error code 195!
Redsys Creditcard
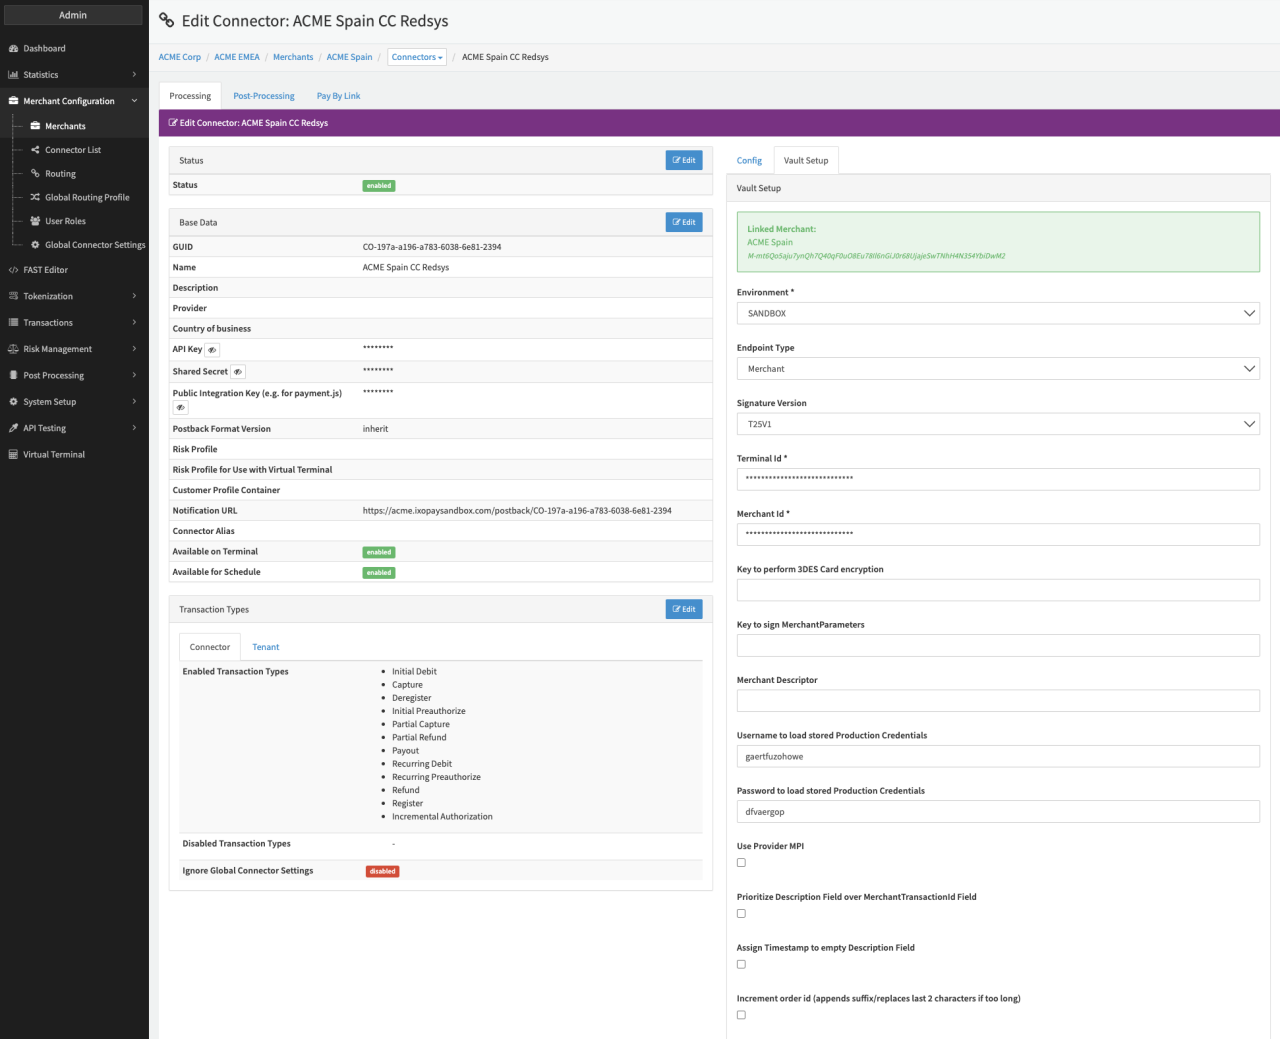
Configure the following parameters for the Connector (see Connector Detail Overview - Redsys - Vault Configuration):
- Select the mandatory Environment: Production, Sandbox, Sandbox_SYS_T
- Select the optional Endpoint Type: Merchant, PSP
- Select the optional Signature Version: T25V1, HMAC_SHA256_V1
- Fill in the mandatory Terminal Id (see also https://pagosonline.redsys.es/entornosPruebas.html)
- Fill in the mandatory Merchant Id (see also https://pagosonline.redsys.es/entornosPruebas.html Merchant Code)
- Fill in the optional Key to perform 3DES Card encryption (see also https://pagosonline.redsys.es/conexion-rest.html)
- Fill in the optional Key to sign MerchantParameters — ParamsKey given by Redsys
- Fill in the optional Merchant Descriptor
- Fill in the optional Username to load stored Production Credentials (Credentials given by the IXOPAY platform in case the Key to perform 3DES Card encryption is stored in the IXOPAY platform)
- Fill in the optional Password to load stored Production Credentials (Credentials given by the IXOPAY platform in case the Key to perform 3DES Card encryption is stored in the IXOPAY platform)
The IXOPAY platform provides additional options
- Check optional option to Prioritize Description Field over MerchantTransactionId Field: to enable the prioritizing of the "Description" field over the "MerchantTransactionId" field, send in the request.
- Check optional option to Assign Timestamp to empty Description Field (to prevent empty fields)
- Check optional option to enable Increment order id (appends suffix/replaces last 2 characters if too long)
tip
In case you want to use the additional options Prioritize Description Field over MerchantTransactionId Field and Assign Timestamp to empty Description Field, please make sure to send an empty description field in the transaction request.
note
Be aware regarding the format restrictions on Redsys side https://pagosonline.redsys.es/conexion-rest.html.