Bank Of America
Pre-requisits Bank of America ACH
The Bank of America Adapter in the IXOPAY platform differs in its behavior from an ordinary Adapter. It does not directly communicate with any Bank of America provided Endpoint to process transactions. It is solely responsible for Transaction creation (and validation) in the IXOPAY platform, to be processed later on with an so called IXOPAY platform Provider (for more information have a look in the Post Processing section).
The general idea of the Adapter is to represent an Endpoint that validates the required ACH Transaction Data, depending on the selected Standard Entry Class Code - SEC Code (CCD, IAT, PPD, …) which are required for a later NACHA Data Export via SFTP.
A single Adapter represents a Batch in a final NACHA File.
Keep in mind, that for each Standard Entry Class Code (CCD, IAT, PPD, …) a new Connector needs to be configured.
Connector Configuration
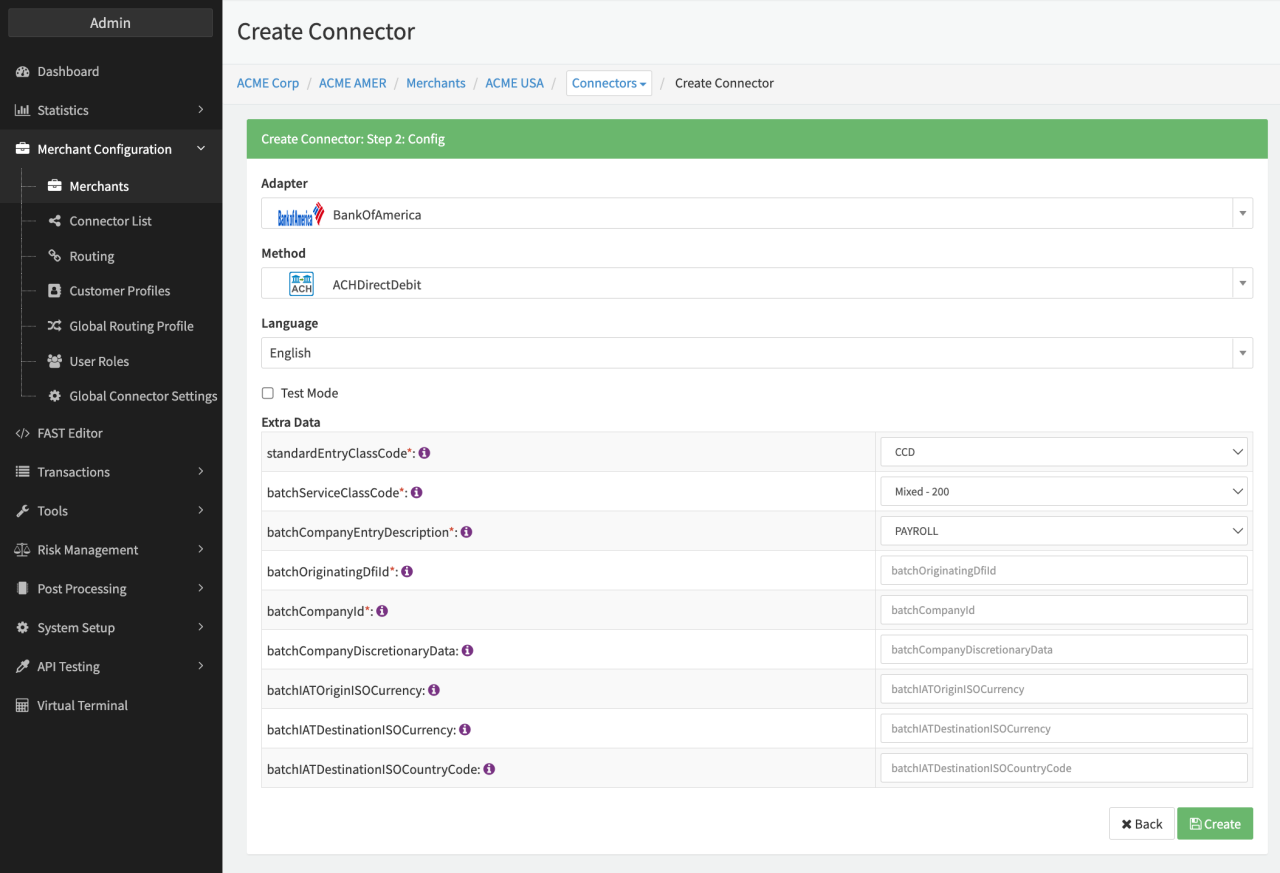
Configure the following parameters for the Connector (see Connector Config):
- Fill in the mandatory Extra Data: standardEntryClassCode:
- CCD, CTX, IAT, PPD, TEL, WEB — Identifies the specific record format used to carry payment and payment-related information.
- Fill in the mandatory Extra Data: batchCompanyEntryDescription:
- Max. 10 characters.
- Field 7 "Company Entry Description" in case of non-IAT Batch, Field 10 "Company Entry Description" in case of IAT Only Batch — as described in NACHA File Specification.
- Fill in the mandatory Extra Data: batchOriginatingDfild:
- Max. 8 digits.
- Field 12 "Originating DFI Identification" in case of non-IAT Batch, Field 16 "Originating DFI Identification" in case of IAT Only Batch — as described in NACHA File Specification
- Fill in the optional Extra Data: batchCompanyDiscretioaryData:
- max. 20 characters.
- Field 4 "Company Discretionary Data" in case of non-IAT Batch — as described in NACHA File Specification.
- Fill in the optional Extra Data: batchIATOriginatorId:
- max. 10 characters.
- Field 8 "Originator Identification" in case of IAT Only Batch — as described in NACHA File Specification.
- Fill in the conditional Extra Data: batchIATOriginISOCurrency (mandatory if standardEntryClassCode = IAT):
- max. 3 characters.
- Field 11 "ISO Originating Currency Code (Account Currency)" in case of IAT Only Batch — as described in NACHA File Specification.
- Fill in the conditional Extra Data: batchIATDestinationISOCurrency (mandatory if standardEntryClassCode = IAT):
- max. 3 characters.
- Field 12 "ISO Destination Currency Code (Payment Currency)" in case of IAT Only Batch — as described in NACHA File Specification.
- Fill in the conditional Extra Data: batchIATDestinationISOCountryCode (mandatory if standardEntryClassCode = IAT):
- max. 2 characters.
- Field 8 "ISO Destination Country Code" in case of IAT Only Batch — as described in NACHA File Specification.
- Fill in the optional Extra Data: : batchServiceClassCode:
- Mixed - 200, Credits Only - 220, Debits Only - 225;
- Depending on theIXOPAY platform Transaction Types that you would like to process over this Adapter,
you will have to set this value correctly.
- If you are going to process debit, refund and payout you will need to select "Mixed - 200".
- If you are going to solely process debit you will need to select "Debits Only - 225".
- If you are going to solely process refund and payout you will need to select "Credits Only - 220".
For further information have a look at the NACHA File Specification
Transactions
All Transactions initiated via the Bank of America Adapter required three mandatory fields (either as part of the Transaction Extra Data Object (e.g. extraData.accountType), or collected via the Adapters Hosted Payment Page):
- Account Type
- Account Number
- Routing Number
If any of those fields are missing in the initial request, a redirect to the adapters Hosted Payment Page will be returned by default.
If the Standard Entry Class - IAT is selected in the configuration, you will have to provide even further Payment Information in the Transaction Extra Data Object as described in the configuration.
All the mandatory & optional fields required on transaction level, depending on the selected Standard Entry Class, can be found in the Transaction API Documentation.
Job Configuration — NACHA Export
For processing the transactions created by the Adapter a so called NACHA Export is needed. The NACHA Export needs to be configure as a specific Post Processing Job:
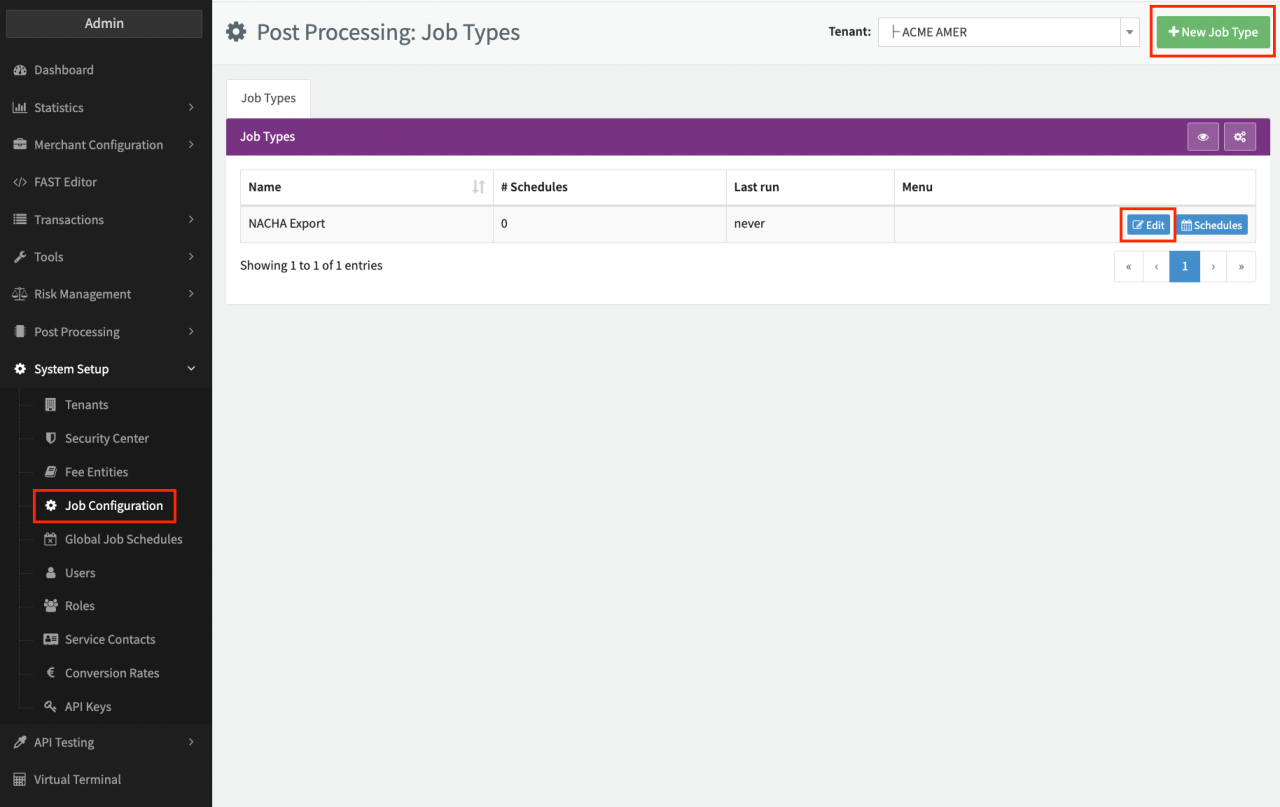
Follow these steps to set up a new Job Type:
- Navigate to the System Setup section > Job Configuration
- Click + New Job Type in the Job Configuration Overview
- Enter a Job Type Name and click + Create
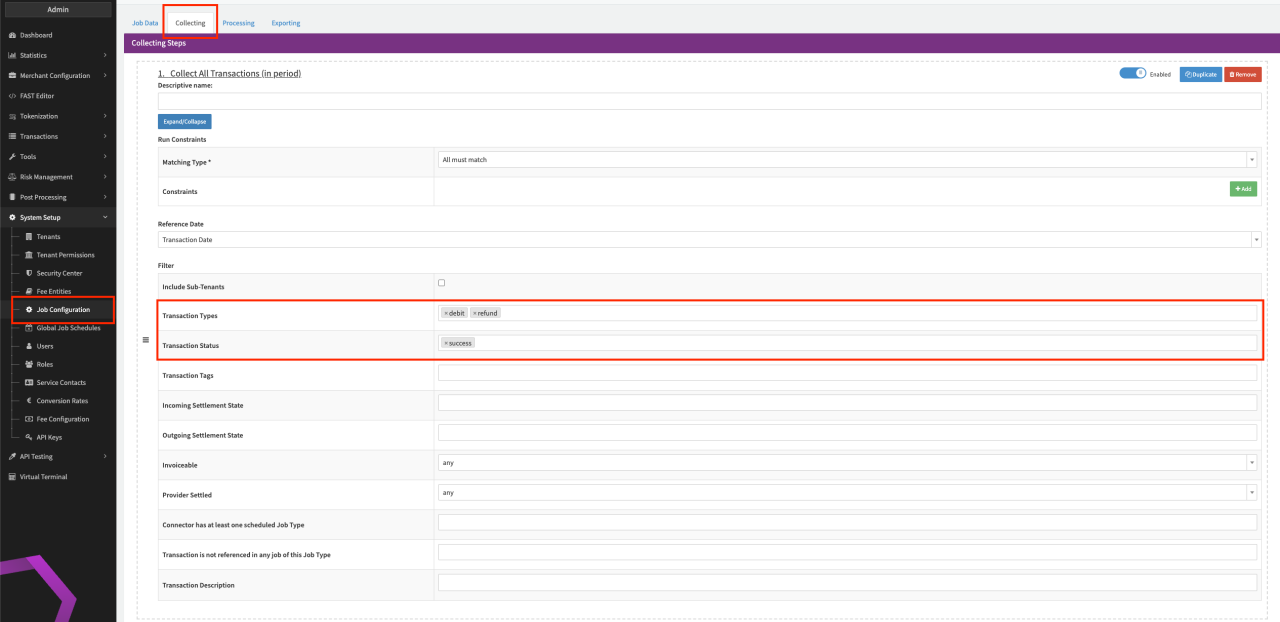
After creating the Job Type you will be able to configure the Job Type steps.
- In the Collecting Step select the option Collect All Transactions (in period)
- n the Collect All Transactions (in period) option, filter the collecting step for Transaction Types "debit" and "refund" and Transaction Status "pending" (see Collecting Step).
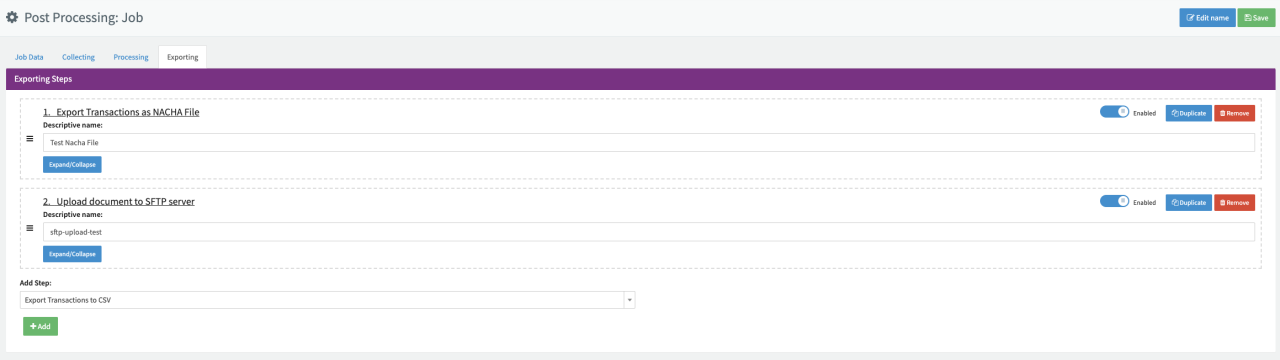
- In the Exporting Step first add the option Export Transactions as NACHA File
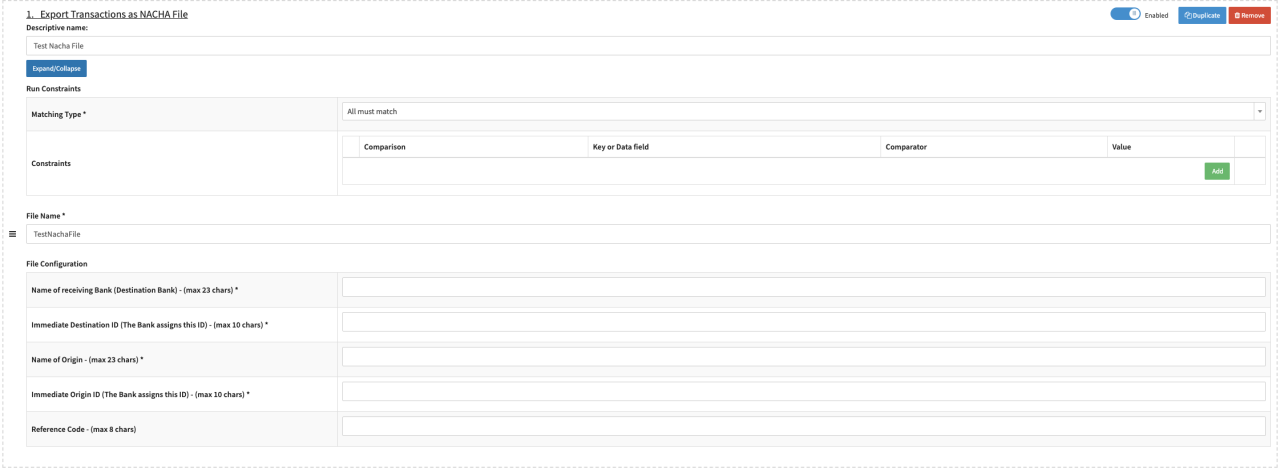
- Configure the Export Transactions as NACHA File option. The option requires the following parameter to be configured for the NACHA File Header:
- File Name — file will be created in .txt format
- Name of receiving Bank (Destination Bank)
- max. 23 characters
- Required Field for the File Header Record. Field 11 "Destination" - as described in NACHA File Specification
- Note: According to the NACHA Specification, it is required to enter the name in CAPS only.
- Immediate Destination ID (The Bank assigns this ID)
- max. 10 digits
- Required Field for the File Header Record. Field 3 "Immediate Destination" - as described in NACHA File Specification
- Name of Origin
- max. 23 characters
- Required Field for the File Header Record. Field 11 "Origin or Company Name" - as described in NACHA File Specification
- Note: According to the NACHA Specification, it is required to enter the name in CAPS only.
- Immediate Origin Id (The Bank assigns this ID)
- max. 10 digits
- Required Field for the File Header Record. Field 4 "Immediate Origin" - as described in NACHA File Specification
- Reference Code — optional
- max. 8 characters
- Optional Field for the File Header Record. Field 13 "Reference Code"- as described in NACHA File Specification
- In the Exporting Step add the option Upload document to SFTP server (after Export Transactions as NACHA File step).
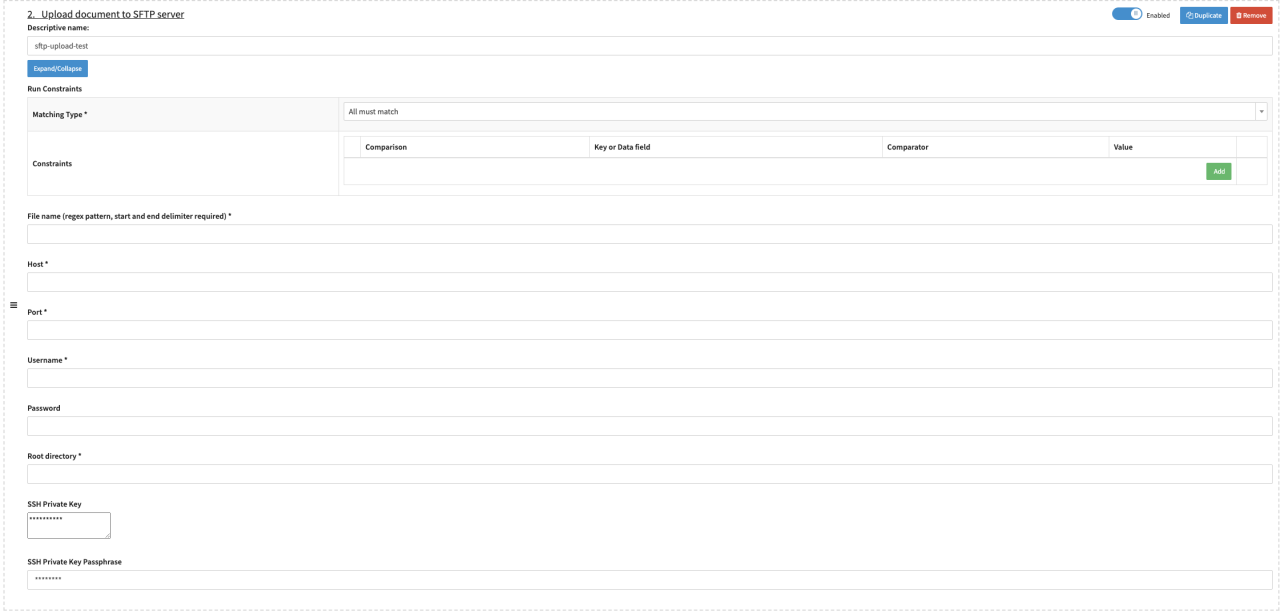
- Configure Upload document to SFTP server option. The option requires the following parameter to be configured:
- File name (regex pattern, start and end delimiter required)
- valid regex pattern (e.g. /^.*.txt$/)
- the regex pattern is required for the SFTP upload to recognize the correct file to be used for the upload, since the Job could contain multiple files (NACHA, CSV, etc) generated in different file formats.
- Host
- Port
- Username
- Password
- Root directory: add the upload directory (e.g. /incoming/something)
- SSH Private Key
- SSH Private Key Passphrase
- File name (regex pattern, start and end delimiter required)
The order of the Exporting steps is important, so make sure it is configured according to the documentation.
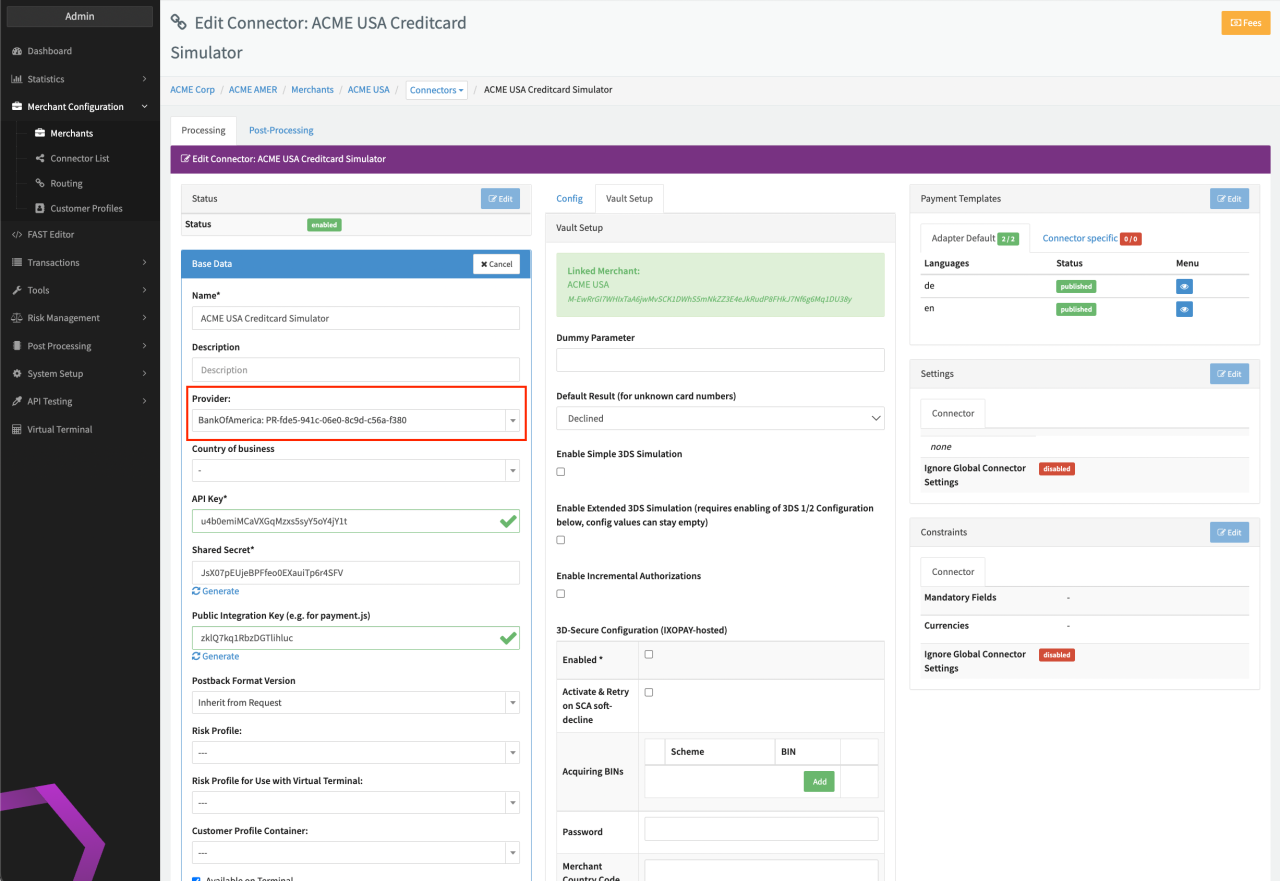
Provider Setup
Lastly you need to set up a Provider. This entity in the IXOPAY platform is needed for the actual NACHA Export (Job Configuration - NACHA Export) as well as the Data Fetching for the Reconciliation File (Result File).
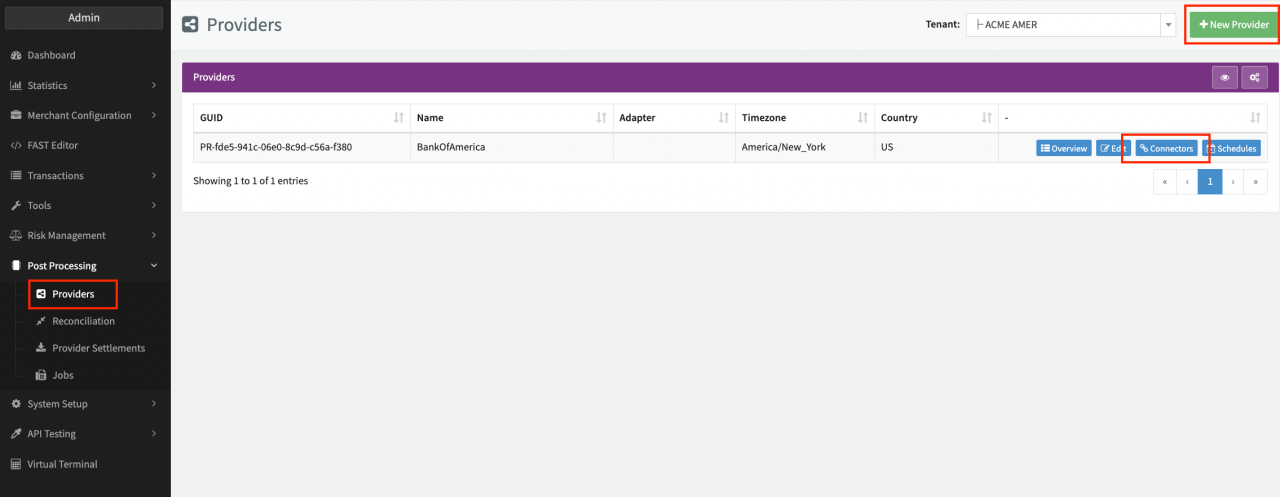
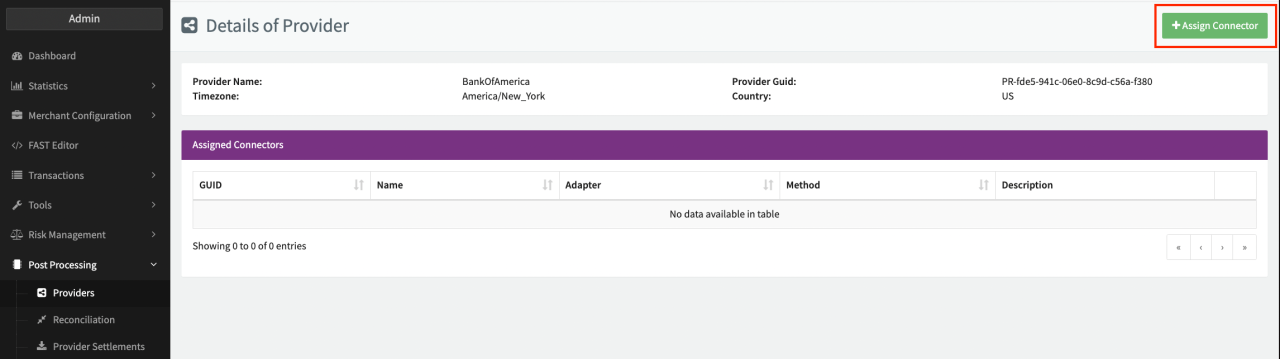
After creation assign the Bank of America Connector to this Provider
- Click on Connectors in the Provider Overview Page
- Click on + Assign Connector (see Provider Connector View)
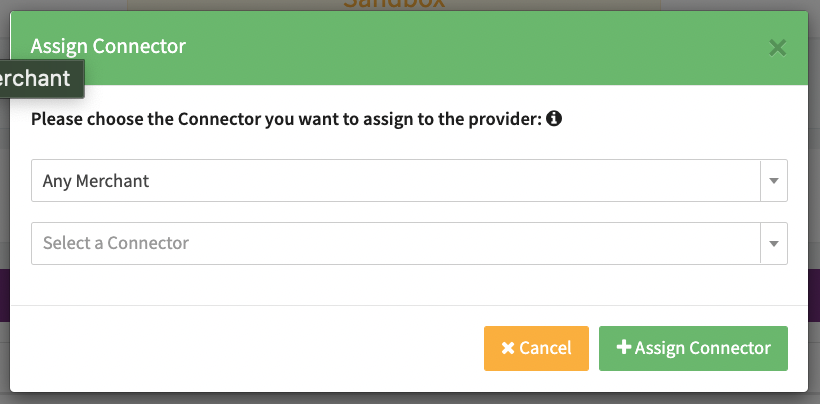
- Select the Connector to be assigned to the Provider (see Connector Selection)
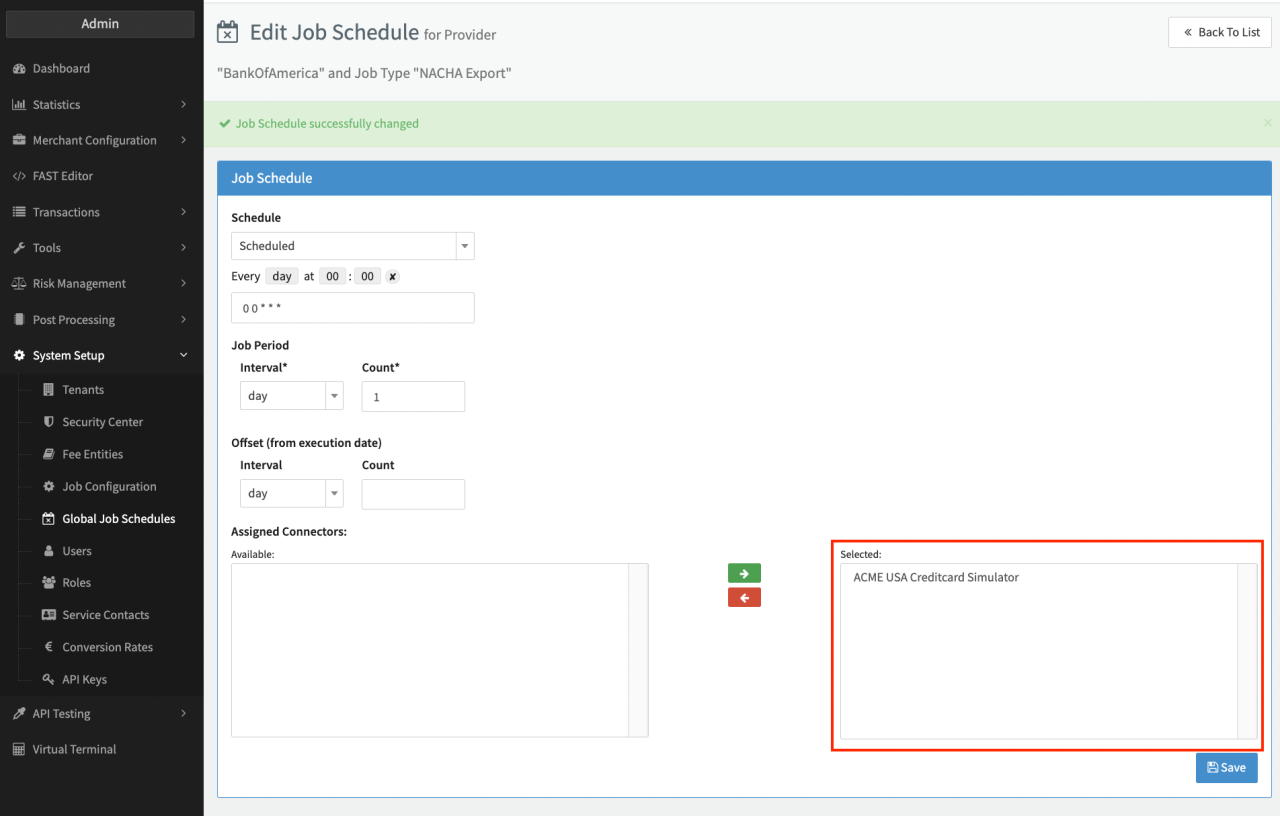
Create a Schedule for the Job Execution of the NACHA Export on Provider level
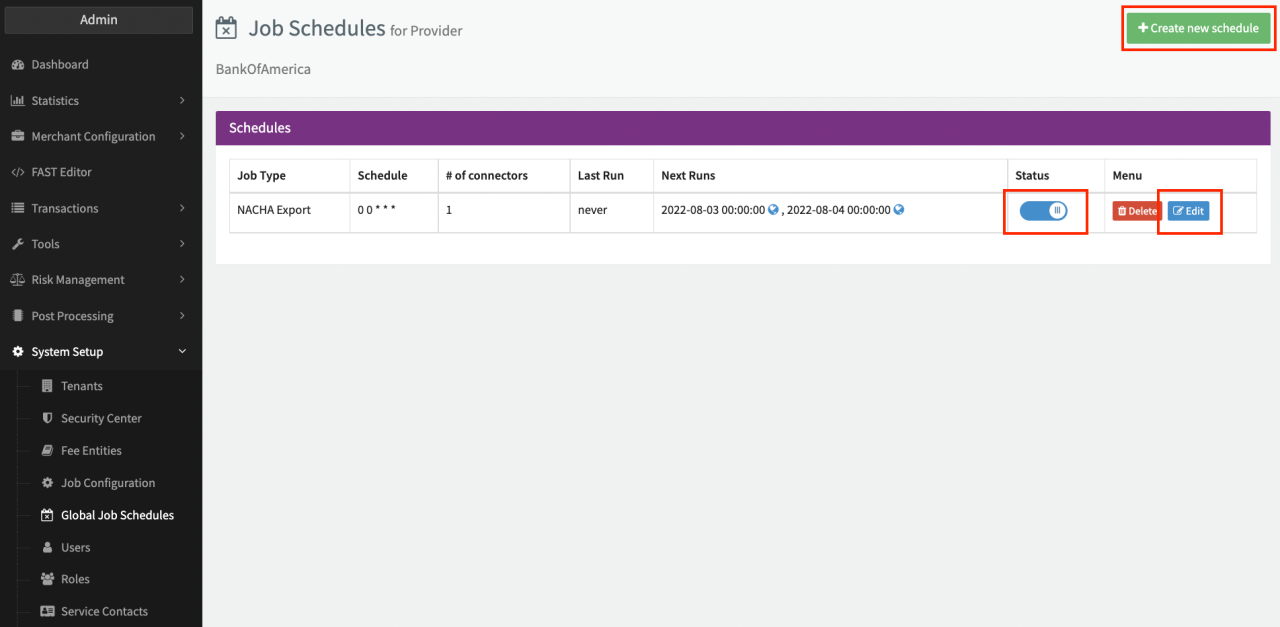
- Click on Schedules in the Provider Overview Page
- Click on + Create new schedule in the Provider Schedule Overview
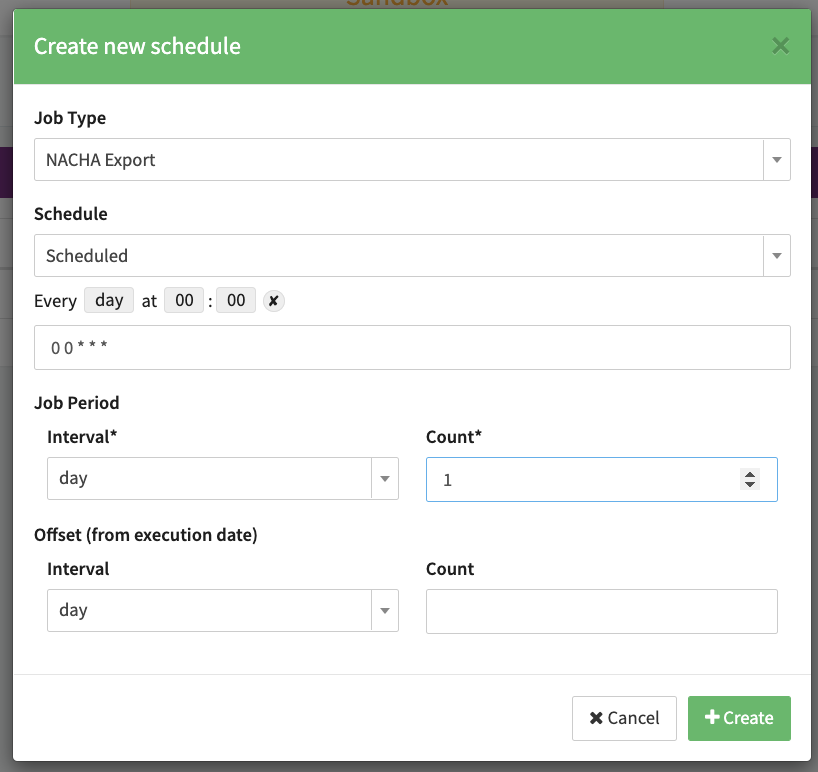
- Fill in the parameter needed for the schedule (see Schedule Details):
- Job Type — Select the previously configured Job Type
- Schedule - Select how the Job should be executed (e.g. automatically triggered daily )
- Job Period — Defines the Period for the Collecting Step in the Job Configuration (e.g. Interval=day, Count=1 (recommended), all Transactions of a single day will be considered)
- Click + Create to save the schedule
- Click + Edit on the created schedule to assign the Connectors to the created schedule (see Connector Assignment Schedule)
- Enable the Status of the Schedule (see Provider Schedule Overview)
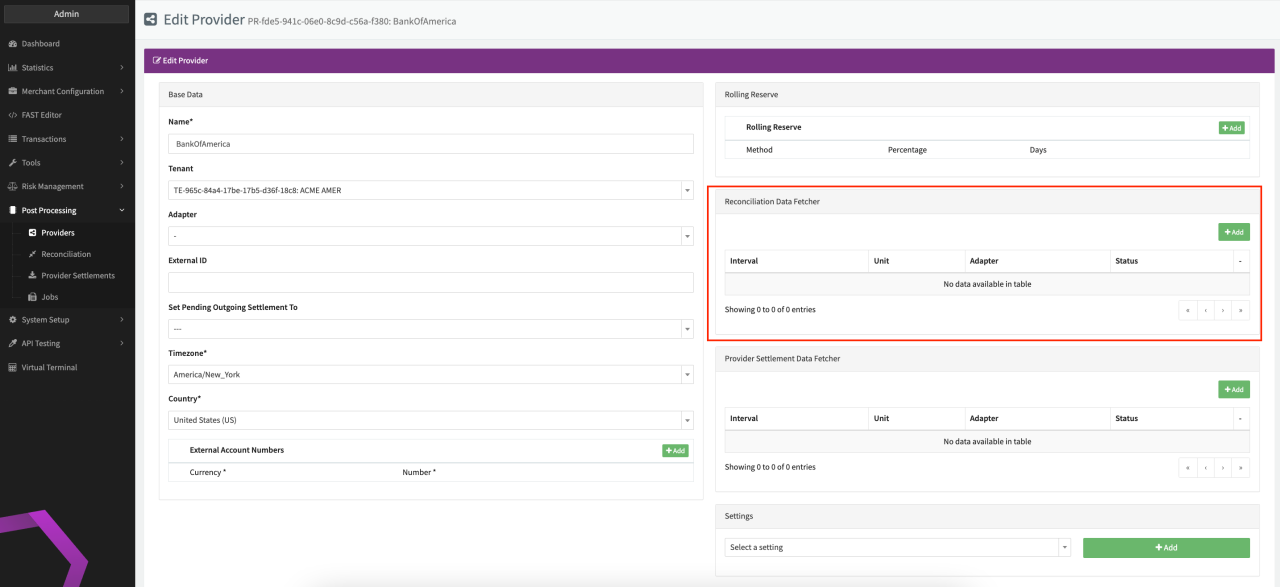
Add a Reconciliation Data Fetcher on Provider level
- Click on Edit in the Provider Overview Page
- Add a Reconciliation Data Fetcher (see Edit Provider)
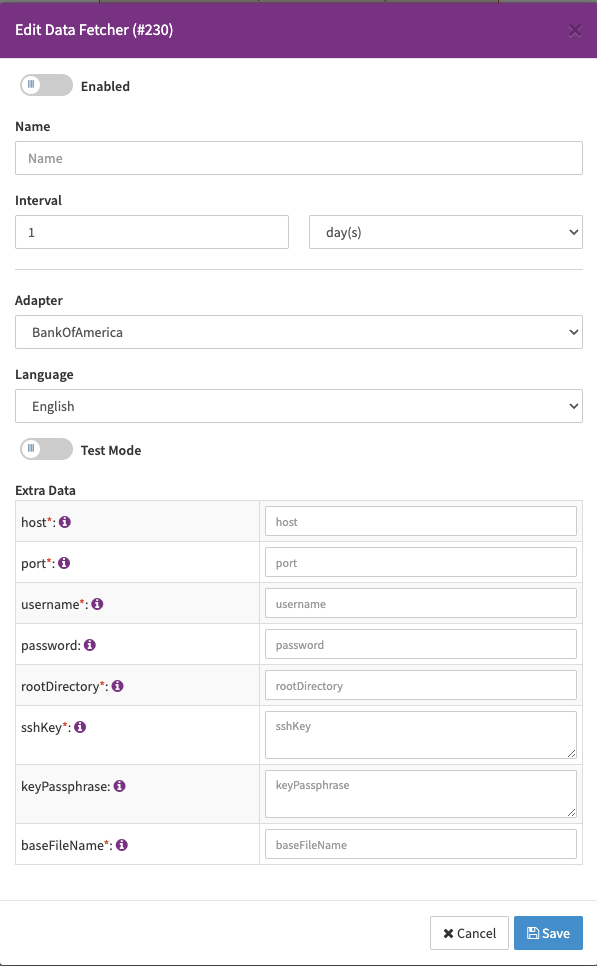
- Fill in the parameter needed and click + Add Data Fetcher (see Data Fetcher)
- Adapter
- Extra Data - information needed to fetch the Reconciliation File
We recommend to keep the the Job Execution Schedule and Data Fetcher Int in sync to avoid data to be inaccurate.
Assigning a Connector to a Provider can also be done in the Connector Details View, we do not recommend to add the Reconciliation Data Fetcher on Connector due to scalability and maintenance.